Painting, decorating and home improvement tips blog
How to wallpaper around a window or door reveal
Posted by Adrian
February 28th, 2011
Wallpapering around a window or door reveal
One of the things that puts people off from wallpapering is they are unsure how to tackle certain area’s. One of these is a window or door reveal.
It isn’t as daunting as it may first appear and I will try to explain how to do it below.
Where and how to start with the wallpaper
One of the first things I do, is measure using a roll of wallpaper to work out where the sheet will come at the reveal, in other words I see if the paper goes around the reveal and not stop on the external corner, this is bad! You may have to adjust where you start hanging the wallpaper or even start from another starting point, such as the other corner of the wall.
Once you have worked this out and made a plumb line on the wall you can start to hang the wallpaper. Hang the first sheet making sure you follow the plumb line to ensure it is straight and upright.
Now take the next sheet and match the pattern, if the wallpaper has one, and hang that sheet, then keep going until you reach the reveal.
Now that you’re at the reveal hang the sheet as you normally would, smoothing out the bubbles where the paper is on the wall and cutting around anything that needs it, such as light switches, sockets or window sills.
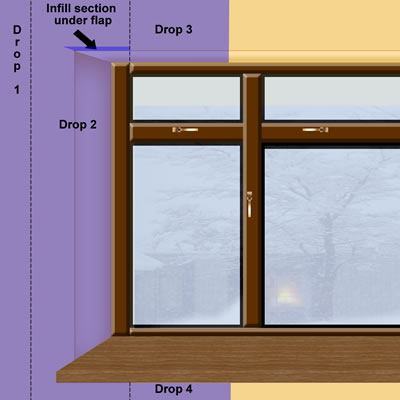
Once you have smoothed out the paper you need to get a sharp knife, cut the wallpaper along the top of the reveal horizontally from the edge of the paper toward the side of the reveal.
Once you have made this cut you can fold the paper around the edge of the reveal and smooth out, then cut the excess off from the window frame edge.
Next, match the pattern for the next sheet along the top of the reveal, but the length of the sheet only needs to be long enough to cover the top of the reveal and go under the reveal to the window or doorframe. Paste and hang this sheet matching the pattern. Once you have done this, you will notice an area with no paper. This is the infill area.

What you need to do is cut a length of paper enough to fill in this infill area; this must also match the pattern. The best way to do this is cut a length of wallpaper the same as the one you have just put up at the top of the reveal, then move it over the top of the piece of paper going around the reveal.
Match up the pattern, you should be able to see where the reveal is through the wallpaper, draw a line with a pencil about an inch or 25mm larger than the edge of the reveal.
Cut the paper along the line you have drawn, paste it up, now to hang it, start underneath the reveal and line the pattern up, smooth it out, now trim along the window or door, next trim along the reveal corner, starting at the outer edge working toward the window, so leaving the inch overhang.
Putting it all together
Now you will need to make a cut on the first sheet of paper, from the reveal corner at a 45 degree angle, about an inch and a half long. Lift the wallpaper up but be careful not to rip the paper, now smooth the infill paper around the reveal and under the flap you have just lifted, finally use some overlap or border adhesive to stick the flap over the infill piece.
You could if you feel confident actually make the infill section longer and the flap bigger, then actually splice the two sheets together. If you’re not confident your pattern will match up best to go with the up and under method.
Continue along the head of the reveal and then use the same principle to go around the other reveal.
Splicing the two pieces together
EDIT: Following on from a question in a comment below, I have explained splicing in a bit more depth.
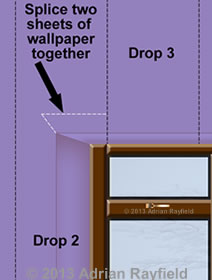
To splice the infill section with the adjoining sheet of wallpaper, make the infill section longer than you would with just a normal infill, about 75mm-100mm, or so you have the pattern you need to line up correctly. Then apply the infill section starting underneath the reveal as mentioned above, trim as required, now fold it over the sheet on top of the reveal but instead of flapping it underneath as we did before we are going to splice the infill section with the adjoining sheet.
You are going to cut both sheets of paper, so make sure your pattern lines up if you have one.
Take a very sharp knife and a straight edge, make a 45 degree angle cut from the reveal corner making sure you cut through both pieces of paper, next cut a horizontal line starting from the top of the first cut and cut horizontally toward the edge of the next sheet of paper.
Now remove the two waste parts of paper, apply some overlap or border adhesive to the wall and flap back the infill and wallpaper sections, you should now be able to marry up the two edges to get a seamless joint and you will not have a bump of paper underneath as you would simply by folding the infill part under the sheet of wallpaper.
Depending on the pattern, you could cut around the pattern rather than cut through it, this may reduce the risk or not matching the pattern correctly, so instead of cutting a horizontal line, cut carefully around the pattern, say a flower, freehand. As always when using a sharp knife, be careful!
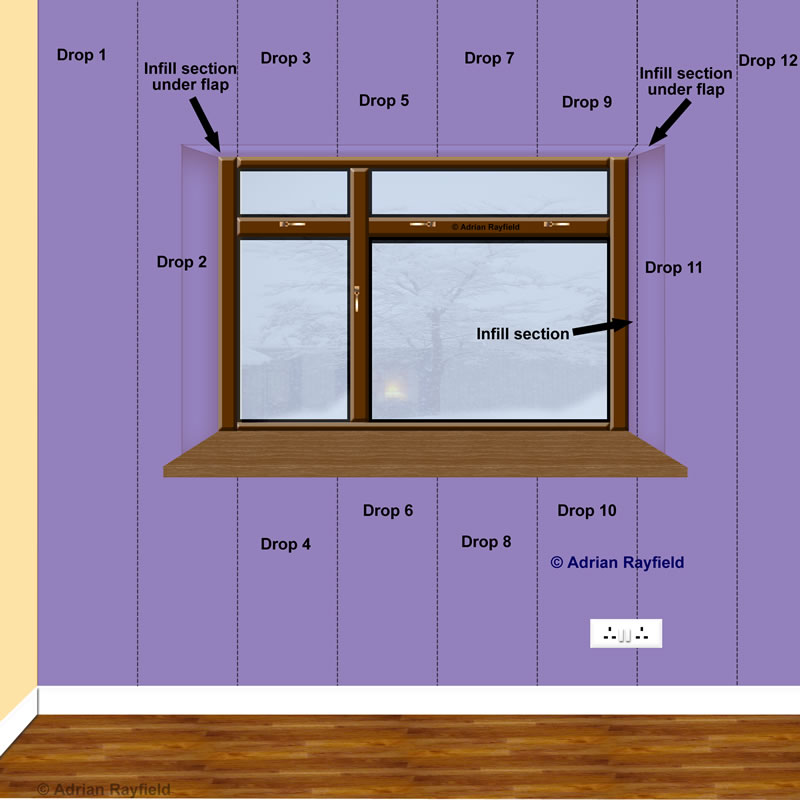
The completed wallpapered wall around the window reveal
The same principle applies to doors with a reveal, such as French doors.
Tags: Decorating, Door, Interior Decorating, Reveal, Splice, Splicing, Wallpaper, Wallpapering, Window
Posted in Decorating Tips | 24 Comments »
Would just like to thank you for taking the time and effort you have gone to in explaining step by step guide on hanging paper around window reveals it has been very helpfull.
I have always struggled when wallpapering around a window. I have never planned where the paper will overlap consequently on many occasions I have had a small overlap, too small to paste down. Disaster!! Now I have read you’re advice it seems obvious!!
Thanks very much you have saved me hours of frustration from a job I already hate!
Thank you so much for explaining how to paper into a reveal. Up until now, I have cut the paper round the edge of the reveal and painted the reveal white to match the window ledge and frame. Now, after reading this, I am going to paper into the reveal for the first time when I decorate next week!
@Gillian Glad you like to post, good luck with the papering. You could always let us know how it goes by posting another comment?
Thank you sooooo much for this information! I have been putting off my wallpapering because of this problem and you have solved it for me in seconds, wish i’d looked sooner. Many thanks again.
Hi Guys
Im a pretty experienced DIY decorator but am about to attempt something for the first time.
Papering a wall with a circular window in it.
HELP!!!!!!
how do i approach such a task?
I know that the internal recess gets papered last in 2 sections from the top centre to the botow left and right hand side, but how do I get the paper on the main wall to turn under / into the round window shape.
Any help would be very much appreciated
Thanks in aniticpation
@Terry
The way I would tackle this is to treat it as an archway and paper it accordingly. Basically hang a sheet of paper so it covers part of the window, then with scissors cut the paper to the edge of the reveal and fold under, depending on size of window cut the strips at about an inch wide, fold them all into the reveal, do the same with next sheet so you have papered the main wall and have strips going into the reveal. Now, ideally cut each strip around the reveal so they are about an inch or so long, as they will show through the paper you will put in the reveal so make it as neat as you can, then finally paper the reveal.
Hope that helps?
Best visual guide on the net. Papering my two double door reveals starts tomorrow 🙂
Since this post I have written a post on How to wallpaper an arch or round window
Dear Adrian Thank you for such clear instructions for Papering around Doors and Windows. I’ll be able to do a better job of it this time. Margaret.
@Margaret
Glad it helped Margaret.
Adrian, this example is so comprehensive, yet simple to understand and follow, that it is brilliant. One question: can you please illustrate the “splice” method around the reveal?
Cheers, Ian
@Ian
I have explained how to splice the two sections of paper and also added an illustration. Hope you find it useful.
Adrian can you give me any tips on how to get the paper to match under the window sill after you have papered the 2nd reveal. Of drops 10 and 11 on your diagram. The paper does not quiet line up. I have had to put an extra sheet over the bottem of sheet 11 and make a splice to the right of the sill. At least this way my paper is matched perfect under the window.
I rarely get sheet 10 & 11 the butt perfectly. Any advice?
@Andy
This does happen sometimes, the only advice I can give is to ensure you have all the sheets upright, soak all lengths for the same amount of time so they expand the same and don’t stretch them out too much. It does depend on how square the window is of course too. Sounds as if you have done OK with splicing it in. If you think the paper will not marry up you can start that sheet from the bottom and work it up so if you splice it it is less noticeable, as it may be behind a curtain or curtain pole.
Great way to paper around a window. Good tips, but I have a porthole window too and cannot get it to look neat and tidy. The window is recessed about 6 ins. Have you any tips on wallpapering it.
Thank you
@Jeanne
I have written a post regarding how to wallpaper an archway and a round window, the principle is the same as an arch.
Thanks Adrian I will give it a try. It sounds quite straight forward I’m sure I can do it!
@Jeanne
You can do it! Let us know how you get on 🙂
What a relief to finally find an explanation that makes window decorating less daunting. Thank you
Hi Adrian,
I am a painter and have had a few problems matching the paper because I never put the infill under the flap at the start and finish hence it not marrying
I’m delighted I came across this diagram.
Many thanks
Darren
@Darren
Glad you found the post useful 🙂
Hi Adrian,I’m trying to work out how to wallpaper around a window with a wooden rail attached to the wall for fixing curtain pole brackets to which I don’t really want to take off the wall-any suggestions would be much appreciated.
Ade
@Ade
I would paper as normal as described in this post and cut around this rail.