Painting, decorating and home improvement tips blog
How to paint new wood
Posted by Adrian
April 30th, 2014
How to paint new wood
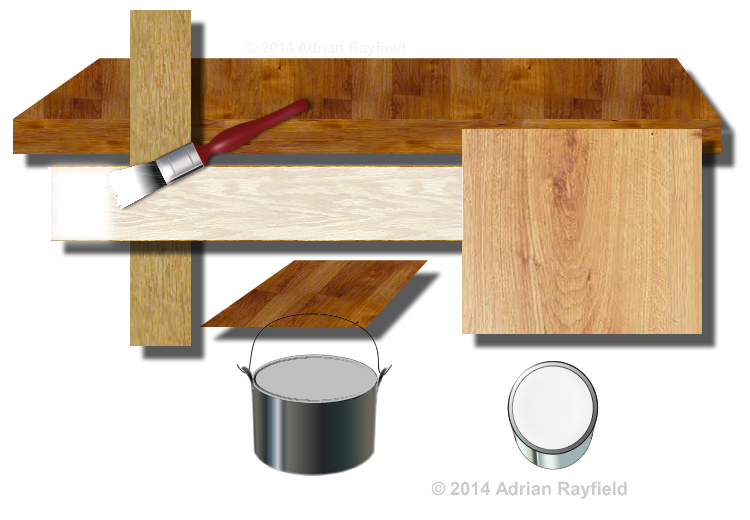
It is important when painting new wood to prepare the wood and paint it correctly, this will ensure the wood lasts for a long time. Most interior wood is softwood, such as skirting boards, door frames, architraves and doors. Whereas exterior wood can be both softwood, such as in fascia boards, but maybe hardwoods for windows and doors etc. This post mainly deals with softwood, such as pine, and painting the wood rather than staining or varnishing.
Preparation is the first job for any new wood, a rub down to ensure the surface is smooth and ready for painting. If you are going to be painting the wood, that is to say not going to varnish the wood, you should apply kotting solution to the knots. This can be applied with a brush or rag. Some knotting solution comes with a brush. Apply two or three coats to the knots and let it dry.
Primer
One the knotting is dry you can apply a suitable wood primer. This can either be solvent or water based, I prefer water based as it dries quickly. Once the first coat is dry, lightly rub down the first coat and then apply a second coat of primer.
Once this is dry, again give it a light rub down, you should now have a well coated piece of wood ready for an undercoat.
Undercoat
An undercoat is used to allow a topcoat such as gloss or satinwood to be applied. Apply one or two coats of a suitable undercoat, for some paints a coloured undercoat can be used, such as a dark grey undercoat for a dark blue or black topcoat for example.
If you are applying more than one undercoat, leave to dry fully and give the wood a light sanding between coats. You may have to give the wood two undercoats depending on how well the wood is covered and how porous the wood is.
Topcoat
Topcoat can be gloss, satinwood, eggshell, solvent based or water based they all come under the heading topcoat as it is the last coat or finishing coat to be applied to the wood.
Once you have applied the primer and undercoat you need to rub the wood down a final time in preparation for the topcoat. Dust of the wood and make sure the wood is free from dirt and grease, then apply the topcoat to the wood. In some cases a second coat may be required, if this is the case allow the first coat to fully dry and then lightly rub the first coat with fine sandpaper and then remove any dust and apply the second coat.
Giving a second coat can give a better gloss in the case of water based paints, it can also give a deeper, fuller finish.
Painting new hardwood
To paint new hardwood, such as a front door, the process is the same, you may not require any knotting solution as hardwood has far less knots. Again, rub down, prime, undercoat and topcoat ensuring you rub down between each coat to ensure a good smooth finish.
Tags: Door, Door Frame, Exterior Wood, Fascia Boards, Gloss, Hardwood, Interior Wood, Knotting Solution, New Wood, Pine, Primer, Satinwood, Skirting Boards, Softwood, Staining, Topcoat, Undercoat, Varnish, Varnishing, Windows
Posted in Decorating Tips | No Comments »
Parts of a door frame
Posted by Adrian
February 12th, 2013
Parts of a door frame
If you have ever been around a builder or in a timber yard or a DIY store you may of heard some terms that you are unsure of there meaning or what they are. You may think a door frame is just that, simply called a door frame. Well, you’ll be wrong, there are many parts that make up a door frame and I will explain them below.
A door frame is typically made out of wood for internal door frames, both hard and soft woods are used, hard wood such as oak is more expensive than the cheapest option of pine. External door frames can be made out of wood, metal or plastic, this will depend on the type of door you have. In this post I am talking about an internal soft wood door frame.

Door frame
An internal door frame is commonly made out of softwood such as pine, it is smooth planed timber and is known as a door frame, a door casing or door lining. It doesn’t matter what you call it, they are all the same thing. The frame comes in different depths to suit different wall thickness. The door frame is made up from several parts, a head, legs or Jamb, a sill or threshold and door stops. The frame is then finished off with a moulding called an architrave.
The door frame set
If you bought a new door frame you would buy a door frame “set” which includes all the parts to build the door frame, the set will have a head, two legs or jambs and door stops, you do not get any architrave in the set and will have to be bought separately. I will explain each part of the set below.
Door frame – head
The head is the top of the door frame, it allows to two side members of the frame, the legs/jamb to fit into a grove. The door frame head has grooves cut into it at two widths allowing you to choose the width of opening, if the inner groves are used the wood sticking out beyond the frame, known as horns, can be sawn off.
Door frame – legs / jambs
The door frame upright parts are called legs or jambs, in a finished frame one side has the hinges screwed into it and the other side has the door lock keep fitted to it. Some frame legs are rebated so a door stop isn’t required as the rebate makes the stop.
Door frame – door stop
The door stop is a thin piece of wood that is fixed to the inside of the leg / jamb, it’s job as the name suggests is to stop the door. With out a door stop the door can’t be halted and would rip of it’s higes. If the leg / jamb has a rebate a door stop isn’t required.
Door frame – sill / threshold
The door frame sill or threshold is the horizontal part at the bottom of the legs / jambs, this isn’t normally found in interior frames but can be seen on external door frames. It’s purpose is to give the frame rigidity and to help channel the water away as it runs off the door. It’s also the part you carry the bride over once you are married.
Architrave trim
Architraves are decorative mouldings. Not bought in a door frame set, these are bought separately as they come in different sizes and styles and can match your moulding on the skirting boards.
Tags: Architrave, Door, Door Frame, Door Frame Set, Frame, Head, Jamb, Legs, Stop
Posted in Decorating Tips | 5 Comments »