Painting, decorating and home improvement tips blog
How do you paint a hall stairs and landing?
Posted by Adrian
January 13th, 2013

How do you paint a hall stairs and landing?
Painting a hall, stairs and landing for a lot of people is a daunting task and too much for them to tackle themselves, so they call a professional decorator like myself to do it for them. A lot of people will not have the ladder to aid them to reach the tallest part, or the stairs are an awkward shape.
Having the right tools makes it safe and easier to do, safety should always be in your mind when painting and decorating but especially if you are painting and decorating your hall, landing and stairs. Falling off a ladder whilst working on a stairway can be very painful.
Painting a hall, stairs and landing
Painting a hall, landing and stairs is just like painting any other interior room, you start at the top and work down.
So, start with preparing the walls, filling and holes and cracks, then paint the ceiling and coving, if you have any. Paint the picture rail next, if you have one, then emulsion the walls, if you have a dado emulsion down to that, then paint the dado before painting the remaining walls below the dado rail. This will save the newly painted wood work getting splashed with emulsion.
Finally, paint the stair stringers (the bit that goes up each side), the spindles and handrail and skirting boards.
And don’t forget the loft hatch if it’s in the hallway.
Wallpapering a hall, stairs and landing
If you are going to wallpaper your hallway, landing and stairs it is similar to wallpapering and interior room, you do all the preparation first, then you paint the ceiling and coving, then paint any woodwork such as picture rail, dado rail and the the stair stringers, spindles and handrail and also the skirting boards.
Once all the paint is dry, the final job is to wallpaper your hall, landing and stairs.
Useful links
Below is a list of useful links you may find help you when either painting or wallpapering your hallway, stairs and landing.
- Wallpaper calculator
- Paint calculator
- Ceiling wallpaper calculator
- How to wallpaper
- How to wallpaper around a door
- How to wallpaper around a window or door reveal
Please feel free to comment below, share this and other posts and follow us on our social media channels.
Tags: Ceiling Wallpaper Calculator, Decorating, Door, Hall stairs landing, Interior Decorating, Paint Calculator, Painting, Reveal, Skirting Boards, Wallpaper, Wallpaper Calculator, Wallpapering, Window
Posted in Decorating Tips | 6 Comments »
Wallpapering a hall landing and stairs
Posted by Adrian
October 20th, 2010

How to wallpaper a hall landing and stairs
Firstly you need to measure the walls you are going to papering the downstairs hallway, upstairs landing and stairs/stairwell to work out how much paper you need to buy, our wallpaper calculator can be used for this job.
So how do you measure a hall, stairs and landing for wallpaper?
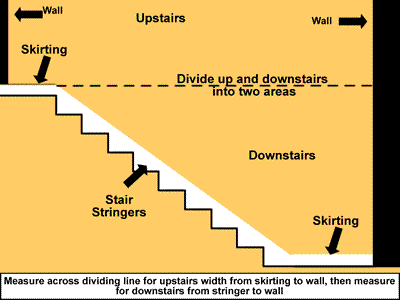
Well it’s not as hard as you may think. If you think of the upstairs and downstairs as two different rooms, splitting the stairwell wall into two parts. Imagine the skirting of the upstairs goes all the way across the stairwell wall and measure as you would normally.
You will use a lot of paper on the stair walls as there is a lot of wastage, especially if you have a pattern paper.
Now you know how much paper to buy, and have bought it, you can start to paper. So where do you start?
Where to start papering the hall, stairs and landing
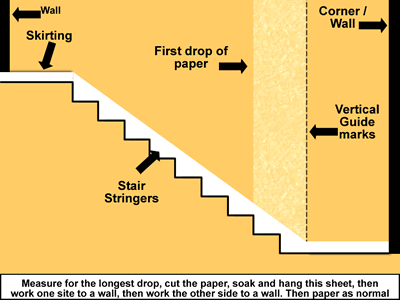
You should start by hanging the longest sheet first down the stairwell, and working along one way until a corner. Mark the wall using a plumb line to ensure your paper is vertical, then measure your drop of paper ensuring you allow for the angle of the stair stringer, mark the paper at either side at the bottom allowing for trimming.

Take your roll and lay it on the paste table, then take a straight edge and draw a line joining the two marks up, you should have a diagonal line. Cut the paper as you normally would, then trim the paper along the diagonal line, this will save you getting paste all over the carpet when you hang the sheet.
Paste the sheet and allow to soak, and then hang the first drop. You should then take the roll of paper and line it up with the one you have just put up, unroll it and ensure any Patten is lined up, then mark and trim as before, continue doing this until you reach a corner, then do the same the other side of the longest drop until the other corner.
Once the longest drops are done you can work as you would for a normal room.
Tags: Hall stairs landing, Wallpaper, Wallpapering
Posted in Decorating Tips | 41 Comments »
