Painting, decorating and home improvement tips blog
How to fit a door Cylinder rim lock
Posted by Adrian
September 30th, 2020

How to fit a door Cylinder rim lock
A cylinder rim lock is often known as a night latch lock or a Yale lock, it is a very common lock and can be found on lots of front doors, you may even have one on your front door. A cylinder rim lock is a lock that is mounted on the surface of the door, rather than being fitted in a door such as a mortise lock. With a rim lock the door is held closed by a latch that can often be deadlocked with the key externally or via a button on the inside of the door. It can only be opened from the outside via a key or a handle on the inside.
Choosing the correct position for a cylinder rim lock
A rim lock is fitted typically ⅓ from the top of the door or 1500mm from the bottom of the door, but there are no hard and fast rules. Decide the best place for you but avoid fitting a lock on a joint where a rail (horizontal part) goes into the stile (the vertical part) as this could weaken the door.
Fitting a cylinder rim lock
Firstly gather all the tools required to complete this job, you will need:
- A cylinder rim lock / night latch / Yale lock
- A drill
- Wood drill bits
- A Tape measure
- Chisels
- A pencil
- A door wedge
- Masking tape
- A junior hacksaw

When you have all the tools together, start by opening the lock packet and familiarise yourself with all the parts. Inside the pack should be a template, this will help you mark and drill the main hole through the door, you don’t want to get this bit wrong. There should also be a cylinder lock, keys, a backing plate, a lock body, fixing screws and a staple.
Place the template on the door as instructed, use some masking tape to hold it in position. You will need a large spade drill bit, typically a 32mm / 1 ¼ inch. You are going to need to drill a 32mm hole through the door, start drilling from one side, then as the tip of the drill comes through the other side, stop and drill from the other way, this will help prevent the wood splintering as you drill through.
Next drill two holes for the two fixing screws that hold the cylinder lock onto the door. Again, drill all the way through the door. You may need to drill the inside holes with a slightly bigger drill bit to allow the screws to go into the door when you screw the cylinder on and do not fail the operation of the backing plate when it is fitted.
Now take the backing plate and position this on the door, mark and drill the fixing holes, then remove. You typically will need to drill three holes.
On the template there may be a line for a recess on the door edge, mark this on the door and then hold the lock body in place, draw around the part of the lock body that goes onto the door edge, you will then need to chisel this area away to allow the lock to sit flush on the door edge. The recess will only need to be 2-3mm depending on the thickness of the lock body edge. Not all locks will require this as they do not all go onto the door edge.

Once you have done this mark the two retaining screws of the lock body on the door edge, drill pilot holes, but do not screw the lock on yet.
Fitting the Cylinder rim lock to the door
![]()
With all the parts of the lock off the door, you can now assemble the lock onto the door, place the cylinder in the large hole and the slip ring or cylinder latch pull if you have one, make sure the arrows on the rear of the lock body line up before filling it. Put the cylinder connecting bar into the slot on the backing plate, screw the backing plate on, screw the cylinder on. You may need to put the key in the cylinder and turn it to allow access to all the screw holes but make sure you put it back in the same place when your done. If the connecting bar is to long, you can shorten it using a junior hacksaw.
Once the cylinder and the backing plate are securely fitted you can now fit the lock body, hook one edge of the body on first, then with a little wiggle and slight operation of the lock handle you should be able to get the lock body on. Once it is on, use the retaining screw to secure it to the door.
Fitting the door lock staple
The staple is the part that holds the door shut and goes on the door frame. Once the lock is fitted to the door, close the door and mark the position where the staple has to go, chisel out a recess for it to sit in. Drill pilot holes to fit the staple to the frame and screw the staple to the frame. Ensure the gap between the lock and the staple is no more than 5mm, if it is the effectiveness of the lock is greatly reduced.
And finally, try the door to make sure it closes OK without catching the staple, if it does you may need to recess the staple a little more. Once the door closes OK try the lock from inside, then try opening the lock with a key from outside.


Tags: Backing Plate, Cylinder Latch Pull, Cylinder rim lock, Door, Lock, Mortise Lock, Night Latch, Staple, Yale Lock
Posted in Home Improvements | No Comments »
How to fit a mortise deadlock and mortise sash lock
Posted by Adrian
March 19th, 2020
How to fit a mortise deadlock and mortise sash lock
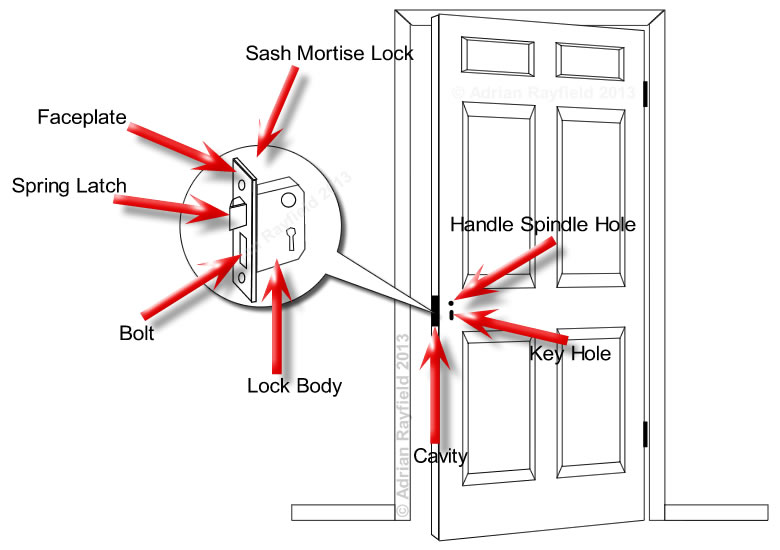
First things first, a mortise deadlock and a mortise sash lock are not exactly the same thing although they are both mortise locks. A mortice lock fits into a recess cut into a door, unlike a cylinder rim lock that fits onto the door. The meaning of mortice is a cavity cut into a piece of wood. You may of heard of mortise and tenon before, this is a woodworking joint, the mortice being the cavity cut into the wood and the tenon is the piece of wood that goes into the cavity or mortice.
Choosing the correct mortice lock
A mortice deadlock can only be opened with a key, it doesn’t have a latch on it. This type of lock has a bolt operated by a key and have great security properties. They have different amount of levers inside them giving them a higher security rating, a 5-lever or British Standard 5-lever conforming to BS3621 or 6-lever locks are ideal for external doors and are often required by house insurance companies, it’s worth checking your policy to be sure. These locks also come as a 3-lever which are more suited for internal doors.
A mortise sash lock is similar to a deadlock is as much as it has a bold, the deadlock part, but also has a latch like a traditional lock. To operate this lock you need a key and a handle. You may find these on front and rear doors on a house. These locks offer security via the dead bolt and convenience via the latch. Again, these lock have different amount of levers inside them, from 2-lever to 5-lever. A 2-lever mortice sash lock is ideal for internal doors or places you need less security.
Fitting both types of lock is done in the same way.
Fitting a mortise lock
Firstly gather the tools required, you will need:
- A mortice lock
- A drill
- Wood drill bits
- A Tape measure
- Chisels
- A pencil
- A door wedge
- Masking tape
Once you have all the tools to hand you can begin to fit the mortice lock. You need to decide the best place for the lock to go, this will depend if it is a mortice deadlock, which can go lower on the door, or a mortice sash lock, which needs to go at a good height to allow for the handle operation.
You should never fit a lock on a joint where a rail (horizontal part) goes into the stile (the vertical part). A good place is in the middle of the centre rail.
Once you have decided on the location of the door, wedge the door open. On the door edge, mark a centre line, then take the lock and place the body of the lock on the edge of the door so you can mark how tall cavity you need to drill out.
Next take a drill and wooden drill bit, measure the depth of the lock and put masking tape on the drill bit that depth, as a guide. Carefully drill on the centre line from top to bottom the depth of the lock being careful not to drill too far in and breaking through the door.
Once you have done this, take a wide wood chisel and tidy up the edges, try the lock into the cavity you have just created, if it doesn’t fit you may have to drill out a bit more or chisel a bit more wood away.
Once the body of the lock fits into the cavity in the door, push the lock into the cavity up to the back of the faceplate, now with a pencil, draw around the faceplate. Then remove the lock and chisel a recess just deep enough for the faceplate to fit into. Chisel around the edge on your pencil mark first. Try the faceplate into the recess by putting the face of the lock into the recess. If you put the lock into the cavity and its a tight fit you will have trouble getting the lock out again. Once your happy the lock and faceplate will fit OK you can then mark out for the other holes to be drilled.
Place the body of the lock on the side of the door with the faceplate flush with the edge of the door, as if it would be if the lock was fitted. Next with a pencil mark the key hole for a mortise deadlock and a key hole and handle spindle hole for a mortise sash lock. Do this both sides of the door. Use a suitable sized wood drill bit and drill the holes from the outside inward on both sides. If you only drill from one side the second hole maybe miss-aligned.
Once you have drilled all the holes fit the lock into the door cavity, once your happy the lock and handles work OK, drill fixing holes on the edge of the door and screw the faceplate into position.
Fitting the lock keep / strike plate
The mortice lock would have come with a keep / strike plate in the kit, most likely a box keep. The keep is the part that goes into the door frame and keeps the door shut or locked. It’s called a box keep as the keep has a box section that the spring latch and or bolt goes into.
To fit the keep, operate the lock so it is in the locked position, then carefully close the door so the bolt and latch if your fitting a mortise sash lock. Mark the frame with a pencil where the top and bottom of the bolt, and latch if you have one, hits the door frame.
Open the door, now place the keep of the frame and align it with the marks, cut out a recess for the box part of the keep, once you have this done fit the keep into the recess and draw around the keep to mark where the actual strike part will go. This will only need to be shallow enough to allow the strike plate to fit into. Once you have done this, drill the holes for it and secure into place.
Trying the lock and keep / strike plate
Once you are happy the door lock works OK it is time to try shutting and locking the door. Close the door and try the latch operation if you have fitted a mortise sash lock. If you fitted a mortise deadlock, close the door and slowly try the bolt, if it catches don’t fully lock the door as you may have trouble getting it open again.
If the bolt caches, paint the end with a bit of paint, or a marker pen or chalk, then close the door and try the lock again, the paint, marker pen or chalk will leave a mark on the keep and you can see where it catches and then adjust the keep and retry it.
Only once you are happy the lock fits OK should you close and lock the door.
Finally you can fit the escutcheon (key hole cover)on both sides of the door. A good way to do this is by placing the escutcheon on the door in the correct position and try the key in the hole, remove the key and drill the first hole, then put the first screw in and then try the key to make sure it goes in and out easily in the hole. Once your happy it does so, drill the second hole and finish screwing the escutcheon on. Then repeat the process on the other side of the door.
")
")
Tags: 2-lever, 5-lever, 6-lever, door keep, escutcheon, latch, Lock, mortise deadlock, Mortise Lock, Mortise Sash Lock, strike plate
Posted in Home Improvements | No Comments »
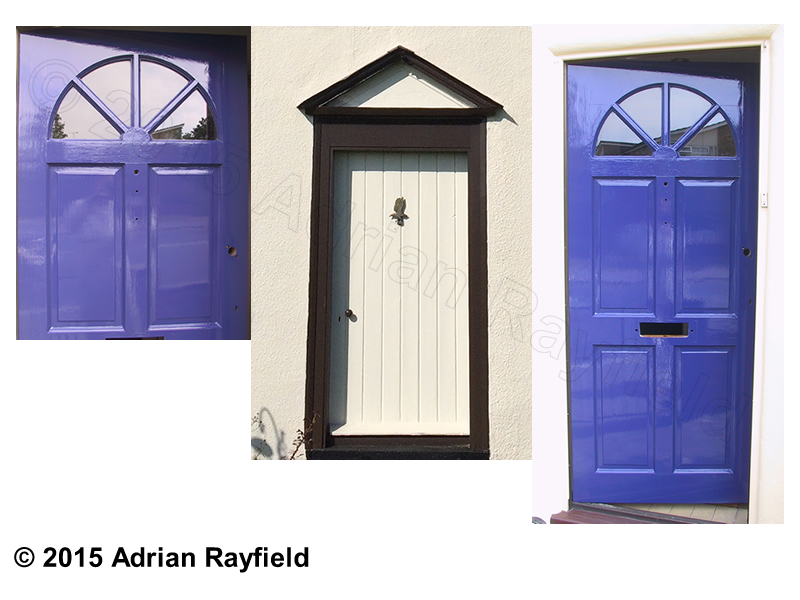
How to paint a front door
Posted by Adrian
May 18th, 2015
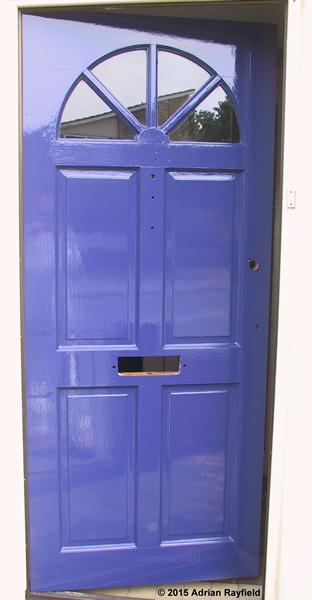
How to paint a front door
From time to time you will need to paint your front door, if it is wood that is. Ideally pick a couple of dry days to complete the job such as spring or summer. Pick a good quality exterior paint to ensure a long lasting job.
The front door is one of the most seen parts of your house, a good looking door gives a good impression to visitors, and especially if you are selling your house as it gives kerb appeal.
You should gather all the tools required before starting, you will need:
- Screwdrivers
- Adjustable spanner
- Sandpaper (various grades)
- Primer
- Undercoat
- Topcoat (Satin or gloss)
- Paint stripper (optional)
- Heat gun (optional)
- Scraper (optional)
Ironwork / Door furniture
The first job is to remove all ironwork or door furniture such as locks, knocker, letterbox, escutcheon, door pull and numbers. This will make it far easier for working on the door. Put everything to one side being careful not to lose any screws as some can be tiny and you will need them again later to refit the ironwork / door furniture. You may need an adjustable spanner for the knocker or letterbox.
Preparation
As with all decorating jobs, preparation is key and will take most of your time. Now is the time to decide if you are simply going to re-decorate your door, or give it a real overhaul and strip the existing finish off back to bare wood.
If you are going to remove all the existing paint finish you can do this either by using a heat gun and scraper, or paint remover and scraper. The choice is really up to you. Once the door is stripped give it a good rub down and fill any crack and holes and sand these level and smooth. Once you have done this you are now ready to move to the next section, prime.
If you decide against stripping the door back to bare wood, or it simply doesn’t need it you should give the existing surface a good clean off to remove dirt and grime with a cloth and maybe water, the give the surface a good rub down. Fill any cracks or unwanted holes and rub them down level and smooth. Dust off and you can move onto the next section, prime.
Prime
Once you have prepared the door you should prime the entire door if you have stripped it back to bare wood, or spot prime bare wood if you have just rubbed down and filled. Allow to dry before moving onto undercoating.
Undercoat
Once you have primed the door, whether it be the entire door or spot primed, give the primer a light sand down before applying one or two coats of undercoat. Allow each coat to dry fully if you give it more than one coat sand back between coats for that perfect smooth finish.
Topcoat
Once you have prepared the door correctly and given it it’s necessary coats of primer and undercoat you can now give the door it’s final sand back and the final coat, the topcoat. This maybe a satin finish or a gloss. Again you may want to give two topcoats, but read the manufacturer’s instructions to ensure you leave enough time between coats, and a word of warning, if you sandback, you a fine paper and use light strokes. If you are too harsh you could scratch the surface too much, or even worse roll up the first coat and ruin all your hard work.
Non-painted or varnished doors
This post deals with painted doors, such a glossed doors but for other finishes, such as varnish or stained door the principle is the same, apart from you wouldn’t use primer or undercoat, however the preparation part is still applicable and needs to be done.
Tags: Door, Door Furniture, Filler, Filling, Gloss, Ironwork, Knocker, Letterbox, Lock, Paint, Painting, Preparation, Primer, Satin, Topcoat, Undercoat, Varnish, Woodstain
Posted in Decorating Tips | 1 Comment »