Painting, decorating and home improvement tips blog
My review of the Paint Soap brush cleaner
Posted by Adrian
June 28th, 2017
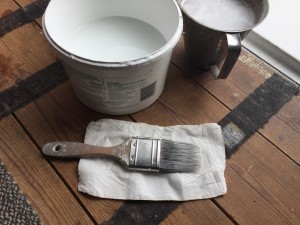
My review of the Paint Soap brush cleaner
I recently followed a company on Twitter (@PaintSoap) and I was asked if I wanted to try some of their product. Me, not being one to turn down the opportunity of trying out products I said yes. Paint Soap is based in the USA but were happy to send me some samples to the UK. They currently do not sell in the UK but they are hoping to start selling in the UK by the end of 2017.
About a week later a package arrived with the samples of Paint Soap for me to try. I was keen to give it a go and used it a couple of times on my next job. I liked the idea of being able to leave the brush to ‘clean itself’ as it soaked in the product, leaving me time to carry on with what I needed too.
After a few minutes of soaking I returned with anticipation to see how well the paint soap did, I removed the brush from the Paint Soap and rinsed it out, it was clean, and used a lot less water than I normally would have.
So what do I think of Paint Soap?
Paint Soap worked well and I like the idea of what is stands for, it saves time, saves money and your brushes, it is also eco friendly and the residue that is left can be disposed of safely as it is non toxic.
This product will only work on water based paints, such as emulsions, so no oil based products, and will not clean out dried paint as it reacts with the wet paint. So you can’t leave your brushes to dry out before cleaning them, but that goes with all paint tools.
So this product can save you, and your client water if you wash brushes out on the job. It can save you time as you can leave brushes to soak whilst carrying on with your work. And it cleans out the paint from your brushes easily and effortlessly.
My video review of me using Paint Soap
To see the rest of my videos, visit my channel on YouTube.
Tags: brush, Brush cleaner, Brushes, Emulsion, Paint Soap, PaintSoap, Time, Video, Water, water-based paints
Posted in Decorating Tips, Resources, Reviews, Video | No Comments »
How to clean paint brushes
Posted by Adrian
September 2nd, 2015

How to clean paint brushes
Once you have used your paint brush you have three options, option one is to simply throw it away. This is costly and if you have spent out on a good brush it is a serious waste of money! Option two, store the brush in a brush storage container or similar. This is good if you will be using the same brush with the same colour again in the future. Option three, clean your paint brush.
Depending if you are a professional painter and decorator or a DIYer and how much you have spent on your brushes will determine what you will do with your brushes. For professional painters we like to look after our brushes as we tend to buy good quality brushes that aren’t cheap so keeping them for as long as possible requires they are looked after and cleaned out.
Cleaning your brushes
If you are using water based paints then all you need is some water and soap and maybe a brush comb. Once you have finished with it and ready to clean the brush, get as much out of the brush as you can by wiping it on the edge of the paint can. Then run the brush under warm water, have the bristles facing down so the paint runs out of the bristles rather than up them and into the ferrule where it can dry and go hard.
Once the worst is washed out you can use a little soap to help wash any colour out of the bristles. Once you have done this you can use a brush comb to remove any stubborn and dried paint for the bristles, then give it a final rinse and shake out the water.
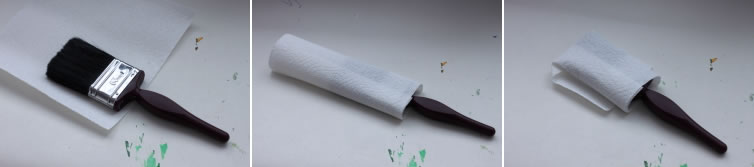
You should now store the brush either in it’s original packaging or wrapped in kitchen towel to help keep all the bristles straight, ready for it’s next use.
If you are using oil based paints, you should start the same way and remove as much paint as possible, then use a brush cleaner or white spirit to wash the brush out in, you may have to use clean brush cleaner to make sure all the paint and colour is removed. You can then treat the brush as you would one you have used in water based paints, so wash in warm soapy water, use a brush comb if required and store in its original packaging or paper towel.
Storing brushes
If you are going to use your brush again in the not too distant future you can buy a brush storage container, there are several on the market. By using these storage containeryou can quickly and easily come back to your brushes, they will still be soft, in the colour you want and ready to go. So they are well worth the investment if you use your brushes a lot or are a painter and decorator.
Tags: brush, Brush Cleaning, Brushes, Decorating, Oil-based paint, Painting, water-based paints
Posted in Decorating Tips | 2 Comments »
How to paint new plasterwork
Posted by Adrian
April 7th, 2012
Painting new plaster
When you have had either walls or ceilings plastered or skimmed over with plaster you need to know how to paint them correctly to get a long lasting finish.
Firstly ensure they are dry, this will depend on what plastering you have had done. One thing not to do, start painting colour samples on bare plaster, due to the brushes that come with the samples and how thick you apply the sample you will see this on your walls forever unless you rub them down, best to paint on some lining paper or plain white paper, you can then move it around the room and see the colour in different lights. There is a previous post about this Colour samples and testers.
To Paint new plasterwork
Firstly get some sandpaper, not too course, as you don’t want to ruin the new plaster, around 120 grit and lightly rub over the plaster to remove any splashed plaster or drips of dirty water. Then brush the area down to remove any loose dust.
Next, you may well think it’s simply a case of deciding on a colour and painting over the new plaster? STOP!
You should never paint new plaster with a vinyl emulsion as this will sit on top of the plaster leaving a skin or layer that could peel off. You should always paint new plaster with a ‘New Plaster Sealer’ or a non-vinyl emulsion.
I use a non-vinyl emulsion and is my preferred method. I use a matt emulsion, typically white to seal the plasterwork before using a vinyl emulsion colour over the top to complete the job. The ‘New Plaster Sealer’ or a non-vinyl emulsion will soak into the new plasterwork and the finish coats you apply will adhere to this first ‘mist’ coat.
You don’t have to worry about covering the plaster totally, you just need to give it a ‘mist’ coat (as it’s known) to seal the plaster, you’re not looking for complete coverage and opacity.
Once you have mist coated your new plaster you can now apply your choice of finish coat and colour.
Paint Calculator
You may find my paint calculator useful to help work out the quantity of paint you require to mist coat your new plaster and also for your final finish coat. One thing to note, new plaster can be absorbent so slightly more paint maybe required than normal to get a good depth of colour and a good finish.
Tags: Ceiling, Emulsion, Mist Coat, Paint, Paint Calculator, Plaster, Plasterwork, Vinyl, Walls, water-based paints
Posted in Decorating Tips | 20 Comments »