Painting, decorating and home improvement tips blog
How to wallpaper an arch or round window
Posted by Adrian
October 15th, 2012
Wallpapering around an arch or round window
Wallpapering can be tricky for many people but they are willing to have a go, but wallpapering around an arch or a round window often confuses people and puts them off tackling the job and can be too much for the casual DIYer. Knowing how to tackle it is the key and then the job isn’t so hard after all.
If you search our blog for wallpapering you will find several tips on wallpapering techniques from how to wallpaper around a door and window reveal, to how to wallpaper a fire breast wall.
Wallpapering an archway
Archways are often used as a way of joining two room together and to add interest to a room, they can be single door width or double or span an entire rooms width, whichever you have the principle of wallpapering the archway is the same.
If you know how to wallpaper a straight wall your halfway there. You would start to wallpaper as you normally would, from a corner. Once you come to the arch you hang the sheet on the face of the arch and then cut the paper that isn’t on the wall toward the corner edge of the arch, do this in small strips of around 1-2 centimetres and stick these to the underside of the arch.
Continue wallpapering the face of the arch and cutting strips and sticking to the underside of the arch until you have completed the arch, now you need to trim the pieces that go under the arch so that they are all an even length, this is done as the strips of paper under the arch will show through the infill paper when it dries so make them as neat as you can.
Tags: Arch, Archway, Round Window, Wallpaper, Wallpapering, Window
Posted in Decorating Tips | 8 Comments »
How to get paint to stick to edges
Posted by Adrian
September 21st, 2012
How to get paint to adhere to edges of woodwork
An odd title maybe but this is a great tip to get paint to stick to the edges of wood such as fascia boards and skirting boards.
You may of noticed when you paint square edged trim such as skirting boards or exterior fascia boards that the paint doesn’t cover so well on the edges, this is simply because there isn’t much of a surface for the paint to adhere too.
So how do I get paint to stay on the edges of woodwork?
Simply you need to make the area larger for the paint to stick too, this is simply done by using sandpaper and rounding the edges off so giving a gentle curve, you will find the paint adheres much better to a curve than a sharp square point.
Fascia boards
This tip is especially important for exterior fascia boards, have you notice how your fascia boards always start to peel at the bottom edge? This is because the paint film is thinnest here and over time the weather gets in and the damp starts to lift the paint off and even worse your fascia starts to rot.

Tags: Fascia, Paint, Sandpaper, Skirting, Trim
Posted in Decorating Tips | 1 Comment »
How to fit new guttering
Posted by Adrian
August 25th, 2012
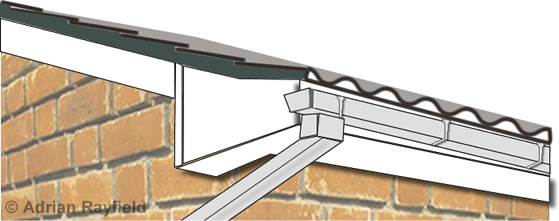
How to put up new guttering
With the end of the summer quickly approaching now is a good time to start thinking about jobs that need doing before the winter sets in. One job that may need doing is guttering, you may need to fix a leaking joint or replace a length of damaged downpipe. Whatever the job now is a good time to do it.
Choosing your guttering
If you are having new guttering you need to decide on which type be it round or square and the colour you prefer, black, brown or white. Then measure up allowing for any cutting that maybe required. Make sure you get enough brackets for the gutter and downpipes. It is advised to have a bracket every metre, this will give the gutter enough support when you get heavy snow sitting in it.
Buying the guttering
Once you have decided on your gutter and measured up it is now time to buy the guttering, ensure you get any outlets either running outlet or stopend outlet, stopends, any angled gutter, a shoe/boot for the end of the downpipe, downpipe and clips, and any union brackets.
Fixing the guttering
You may find it easier with two people to do this job, so now the time to call on a mate to help, but it can be done by just one person for those people with no mates!
Decide on where the outlet is going to be, you may not have a choice as the downpipe may go into a drain or you may want it to go into a water butt. The important thing to remember is the outlet has to be the lowest point for the water to run out of it. One additional tool you will need for this job is some string, this could be a chalk line or string you found in your wife’s craft draw! it doesn’t matter as long as it is long enough to span the length of where your fixing the guttering, which may be the entire width of the house, so a good 5 or 6 metres will be needed.
Now you know where the outlet is going, you can start to fix the guttering, take a bracket and place it against the fascia board and close to the roof tiles , mark the holes, drill and screw the first bracket to the fascia. Now go to the other end of the fascia, if the outlet is going to be at one end, come in about a metre from the end of the fascia and fix another bracket about an inch and a half down from the roof tiles. Now take your string and tie it between the two brackets pulling it tight to give it tension, this will give you a nice gentle fall toward the outlet. Now simply take a bracket measure about a metre from the first one, slide the bracket up to the string line, drill and screw, continue doing this until you get all the way along, you may have to decrease the gap to get brackets around a metre apart, don’t increase by much as the weight of the next snow could pull your gutter down.
If you have your outlet in the middle of the fascia, the same principle applies but work from one side then the other toward the middle, or wherever the outlet is.
Once all the brackets are up you can work out where the stopend outlet needs to be fixed, remember this still needs to continue to have a fall on it from the the last bracket you fitted.
Putting it all together
Next you need to measure and cut the gutter to fit between any union brackets or stopends, once all clipped into place you need to fit the downpipe, cut and fit the the downpipe and angles together to get the downpipe to where you want it to go, simply secure the downpipe to the wall with the downpipe brackets. Ideally your rain water would go into a water butt, this can easily be done by using a water butt connector, this allows the water butt to be filled from the downpipe and when it’s full will continue down the downpipe to a drain, so not overflowing.
Tags: Downpipe, Gutter, Guttering, Running Outlet, Stopend, Stopend Outlet, Union Bracket
Posted in Decorating Tips | No Comments »