Painting, decorating and home improvement tips blog
Colour Trends For 2020
Posted by Adrian
October 31st, 2019
Colour Trends For 2020
Dulux Colour Futures™ from AkzoNobel have again come up with what they think the colour trends for 2020 will be. They have compiled a colour of the year with supporting colour palettes. They have selected a range of colours they think will be the trend throughout 2020.
What Is The Trend Colour For 2020
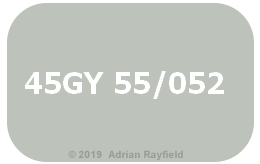
The colour of the year 2020 is…… 45GY 55/052 (also known as Tranquil Dawn).
“Every year Dulux colour specialists at our Global Aesthetic Center assemble a team of top international design experts to discuss the new global trends that will affect us all. We work on transforming these insights into one key 2020 Colour trend that will have an impact on homes all over the world. Then we create four beautiful palettes around the Colour of the Year, with a mood and style to suit everyone.”
Quote from Dulux website.
You can see more of this years colour schemes here:
See more of this years colour of the year and colour schemes.
Paint Calculator
If you would like to use the colour of the year (45GY 55/052) or any other colour you need to buy and need to work out how much you need to buy, use our FREE Paint Calculator.
Other useful links
Here are some further reading links:
- Past years Colour trends from Property Decorating
- Colour Futures 2020 (40 colours)
- Dulux Trade Expert Tranquil Dawn
- Colour Futures 2020 pdf (Select Decorators)
- Colour futures 2020 Dulux Trade pdf
- Dulux Tranquil Dawn
Video from Dulux YouTube channel.
Tags: 2020, 45GY 55/052, AkzoNobel, Colour, Colour of the year, Colour Trends, colour trends 2020, Dulux, Dulux Colour Futures, Dulux Trade, Emulsion, Paint, Paint Calculator, Painting, Spiced Honey, Tranquil Dawn, trend, trends for 2020
Posted in Decorating Tips, Home Improvements, News, Resources | No Comments »
Cleaning a paint brush
Posted by Adrian
October 17th, 2019
Cleaning a paint brush
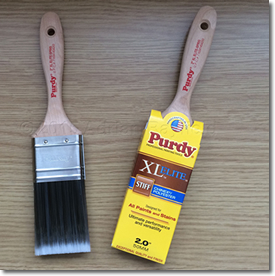
Whether you are a professional painter and decorator, a hobbyist or DIYer you will need to clean paint brushes at some point. Brushes range hugely in prices depending on size and quality from just a few pence to several pounds. You may prefer to simply throw them out when you are done, but is that really cost effective? If you spend the best part of £20 on a brush do you really want to throw it away after just one use?
You could store them in a storage product, but this is OK if you intend to use the brush again in the short term and in the same colour. If you are not going to use a brush say within 3-6 months and use a different colour your best bet is to clean out the brush and store it correctly, this way your brush will last for far longer and be in tip top condition giving a good finish every time you use it.
Cleaning and storing your paint brush
Before you clean or store your paint brushes you need to be aware of the type of paint you have been using, either water or oil based, as this will determine how you clean or store your brushes.
Whichever type of paint you have used, remove as much paint from your brush as possible.
Cleaning brushes – water based paints
Run the brush under a running tap, have the bristles facing downwards to prevent washing paint further in the brush where it could dry and go hard. Wash it out until the water runs clear, you can use some mild soap to help remove colour from the bristles and a brush comb to remove any stubborn paint.
Once all the paint has been removed, store in the original package or sleeve or wrapped in kitchen towel or paper to prevent the bristles from splaying out.
Cleaning brushes – Oil based paints
Oil based paint requires a slightly different approach to cleaning than water based paints. Oil based paints need a solvent to break down to oils in the paint allowing it to come out of the brush, unlike water based paints that can simply be removed with water.
To clean oil based paints from brushes, remove as much paint from the brush as possible by wiping it on the edge of the paint can. Then you will need to use white spirit or a brush cleaner to wash the brush in, this will dissolve the paint within the brush. You may have to do this a couple of times with clean white spirit or brush cleaner to get the paint out. Once the paint is removed you can use a brush comb to remove any hardened paint from the bristles, then wash in warm soapy water and once all the white spirit or brush cleaner has been washed out you should store the brush in its original packaging or paper towel to keep the bristles straight and in good condition, ready for it’s next use.
Tags: brush, Brushes, Cleaning, Emulsion, Oil based, Paint, Paints, Storing, Water based
Posted in Decorating Tips, Home Improvements | No Comments »
Lining paper, what is it?
Posted by Adrian
April 30th, 2019
Lining paper, what is it?
Lining paper has been traditionally used to produce a good, sound, smooth surface for wallpapering over, however it is now more popular to hang lining paper and emulsion over it.
Lining paper is used to remove any small imperfections on a wall or ceiling, it is not however a miracle cure, so preparation should always be done before hanging lining paper. It isn’t a substitute for plastering either.
Once all the holes and cracks have been filled, the walls or ceiling should be properly rubbed down and any filler should be sanded smooth and level. One this is done dust down the walls to remove any loose debris. You can seal any filler by either using a ‘size’ such as watered down wallpaper paste, or you can emulsion over the filler to help seal it off.
What thickness lining paper
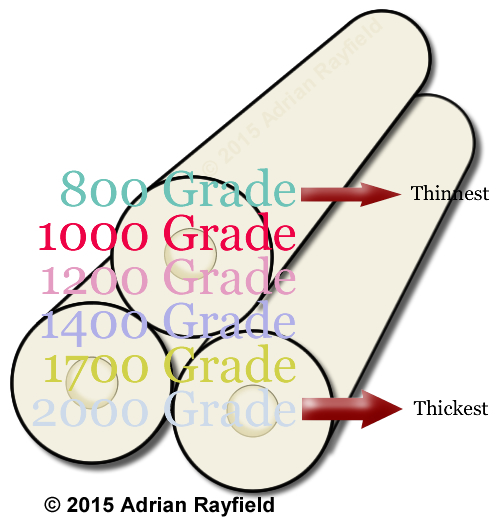
Lining paper comes in different thicknesses, guages or grades, this refers to their weight. they start at 800 guage and go up to 2000 guage, it all depends on how thick you want it to be. Lining paper does offer some insulation qualities but there are also specialist papers for this.
A good mid-range lining paper to go for is 1200 or 1400 gauge, they aren’t too thin and not to thick to be hard to work with.
Can I paint lining paper
As mentioned above, lining paper is meant to produce a smooth background for wallpapering over, but yes you can paint over the lining paper once it is fully dried.
Cross lining, what’s that?
Cross-lining is where the lining paper is hung horizontally rather the vertically like traditional wallpapers, normally if you are going to be emulsioning over the lining paper you could hang it as you would wallpaper, vertically.
Once you have hung the lining paper you need to allow it to fully dry before you emulsion over it, this will take normally between 12 – 24 hours depending on drying conditions.
How to measure for lining paper
Before you buy lining paper or order wallpaper you need to know how much to buy, I have written an article on how to measure a room for wallpaper that explains how you need to do it. I have also written a wallpaper calculator so you can work out how many rolls of wallpaper you need to buy.
Cost of lining paper
With everyone having to tighten their belts these days, cost is a real factor when it comes to decorating, wallpaper can be very expensive if you plan to wallpaper the entire room, a way around this is to only do one wall, or a feature wall as it is known.
If however you wish to change the look of a room every couple of years, or you have pets or children that makes wallpaper not a viable option, lining paper and emulsion maybe the answer.
Once lining paper has been put up it can painted over and over again, saving costs in the long run as all that is required is a fresh new coat of emulsion. Also, if you then decide to wallpaper at a later date, you can do so over the emulsioned lining paper.
Tags: Cross lining, Emulsion, Feature Wall, Lining Paper, Paint, Wallpaper
Posted in Decorating Tips, Home Improvements, Resources | 3 Comments »