Painting, decorating and home improvement tips blog
How to paint a bathroom
Posted by Adrian
February 12th, 2014
How to paint a bathroom
Bathrooms can be a retreat, a place where you can have a long bath a relax from the day to day stresses, so a beautiful tranquil bathroom is what you need with relaxing colours, candles, soft fluffy towels, but if however you do not spend too much time in the bathroom, you just have a quick shower and use the loo then a more practical ‘clinical’ type bathroom may suit your needs.
Bathroom paints
When you paint a bathroom there are a few things to consider, such as the type of paint to buy. Do you go for a special bathroom paint that inhibits mould growth and is moisture resistant, or do you save yourself a few pound and go for standard emulsions?
Well, the choice is yours really, circumstance will dictate a little as which one to choose. If you suffer from mould and dampness, such as you have teenages that spend half an hour in the shower or leave the bath running hot water until it’s nearly overflowing, then you may consider the bathroom paint. Ideally having an extractor fan fitted will also reduce condensation.
If you have a good extractor fan, or open the window to let the steam out so you don’t have a bathroom that looks like a fog from yesteryear you could simply go for a standard emulsion.
Preparing for painting
Before you jump straight in with the paint there are a few things you should do first, such as remove anything on the walls, such as toilet roll holder, towel rail, medicine cabinet, mirror etc, unless you want to either mask them up or paint around them. If you wish to remove them they are simple enough to do. Most toilet roll holders and towel rails have a small grub screw holding them on, these are typically an allen key or small screw, loosen these off to remove the item. You can then remove the fixing, or cut in around it.
If you are removing heavier items such as a mirror or medicine cabinet it is always a good idea to have an extra person give you a hand, you don’t want to be dropping a mirror on the floor!
You can then cover up with dust sheets, cover the toilet including the cistern, the bath or shower cubicle and the hand basin and anything else that isn’t removable, and don’t forget the floor.
Once everything has been removed and covered it is time to prepare the ceiling and walls, fill any holes and cracks with filler, sand level and smooth when dry. You should also wash down any splashes from walls and ceiling and make sure that any mould is washed down and removed, for this you can use a mould and mildew remover, or a little bleach. You should always follow the safety advice on these products to avoid accidents.
Painting the bathroom
Start off with the ceiling and coving, if you have any. Give this at least two coats allowing each coat to dry fully between each coat, once the ceiling is done you can paint the walls, cut into the ceiling and around the fixtures and fittings such as toilet, basin etc and fill in with a roller, you can use a small four inch roller to get into those hard to reach places, such as behind the toilet. Give the walls a minimum of two coats to get a good coverage.
Once the walls are done you can paint any woodwork, such as doors, doorframes, windows, skirting boards, and the floor if it is painted or varnished. Rub them down and if you are painting them give them an undercoat before a topcoat. If you are varnishing, rub down and give two coats, if the floor is varnished it may be advisable to give three or more coats to help protect the wood against the water.
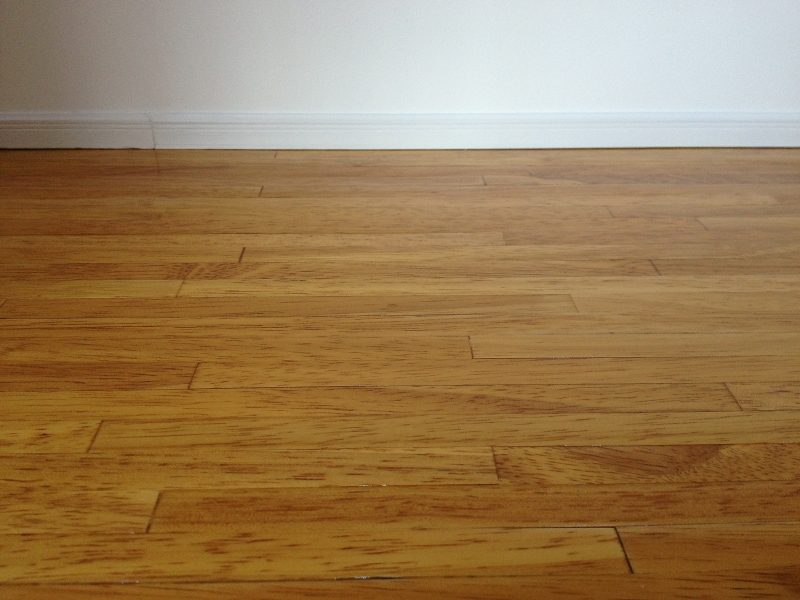
A recent completed bathroom
Below is a picture of a recent completed bathroom I painted, I painted this bathroom in 1999 after it had a complete overhaul and modernisation. I recently painted it using Dulux Soft Sheen Violet White on the walls, Vinyl matt brilliant white on the ceiling down to the picture rail and White satinwood on the woodwork and finished off by re-varnishing the floor with six coats of Ronseal Diamond Hard clear satin floor varnish.

Tags: Bath, Bathroom, Ceiling, Extractor Fan, Floor, Flooring, Mould, Paint, Painting, Toilet, Varnish
Posted in Decorating Tips | No Comments »
How to sand a floor
Posted by Adrian
November 23rd, 2013
How to sand a floor
You may want to have an alternative floor covering to carpet, but don’t want the expense of a hardwood or laminate floor. Well, if you have wooden floorboards you can sand them down and either paint them a colour or use a clear floor varnish to show off the beautiful wood, or stain them.
To sand the floor well you will need to hire a floor and an edging sander. Hiring these is relatively inexpensive at around £50 for the two sanders for a day, and you typically get 24 hours hire which should be enough time for an average sized room.
Before you start sanding
As you sand the floor you will make a lot of dust, so remove as much as you can from a room, cover wall and ceiling lights (as long as they are not in use) with black bags, put masking tape over wardrobe doors and cupboards to prevent dust getting in, you can also seal around any doors to try and contain the dust in the one room.
Safety first
You should wear a suitable dust mask, goggles and ear defenders whilst sanding. These can be bought from the hire shop when you pick up the sanders.
Preparation for sanding the floor
Before you start sanding you should fix any loose floorboards, replace any damaged or rotten boards, and nail punch raised nails as they can catch the sandpaper and rip it, and maybe even cause damage to the sander which could result in paying a charge for repair at the hire centre.
Start sanding
To start sanding decide on the coarse of sandpaper to use, you should of got three types when you hired the sander, a coarse, medium and fine. Depending on the condition of the floor will depend on what sandpaper to use, if the floor is in good condition and has not been previously painted or stained you can use the medium, otherwise start with the coarse.
You should keep the sander moving at all times whilst it is switched on to prevent making dips and low spots.
Sand diagonally across the boards, this will help level them off and remove a good amount of the surface to reveal the wood lower down. Once you have completed one diagonal sanding, go the other way, and them sand in the direction of the boards.
Once you are happy with the boards you can change to the medium grit, working in the direction of the boards go up and down overlapping each strip, once you have done this a couple of times, repeat the process with the fine sandpaper until the floor is smooth.
Finishing of the edges
To finish off the edges, use the edging sander, again use the coarse, medium and fine sandpaper. A word of warning, be careful around heating pipes as the sander could damage or even cut the copper pipe. You can use a scraper or chisel to get right into the corners and around pipework.
Staining, painting or varnishing a floor
Once you have sanded the floor and you are happy with it, it is time to clean up all the dust, vacuum the floor in both directions, and around and under the skirting boards, to remove any fine dust left on the floor, use a soft cloth and white spirit to wipe over the boards, this has the added benefit of removing and grease that may be left on the boards.
At this stage you need to be aware that the floor is vulnerable to stains so be careful walking across it and don’t spill your tea or coffee over it as you stand back and admire your hard work.
Painting the floor
If you are varnishing, painting or staining the floor the principle is the same, use a roller to apply the paint, I prefer to use a small roller but you may find it easier with a 9 inch roller to cover the area quicker. You will also need a brush to paint around the edges of the skirting boards.
Make sure the paint you are applying is a good quality floor paint, start with painting around the edge and then rollering up to it, apply one coat and leave to dry. If it is a quick drying paint / varnish you can apply more coats the same day otherwise leave overnight to dry.
Lightly rub the floor down between each coat and remove the dust before apply a second coat.
For high foot traffic areas apply three good coats to the floor. Once you have applied all the coats leave to fully dry before putting back furniture etc into the room. You may consider adding felt pads to the bottom of furniture such as dining table and chairs to help protect the floor.
Tags: Edging Sander, Floor, Floor Paint, Floor Sanding, Floor Stain, Floorboards, Flooring, Painting, Sanding, Sandpaper, Varnish
Posted in Decorating Tips | No Comments »
Painting over varnished wood
Posted by Adrian
March 14th, 2012
Preparing to paint over varnish or old stained wood
I recently did a job that had new fire doors installed and because of this new door stops also had to be fitted, when the stops were fitted the paint came away with the old door stops. The paint had been applied over stained and varnished wood. You may have this in your home if it’s old enough, does the paint chip easily and reveal dark wood underneath? More than likely you have varnish or stained wood and painted over without the proper preparation. As you can see by the following picture it looked a bit of a mess.
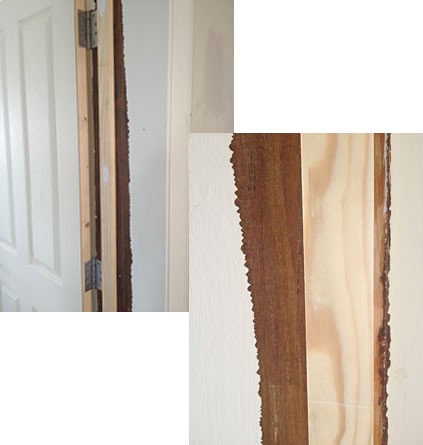
The paint hadn’t adhered to the varnish underneath and simply flacked off, as you can see by the following quick video it wasn’t too much of a job to scrape the paint off due to lack of preparation when the varnish was painted over.
The following image shows the paint removed and prepared ready for the first coat of primer.
Tags: BIN, Door, Paint, Painting, Primer, Satinwood, Varnish, Zinsser
Posted in Decorating Tips, Video | 2 Comments »