Painting, decorating and home improvement tips blog
How to fit new glass into a window or door frame
Posted by Adrian
November 2nd, 2016
How to fit new glass into a window or door frame
Fitting a new piece of glass into a wooden or metal frame is a job you may need to do from time to time. Before you start running out to the shed a grabbing a hammer and chisel, safety first.
Make sure you wear suitable gloves to protect your hands and safety glasses or goggles for your eyes. You may also want to wear safety boots or at least sturdy shoes or boots and suitable clothing, this is not a flip flop, t-shirt and shorts kinda job!
Once you have to correct safety gear on you are ready to get the tools you require. Firstly determine the tools you need, is the glass held in with beading or putty?
For glass held in with putty you will need:
- A hammer
- A chisel or alternative to remove old putty
- Small tacks to hold new glass in
- Putty
- A tape measure
- A new pane of glass
For glass that is held in with glazing beads you will need:
- A hammer
- A chisel or alternative to remove glazing beads
- Pincers or pliers
- A tape measure
- A new pane of glass
- Putty, silicone, or caulk
It may be easier to remove the door of window and lay flat, but it isn’t always practical.
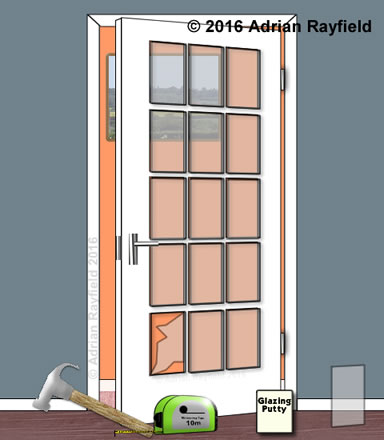
Removal and fitting of glass in a putted window or door
Firstly you need to remove any loose and large pieces of glass, it is a good idea to apply masking tape to the broken glass (carefully) so that as you remove the glass another piece doesn’t fall out. Once the loose glass is removed you need to remove the old putty from the frame, do this carefully with a hammer and chisel, taking care not to cut into the frame.
Ensure all putty is removed as any hard bits left can cause problems as you put the new glass in, and even crack the new glass. Remove any old tacks that held the glass in also.
Once all the old glass,putty and any tacks are removed, clear up, dispose of the old glass safely and remove dust and debris from the frame. A vacuum maybe useful to pick up any small bits of debris.
Now you can measure up for the new glass, of you haven’t done so already. Measure the width, height and thickness of the old glass, then you can either cut some glass yourself or go to a merchant and get them to cut some glass to size for you. The glass should be slightly smaller than the frame it is going in.
Now you are ready to fit the new glass, it is best to remove all the putty from the tub and put onto a board and knead like it is bread, this will mix in any linseed oil back into the putty and also warm it slightly to make it easier to use.
When this is done you can apply some putty to the frame, do this only on the edge the glass sits in. Then put the new glass in the frame, gently push the glass into the frame and making a seal with the new putty. Put some tacks in to hold the glass in place. clean of excess putty from inside frame.
Now you need to apply putty to the frame and smooth off giving an angled bead all around the glass with mitred corners.
Once you have glazed the frame, leave it alone, allow the putty to dry for a day before touching it at all, and a week or more before applying paint.
Removal and fitting of glass in a beaded window or door
You should remove any large pieces of glass, place masking tape of the glass to help prevent more glass falling out as you remove one piece, once all the broken glass is removed you can start to remove the glazing beads.
Take a hammer and chisel and gentle prize up the bead from the frame. You should be able to pull the nails out with pincers or pliers. Be very careful not to break the beading as it can be re-used. Make a note where each bead came from so that you can replace them into the same place.
Now measure for the glass allowing some movement, so 2-3mm smaller on each side. Either cut the glass to size yourself or get a merchant to do it for you. Now you have the glass the correct size you are ready to fit it.
Ensure the frame is clear from debris, use either a brush to dust or vacuum cleaner. The depending on situation and preference you need to apply putty, silicone (this can not be painted over) or caulk or the frame where the glass touches, then push the glass into position, pushing gently onto the glass to seal it against either the putty, silicone or caulk.
You can now start replacing the glazing beads, it is best to start at the bottom, put the bead into place and push it against the glass, lift the glass slightly off of the bottom of the frame and then put a nail into the bead to hold it tight, don’t hammer it all the way in just in case you need to adjust or remove the bead. Now add the second bead in the same way, and finally the two remaining beads. Once you are happy you can hammer all the nails all the way in and fill the holes ready for painting.
Tags: caulk, Door, Glass, Glass panelled door, Glazing bead, Putty, Silicone, Window
Posted in Decorating Tips | No Comments »
How to unstick stuck windows and doors
Posted by Adrian
February 1st, 2015
How to unstick stuck windows
When you have had your windows and doors newly painted it seems it doesn’t matter how many hours you leave them open to dry, they always seem to stick.
This can be frustrating if you want to open the window or door, so how do you release and unstick them? The problem is caused by tacky paint sticking to tacky paint, or maybe the paint has sealed to the frame, either way the following methods are the same.
How to release stuck windows and doors
You will need:
- A Scraper or putty knife
- A Hammer or mallet
- A small block of wood or a kitchen or toilet roll

The first and easiest option is to try using a toilet or kitchen roll, place the roll on the stuck window or door where it is sticking and tap the other end with your hand, this may be enough to release the seal and allow you to open the window or door. It will also cause the lease amount of damage.
If this doesn’t release the windows or door you will have to try breaking the paint seal, this can be done by running a scraper or putty knife between the door or window and it’s frame, do this carefully as you can in order not to damage either the window, door, or frame. once you have broken the seal, try the toilet or kitchen roll method to try and free it and then open of released.
If the window or door is still stuck, next try using a hammer and small block of wood to break the seal, be very careful not to break the glass. Tap the block of wood gently with a hammer or mallet to free the paint seal, then open.
How to prevent sticking sash windows
Apart from paint sticking windows, box sash windows are notoriously for getting stuck if they aren’t used for a while, over the winter for example. To solve this problem there is a simple solution, wax, candle wax to be precise.
Once you have the sash open, rub a candle up and down the frame where the sash runs, do this both sides, then repeat with the other sash. The wax should help the sashes slide far easier.
Tags: Box Sash, Door, Painting, Sash Window, Sticking, Window
Posted in Decorating Tips | 1 Comment »
Parts of a window
Posted by Adrian
August 27th, 2013
Parts of a window
You will certainly have windows in your property but there are lots of types of window styles such as, a sash window where the top and bottom windows slide up and down, or a casement window, this type of window opens outwards like a door and is very common in new houses.
Windows are also available in many types of materials such as hardwood, softwood, aluminium and Upvc to mention few. The glass may be plan or have coloured glass, lead lights or latticework to make a window more ornate.

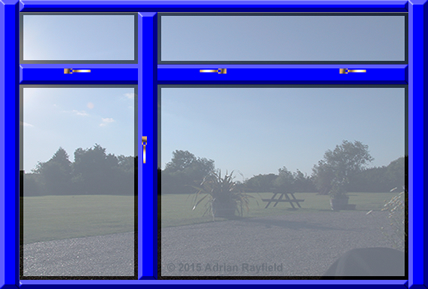
In this post I am talking about a traditional casement window with a fanlight, however many of the terms used relate to all styles of window.
Window frame
The window frame consists of a head that runs along the top, a sill along the bottom and two jambs running vertically at either side. The frame holds the window itself either hinged as in the case of a casement window or free running as in a sash window.
Top drip
Some windows will have a top drip, this encourages the water to run off the tip of the window rather than to run down the window and glass, or even into an open window.
Casement
The casement is the part the glass sits in, the part that opens. A basic design of a casement consists of four parts, a top rail running horizontally at the top, a bottom rail that runs horizontally along the bottom and two styles that run vertically that go to make the casement. This would typically be hinged on one side or along the top and attached to the window frame.
Mullion
A mullion is the central vertical part that makes up the frame on a casement window and separates two windows, for example a opening casement window and a fixed pain window.
Transom
A transom is a horizontal part separating two windows, for example a fixed pain and a fanlight / vent window.
Window sill
The sill is at the bottom of the frame and attached to the two vertical jambs to complete the window frame, the sill will slant away from the window to encourage water to run away from the window frame, the sill will also have grove underneath it to allow the water to drip off and to stop the water running back under the window frame.
Many new windows now come with trickle vents, these are air vents that are in the head of the frame that have a grill on the outside and a closing vent on the inside, this allows air flow into the property and help prevent condensation forming on the windows.
Tags: Casement Window, Fanlight, Mullion, Sash Window, Sill, Style, Transom, Window, Window Frame, Windows
Posted in Decorating Tips | No Comments »