Painting, decorating and home improvement tips blog
How to paint a flush door
Posted by Adrian
November 1st, 2009
Painting a flush door
This tip applies to both interior and exterior flush doors. Flush doors have no panels on them so you may find it easier and quicker to use a gloss roller to paint the door, see the note at the end of this tip.
The first job is to remove the door furniture such as handles, letterbox, knocker etc, now cover the floor. The next job is to remove any loose paint as well as any dirt and grime. Next rub the door down, depending on the surface you are painting over and its condition 80-grit sandpaper will be fine. Rub down, going in the direction of the grain.
Once you have ‘keyed’ the surface with the sand / glass paper dust off the surface. If the door has any bare wood showing you will need to use the appropriate primer. Once the primer is dry you can paint the door with a suitable undercoat, finally the finish coat (woodstain, gloss or satinwood etc) of your choice.
So what order do I paint the flush door?
OK, here is the order to paint your flush door:
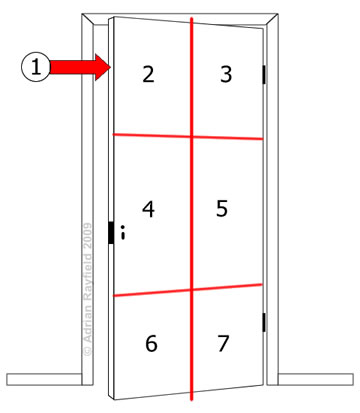
If you imagine the door split up into sections, say 6 sections. (Shown as red line in diagram). You may want to work in smaller sections, so divide the door into 8 sections. You should work quickly and complete the door in one go.
- Paint the door edge, you should always paint the edge you will see if the door is open. Number 1 in diagram. If it is an exterior door you should also paint the top of the door, and the bottom if you can.
- Paint the first two sections. Numbers 2 and 3 in the diagram.
- Paint the next two sections. Numbers 4 and 5 in the diagram. Blend the paint of section 2 and 4 with long brush strokes, do the same for section 3 and 5.
- Finally paint the two remaining sections. Numbers 6 and 7 in diagram. Blend the sections as before.
- If you are using gloss, check to ensure the paint hasn’t run, if there are runs simply brush them out.
- You should now have a newly painted door!
NOTES:
If you are using a gloss roller, work in the same way as above and when the entire door is covered, roll from top to bottom across the door, then do it again but this time without applying any preasure to the roller, this should eliminate any ‘air’ bubbles the roller may have left.
Tags: Door, External Door, Flush door, Gloss roller, Internal Door, Painting
Posted in Decorating Tips | 1 Comment »
Cross lining and lining
Posted by Adrian
October 23rd, 2009

What is the difference between lining and cross lining?
If you are thinking of wallpapering, either an entire room or just a feature wall you may want to consider lining or cross lining your walls first.
By cross lining you will give yourself a smoother surface in which to wallpaper over.
So what is cross lining, and what is the difference between lining and cross lining? And do I need to do it?
The difference between lining and cross lining is simple; ‘lining’ as it is most commonly referred to is putting lining paper up vertically.
Tags: Cross lining, Emulsion, Feature Wall, Lining, Lining Paper, Wallpaper
Posted in Decorating Tips | 21 Comments »
Order colour samples online at Dulux
Posted by Adrian
October 15th, 2009

Colour samples
Order colour samples online at Dulux for 98p or free colour cards from in stores and online.
Looking for that perfect colour for your room, but don’t want to get it wrong? How about trying one of Dulux colour paint samples.
Simply go to http://www.dulux.co.uk/colours/samples/index.jsp and select your colour or colours then add them to your basket and they will send them in the post for you.
They are only 98p each plus P&P with over 1900 colours to choose from.
Tags: Colour card, Colour testers, Dulux, Sample pot, Tester pot
Posted in News | 2 Comments »