Painting, decorating and home improvement tips blog
Colour Trends For 2022
Posted by Adrian
November 9th, 2021
Colour Trends For 2022
Each year a team of top international design experts come together to discuss world wide trends. This is then translated into a colour scheme, then they compile a colour of the year with supporting colour palettes. They have selected a range of colours they think will be the trend throughout 2022.
What Is The Trend Colour For 2022
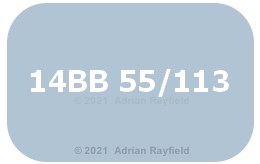
The colour of the year 2022 is…… 14BB 55/113 (also known as Bright Skies).
“Every year the Dulux Colour specialists at our Global Aesthetic Centre assemble a top team of international design experts to discuss the new global trends that will affect us all. Using these insights and a wealth of colour expertise, the team then chooses a Colour of the Year, and builds four new, easy to use paint palettes around it to help interior designers, decorators and building design professionals to create better, more comfortable homes and public spaces all over the world.”
Quote from Dulux website.
You can see more of this years colour schemes here:
See more of this years colour of the year and colour schemes.
Paint Calculator
If you would like to use the colour of the year (14BB 55/113) or any other colour you need to buy and need to work out how much you need to buy, use our Paint Calculator.
Other useful links
Here are some further reading links:
- Past years Colour trends from Property Decorating
- Dulux Trade Expert Bright Skies
- Dulux colour of the year
Video from Dulux YouTube channel.
Tags: 14BB 55/113, AkzoNobel, Bright Skies, Calculator, colour 2022, Colour of the year, Colour Trends, colour trends 2022, Dulux, Dulux Colour Futures, dulux colour of the year, Dulux Trade, Paint, Paint Calculator, Painting, trend, Trends
Posted in Decorating Tips, Home Improvements, News, Resources | No Comments »
Making and using a water level
Posted by Adrian
March 31st, 2021
Making and using a water level
Water levels can come in very useful when you need to make a level line across a big expanse, such as in a room and a level simply won’t do. You can buy laser levels but they can be expensive and you may only require it once, this post describes how to make a cheap water level.
Water levels can be used for things such as dado and picture rails, wallpaper borders etc.
Making a water level
To make a water level is fairly straightforward, you will need the following items.
- A long length of clear tubing
- Water
- Something to bung ends of tube (optional)
- Funnel (optional)
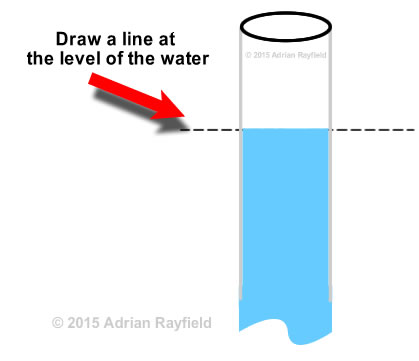
You will need a length of clear tubing, long enough to reach around your work area, such as a room. The tube needs to be clear so you can see the water, so a garden hose wouldn’t be any good as it isn’t transparent.
Once you have your length of tubing you need to fill it with water. This can be done by using a funnel in one end of the tube and running water into it to fill the tube. You can also try the syphon method, but whatever you find works best for you. Make sure that there are no air bubbles in the length of tube, if there are work them out to an open end.
Don’t fill the tube fully as you will need to allow the water to move without it coming out all over the place and for it to settle to get the level.
Once the tube is filled enough you will need to stop the water coming out again, this can be done simply by placing your thumb over the end or a bung of some kind if you have one.
Using a water level
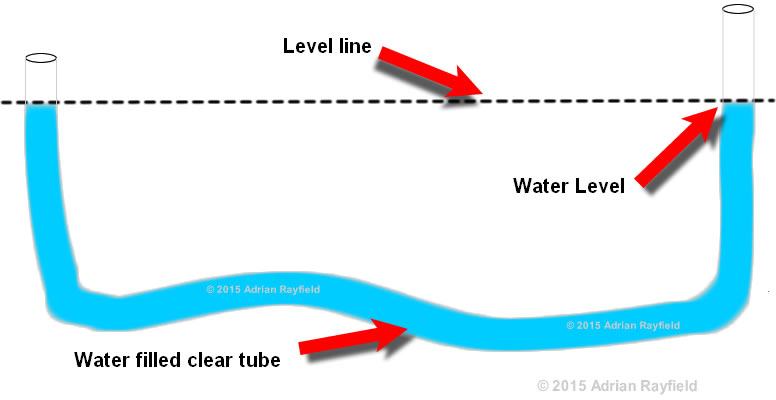
Now that you have made your water level you are ready to use it. You will need a starting point, this can be achieved by measuring and making a pencil mark, or maybe using an existing level, such as a dado rail, it could even be something in another room if the tube is long enough. For example if you want to make sure the dado rail is the same in two rooms. This will be your starting point.
You will need a second person to help you with using the level. One stays at the original level point whilst the other uses the level and marks the wall at the level.
The person holding the ‘fixed’ end, that is the original level mark stays holding the tube at this point, whilst the second person moves to a new point and holds the tube against the wall. The first person instructs the second person to move up or down until the water is level with the original mark, the second person can then mark the wall level with the water in the tube, thus giving a level line.
Continue doing this in several places as required. Remember not to lift tube too high without having end blocked as it will flow out. You can then if required draw a line and join up the marks.
Tags: Dado rail, Decoratomg, DIY, Handyman, Level, Painting, Wallpaper Border, Water, Water Level, Woodwork
Posted in Home Improvements | No Comments »
How to cut a bolt without damaging the thread
Posted by Adrian
February 28th, 2021
How to cut a bolt without damaging the thread
If you find yourself with a job that requires a bolt to fix something together, or maybe simply fitting a new door or drawer knob onto furniture, sometimes you may find the supplied bolt is too long for your requirements, this is often done intentionally allowing the manufacturer to supply only one bolt at the longer size allowing the end user to cut to the required length. So what do you do if you find yourself in this situation, you can cut it but but how as there is a possibility of damaging the thread making the bolt unusable.
However, this very simple tip will make cutting the bolt easy and also save the tread from damage. All you require is the bolt, a nut, a hacksaw, and something to hold the nut and bolt with, such as a vise.
Cutting the bolt
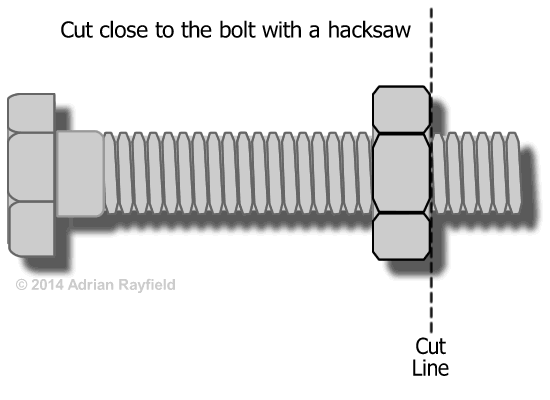
To cut the bolt simply take the bolt and a nut that fits the bolts thread (if one doesn’t come supplied), screw the nut onto the bolt just further onto the bolt than the length you want the final bolt to be. In other words the nut will need to be still left on the bolt once it has been cut.
Once the nut is in place, hold it in the vice, with the nut or the bolt head, not the thread. Then take the hacksaw and place the blade right up against the nut, on the waste side of the bolt. Then with one hand steady the bolt and with the other hand start to cut with the hacksaw. Go slowly and be careful of your hands and fingers. Keep cutting until you have gone through the bolt.
Checking the bolts thread
Once you have cut the bolt, the nut should still be on the bolt. To make sure the thread is OK simply unscrew the nut off of the bolt, if it is a little hard to do so use a spanner or adjustable spanner to ease the nut off. If it is really hard to get off unscrew the nut slightly, then screw it back on then off then on until the nut comes off of the bolt.
To finish off, and ensure any loose metal is removed from the thread brush the end with a wire brush.
Now you can use the shortened bolt to complete that job.
Tags: Bolt, Hacksaw, Nut, Thread, Vise
Posted in Home Improvements | No Comments »