Painting, decorating and home improvement tips blog
How to fit shelves
Posted by Adrian
January 28th, 2021
How to fit shelves
Shelves are a handy way to store and display items, from books to ornaments. There are a few different types of shelving available, such as floating, fixed bracket, slotted shelving system and built in shelving. You will find one that suits your needs and situation.
Obviously the most important thing with shelving, whatever the type you use is to ensure the shelve is level and securely fitted to the wall. You will need a few basic tools to fit shelves and is an easy job to do.
Tools needed to fit shelving
You will need the following tools to fit shelves:
- A pencil
- A spirit level
- A drill
- Rawl plugs
- Drill bit
- A cable and pipe detector
- A tape measure
- A dust sheet
Unless you are sure where pipes and cables run you should always use a detector to find and mark them to avoid drilling through pipes or cables.
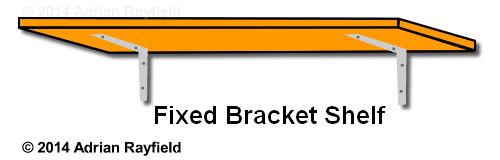
Fitting fixed bracket shelves
Firstly use the pipe and cables detector to find and then mark the location of any cables or pipes on the wall. Once this is done you can work out where to fix the shelf, making sure you avoid the cables and pipes you may of marked.
Once you have decided on the shelves location, hold the shelf against the wall and with a spirit level ensure the shelf is level, then draw a line along the under edge of the shelf, then put the shelf to one side.
Now take a bracket and hold it so that the top of the bracket is level with the line you have drawn on the wall and far enough in from the edge to give the shelf good support (this will depend on the shelf size and the weight you are going to put onto it). Mark the holes of the bracket onto the wall using a pencil, then put the bracket to one side.
Now with a drill bit and drill, drill the holes required and put rawl plugs into the wall, repeat the same process with the other bracket.

Once you have the holes drilled and plugged you can screw the brackets onto the wall, then fit the shelf to the bracket, the brackets will have holes in them to allow you to screw through the bracket and up into the shelf to stop the shelf from moving or being pulled off. Just make sure the screws are small enough so they do not go all the way through the shelf.
Finally check the level of the shelf, and you are now ready to use your shelves. If you have more than one shelf to fit, follow the same procedure as above.
Fitting floating shelves
A floating shelf is designed to hide the supporting bracket by concealing it inside the shelf, these types of shelves give a modern minimalistic look.
Firstly use the pipe and cables detector to find and then mark the location of any cables or pipes on the wall. Once this is done you can work out where to fix the shelf, making sure you avoid the cables and pipes you may of marked.
Once you have decided on the shelves location, hold the shelf bracket against the wall and with a spirit level ensure the shelf is level, then mark the holes through the bracket onto the wall, put the bracket to one side, drill and plug the holes.
Now screw the bracket onto the wall using the holes you have just drilled, once the bracket is firmly fixed to the wall slide the shelf onto the bracket. Check the level of the shelf, if you are happy screw the grub screw (small screws) through the shelf and into the hole in the bracket to ensure the shelf can not be pulled off the wall.
Fitting slotted adjustable shelf system
This type of shelving is great if you may wish to alter the height of the shelves to allow taller things in between shelves in the future, and can be removed completely and just leave the vertical rails on the wall until you wish to use them again, in you need a versatile shelving system then this is the one to go for.
Firstly use the pipe and cables detector to find and then mark the location of any cables or pipes on the wall. Once this is done you can work out where to fix the shelf, making sure you avoid the cables and pipes you may of marked.
Work out the height of the supporting rail and mark it on the wall, hold the supporting bracket so the top lines up with the mark on the wall, then mark the top hole, drill and plug this hole and screw the bracket to the wall, but don’t tighten the screw all the way in, allow the bracket to hang, it should hang vertically level as it is only fixed in one place, check and adjust if needed using a spirit level, then mark the remaining holes, hold the bracket out of the way, drill and plug the remaining holes. Then screw all the screws into the bracket.
Now moving onto the second bracket, ensure it is at the same level as the first one, and not too far apart for the shelf. By using the same procedure as above fit the second bracket.
Once both brackets are fitted you can slide the shelf brackets into the supporting bracket and lock them into place.
Then you can put your shelves on the shelf brackets and then using a small screw screw through the underneath of the bracket up into the self to stop it from moving or being pulled off.
Fitting built in shelves
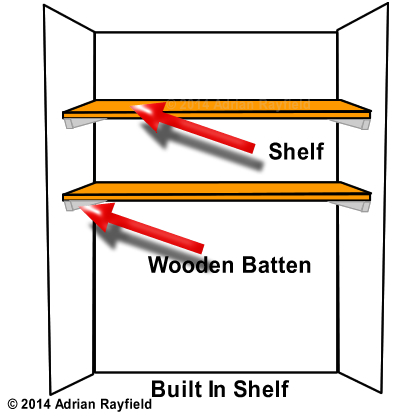
Built in shelving is ideal for alcoves either side of a fireplace. They consist of wooden battens that are screwed to the wall and then a shelf is cut to fit the alcove and sits on top of the battens.
Firstly use the pipe and cables detector to find and then mark the location of any cables or pipes on the wall. Once this is done you can work out where to fix the shelf, making sure you avoid the cables and pipes you may of marked.
You now need to measure the battens, one for the back and two for the sides. Drill and fix the batten on the back wall, then line up, drill and fix the two side battens. The two side battens can be shaped so they aren’t square edged on the front edge, you can cut them at a 45° angle.
Once all the battens are fixed to the walls you can fit the shelves. You will have to make bespoke shelves to fit your width and depth of alcove. Once the shelves are fitted you can screw the shelves from the top into the batten to ensure they don’t move or are pulled off.
Tags: Adjustable Shelving, Alcove, Bracket, Fixed Bracket, Floating Shelves, Shelf, Shelves
Posted in Home Improvements | No Comments »