Painting, decorating and home improvement tips blog
10 ways to improve your property
Posted by Adrian
June 19th, 2019

10 ways to improve your property
If you are thinking of selling your property or simply want to give it an update but wish to add value to your property also, the following 10 ways to improve your property is a good start. They are in no particular order of importance, cost or value adding potential.
As with all improvements you need to decide the reason behind them, if it is to add value to your house you should always research the local area to find out if doing a job will actually add value. If you just want to update your house for you then it is less of a consideration but be careful not to do things to devalue your property.
Garden – Do you have kerb appeal
Is your garden in need of some work, is the grass up to your knees or does it resemble a jungle? The first thing people see as they come to your property is your garden. Simply by keeping it neat and tidy will increase the kerb appeal. Simple things such as weeding the borders, cutting the grass and having well planned all year round plants is maybe all you need to do. If you wish to go a stage further you could use weed control membrane and coloured slate, some coloured pots and maybe even block pave the driveway, this is obviously more expensive but will improve the look and initial appearance of your home.
Environmentally friendly house
Is your property Environmentally friendly? Many people are looking to buy houses that are Environmentally friendly nowadays, for example short flush toilets, double glazed windows, water collection devices such water butts to recycle rain water or condensing boiler. All these things could not only benefit you, the home owner, but also the environment and are all good selling points.
New kitchen?
The kitchen for most homes is the hub of the house, it is where you make meals, maybe eat, and often meet other family members from the household passing through, it can be the organisational hub also with notes stuck on the fridge. A kitchen is also a great selling point of a property, does your kitchen look old and tired, is it 20 years old? There is nothing wrong with an old kitchen, they will often last for years it’s just the fashion and trends that change but the carcass or the kitchen maybe nearly as good as new.
Instead of ripping the entire kitchen out why not consider either having it painted or just replace the doors and worktops to give your kitchen a modern look and feel. There are lots of companies offering replacement doors and worktops online. And you can save yourself a small fortune at the same time.
Bathroom
Everyone likes a nice bathroom, a nice suite and well heated. So if your bathroom isn’t that welcoming you may consider doing it up, especially before selling. You don’t, unless you want to, need to install an entire new suite, replacing taps and getting rid of that old wooden toilet seat and replace it with a new one or a plastic one could be an idea.
Adding a few tiles could brighten up a bathroom and make it easy for mopping up splashes, especially around the bath or basin. Re-grouting your existing tiles could make the bathroom look cleaner and more appealing to potential buyers.
Another consideration is flooring, carpet may seem a good idea and feel nice on your feet in the morning but if your selling your house people may prefer a tiled floor or a vinyl flooring as it is more hygienic and easier to keep clean.
Flooring – carpets or hardwood flooring
Flooring is a large expense so you have to make to right decision, do you go for carpet or a laminate or hardwood floor? If you have cats or dogs a laminate or hardwood floor maybe a better choice than carpet. A dark carpet rather than a light coloured one would be best in a high traffic area, such as by a front or rear door. Hardwood and laminate floors are quick and easy to keep clean, simply brush them over with a broom.
The expense has to be a consideration also, especially if you are thinking of moving. Saving that worn out carpet will not help sell a house whereby a nice hardwood floor may do.
Storage
Storage is always a problem in most households, there is never enough space to keep everything we have nowadays. If you can build storage space it will certainly improve your properties look as all the clutter can be put away. For example, can you make a window seat with storage under the seat? Maybe you can build cupboards under the stairs, or build a toy box for the end of the kids bed.
Any space that can be utilised for storage will make your home run better and could add value to it also, as people always look for storage spaces when viewing a property.
Build
If you have the money you could always build, either an extension or convert the loft maybe, but you don’t have to go for a full on build, simply re-thinking a house and altering it may make the house work better and add value, for example adding an en-suit. A garden room or conservatory is another way of extending and would make a great play room for the kids, or a nice quiet place to relax in an evening.
You could also consider a garage conversion if you don’t use your garage for a car, but consider this carefully as it could affect the selling price later on.
Redecorate -Interior
It may seem obvious but redecorating is a relatively cheap way of improving your property, all houses need to be decorated from time to time as the décor gets tired and may suffer from the knocks and scratches of everyday life. Buying a tin of paint and painting a room can transfer how it looks, bringing it up to date by using a fashionable colour perhaps.
Adding wallpaper, even a feature wall can make a room more sophisticated and doesn’t have to cost the earth.
Redecorate – Exterior
The exterior of your house is just as important if not more so to maintain. Keeping the exterior paintwork such as fascia’s and soffits, doors and windows painted will keep the weather out and reduce the risk of them rotting.
Masonry also needs to be kept in good condition to stop damp from getting in.
Having a well maintained house gives a property great kerb appeal and could help sell a house.
Insulation
Sounds boring doesn’t it? But a well insulated house will have smaller energy bills than those houses with minimal or no insulation. Cavity walls and loft insulation can be done at any time and you may even be able to get a grant to help with the costs. If you haven’t got cavity walls you could line the walls with a thermal liner to reduce heat loss.
Upvc windows and doors with special coated glass will keep the cold out, look for the highest rated glass when you have them fitted. Also adding Upvc windows and doors is nowadays a great selling point as not only does it reduce the energy bills but also noise and or course there is no maintenance except cleaning them.
Tags: Bathroom, Building, Carpets, Exterior Decorating, Flooring, Gardening, Interior Decorating, Kitchen, Property, Storage, Wooden Flooring
Posted in Decorating Tips, Home Improvements | No Comments »
How to Install an Outdoor Tap
Posted by Adrian
May 20th, 2019
How to Install an Outdoor Tap
Outside taps are essential if you use a garden hose to water the garden, use a sprinkler, irrigation system or even just a pressure washer to clean the patio or car. If you have not already got one you may be thinking it is going to cost a lot of money to call a plumber in to do it. Well if you are confident enough you can fit an outside tap yourself by using an outside tap kit readily available in hardware stores.
In this post I will describe how to fit an outdoor tap but you can also watch the included video to see how it is done. As with all plumbing jobs, if you are not sure how to do it, call a professional plumber to give advice or do the job for you, you do not want to end up ankle deep in water.
If you buy an outdoor tap kit you will have everything you need to install the tap, including an isolator tap.
Tools required
You will need the following tools:
- An Outdoor Tap Kit
- Masonry Drill Bits (6mm and 16mm)
- Screwdrivers
- Adjustable spanner
- PTFE (thread tape)
- A Sharp Knife
Installing the water supply pipe
To install the water supply you need to connect to an existing copper water pipe. This is done by using a self cutting isolator tap to cut into the copper pipe. You should clean the copper pipe, remove any paint with a scraper or knife in the area you are going to install the isolator tap.
Remove the isolator tap from the clamp and attach the clamp to the copper pipe in the place you wish to have the isolator tap. Ensure the clamp seal washer is correctly in place before tightening the clamp to the copper pipe.
When the clamp is in place take the self cutting isolator tap and place it into the clamp hole making sure the isolator tap is turned off, be careful not to cross thread the tap, screw the isolator tap clockwise until the cutter has cut a hole into the copper pipe.
Once the isolator tap has cut a hole into the copper pipe you need to secure the tap by using the back nut onto the clamp. You can test the isolator tap now by turning it on, catch the water in a bucket, the turn the isolator tap off again.
Once you are happy the isolator tap is fitted OK and working, you can connect the water supply flexible hose to the end of the isolator tap.
You should now drill a 16mm hole through the wall if you are having an external tap, but if you are having the tap in say a garage you do not need to do this stage. If you are drilling a hole, do so now and push the water supply flexible hose through the hole.
You can now move on and fit the outdoor tap.
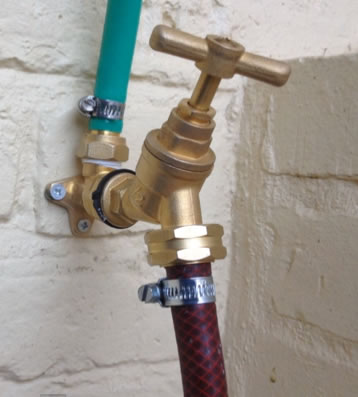
Installing the outdoor / garden tap
Once you have the water supply to the location of your outdoor tap you can then install the tap.
Take the backing plate / wall mounted connector, the water inlet and the tap and wrap some PTFE (thread tape) around the threads to ensure a watertight seal. Wrap the PTFE tape around the thread a few times of both the inlet and the tap. The screw the inlet onto the backing plate / wall mounted connector and use an adjustable spanner to tighten this onto the backing plate.
Now decide where you wish for the tap to be fixed to the wall, mark the holes using the backing plate and drill and rawl plug the holes, then screw the backing plate onto the wall.
You now need to cut the water supply flexible pipe to the correct length, you can cut the pipe with a sharp knife, once you have done this you can push the pipe onto the water inlet on the backing plate, secure the pipe using a hose (jubilee) clip.
Next you can screw the tap into the backing plate / wall mounted connector, tighten the tap into the connector with adjustable spanners.
Now the tap is fitted and you have the water supply connected up you can attach the hose adapter or whatever fitting you have for the tap.
Finally, you can turn on the isolator tap to allow water down the water supply hose and to the outdoor tap, then undo the tap and test the function of the tap.
You have just fitted an outdoor tap.
How to Install an Outdoor Tap video
Watch this video to see step by step stages of how to fit an outdoor / garden tap.
Tags: Exterior Tap, Garden Tap, Garden Tap Kit, Gardening, Irrigation System, Outdoor Tap, Outside, Plumber, Plumbing, Pressure Washer, Sprinkler, Tap
Posted in Home Improvements | 1 Comment »
Lining paper, what is it?
Posted by Adrian
April 30th, 2019
Lining paper, what is it?
Lining paper has been traditionally used to produce a good, sound, smooth surface for wallpapering over, however it is now more popular to hang lining paper and emulsion over it.
Lining paper is used to remove any small imperfections on a wall or ceiling, it is not however a miracle cure, so preparation should always be done before hanging lining paper. It isn’t a substitute for plastering either.
Once all the holes and cracks have been filled, the walls or ceiling should be properly rubbed down and any filler should be sanded smooth and level. One this is done dust down the walls to remove any loose debris. You can seal any filler by either using a ‘size’ such as watered down wallpaper paste, or you can emulsion over the filler to help seal it off.
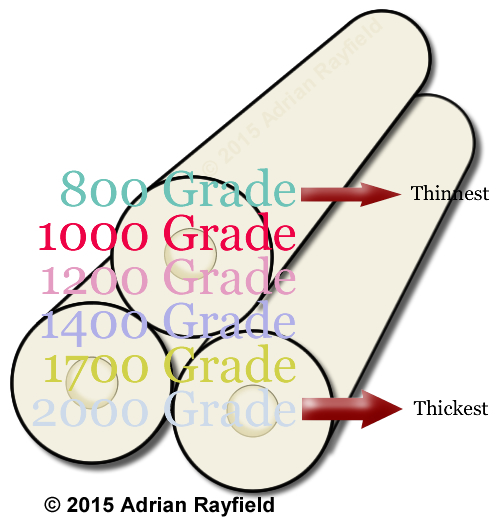
What thickness lining paper
Lining paper comes in different thicknesses, guages or grades, this refers to their weight. they start at 800 guage and go up to 2000 guage, it all depends on how thick you want it to be. Lining paper does offer some insulation qualities but there are also specialist papers for this.
A good mid-range lining paper to go for is 1200 or 1400 gauge, they aren’t too thin and not to thick to be hard to work with.
Can I paint lining paper
As mentioned above, lining paper is meant to produce a smooth background for wallpapering over, but yes you can paint over the lining paper once it is fully dried.
Cross lining, what’s that?
Cross-lining is where the lining paper is hung horizontally rather the vertically like traditional wallpapers, normally if you are going to be emulsioning over the lining paper you could hang it as you would wallpaper, vertically.
Once you have hung the lining paper you need to allow it to fully dry before you emulsion over it, this will take normally between 12 – 24 hours depending on drying conditions.
How to measure for lining paper
Before you buy lining paper or order wallpaper you need to know how much to buy, I have written an article on how to measure a room for wallpaper that explains how you need to do it. I have also written a wallpaper calculator so you can work out how many rolls of wallpaper you need to buy.
Cost of lining paper
With everyone having to tighten their belts these days, cost is a real factor when it comes to decorating, wallpaper can be very expensive if you plan to wallpaper the entire room, a way around this is to only do one wall, or a feature wall as it is known.
If however you wish to change the look of a room every couple of years, or you have pets or children that makes wallpaper not a viable option, lining paper and emulsion maybe the answer.
Once lining paper has been put up it can painted over and over again, saving costs in the long run as all that is required is a fresh new coat of emulsion. Also, if you then decide to wallpaper at a later date, you can do so over the emulsioned lining paper.
Tags: Cross lining, Emulsion, Feature Wall, Lining Paper, Paint, Wallpaper
Posted in Decorating Tips, Home Improvements, Resources | 3 Comments »