Painting, decorating and home improvement tips blog
Wallpapering a hall landing and stairs
Posted by Adrian
October 20th, 2010
How to wallpaper a hall landing and stairs
Firstly you need to measure the walls you are going to papering the downstairs hallway, upstairs landing and stairs/stairwell to work out how much paper you need to buy, our wallpaper calculator can be used for this job.
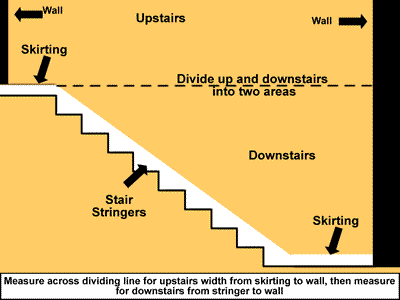
So how do you measure a hall, stairs and landing for wallpaper?
Well it’s not as hard as you may think. If you think of the upstairs and downstairs as two different rooms, splitting the stairwell wall into two parts. Imagine the skirting of the upstairs goes all the way across the stairwell wall and measure as you would normally.
You will use a lot of paper on the stair walls as there is a lot of wastage, especially if you have a pattern paper.
Now you know how much paper to buy, and have bought it, you can start to paper. So where do you start?
Where to start papering the hall, stairs and landing
You should start by hanging the longest sheet first down the stairwell, and working along one way until a corner. Mark the wall using a plumb line to ensure your paper is vertical, then measure your drop of paper ensuring you allow for the angle of the stair stringer, mark the paper at either side at the bottom allowing for trimming.
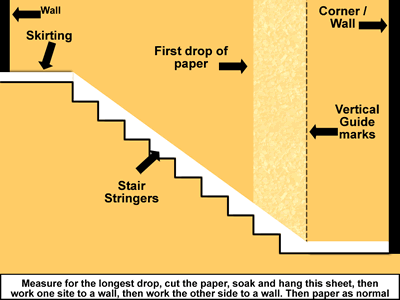
Take your roll and lay it on the paste table, then take a straight edge and draw a line joining the two marks up, you should have a diagonal line. Cut the paper as you normally would, then trim the paper along the diagonal line, this will save you getting paste all over the carpet when you hang the sheet.
Paste the sheet and allow to soak, and then hang the first drop. You should then take the roll of paper and line it up with the one you have just put up, unroll it and ensure any Patten is lined up, then mark and trim as before, continue doing this until you reach a corner, then do the same the other side of the longest drop until the other corner.
Once the longest drops are done you can work as you would for a normal room.
Tags: Hall stairs landing, Wallpaper, Wallpapering
Posted in Decorating Tips | 41 Comments »
How to paper a ceiling
Posted by Adrian
September 16th, 2010

How to paper a ceiling
Papering a ceiling can be a daunting thought for many people. I recently had to paper a ceiling with lining paper. The client required the existing paper to be removed, which was an Anaglypta.
After removing the paper, filling the cracks and giving the entire ceiling a good rub down I then re-papered it with 1400 gauge lining paper leaving a smooth flat surface in preparation for painting.
So how do you paper a ceiling?
If you have someone to help you it is an easier job but you can do it yourself.
Firstly you need to work out how many rolls of paper you need, to do this use our ceiling wallpaper calculator.
Next ensure the ceiling is prepared properly, do this by filling any cracks and holes, rubbing the ceiling down and ensuring any stains are blocked out first.
Next, measure the length of the room, for example the ceiling I did was just under 3.7 metres. I then cut the paper allowing enough for trimming at both ends, so in my case I cut the paper at 3.7 metres.
When you have cut the paper you need to mark a straight line or guide marks on the ceiling to follow to get the paper on straight. Measure the width of the paper, lining paper is 56cm wide. Allow for trimming and mark the ceiling from the wall with a pencil, I marked at 54cm allowing 2cm for trimming the edge.
If you have someone who can help you the best way is to mark the ceiling at each end and then use a chalk line to mark the ceiling.
Once you have done your guide marks on the ceiling you need to prepare the ladders or scaffolding etc that you will be using. Now you can paste the paper, make sure it is well pasted and you cover all the edges; fold the paper in a concertina style, allow the paper to soak until supple, for lining paper I allow 10 minutes.
When the paper is ready take the first concertina and put the edge against your guide marks or chalk line allow for trimming and the end also, hold the rest of the paper in one hand and brush out any bubbles. Then unfold the next concertina and smooth out, do this until you get to the end, you can then check the paper is on your marks, if not you should be able to slide the paper a bit until it is.
Next trim both of the ends and the edge.
If you have someone to help you get them to hold the concertinaed paper whilst you smooth out the bubbles and align the edge.
Once the first sheet is in place you can paste the next sheet and put this up, do this by again allowing enough for trimming and the end, butt the edge of the paper with the previous sheet and continue to the end. Carry on doing this until you have finished your ceiling, you then need to allow 24 hours for the paste to dry before painting.
You will no doubt have some sort of light fitting on your ceiling, when you get to this you will need to cut around it. Cut around in small sections removing the paper as you go. Ensure the electric supply is turned off before removing any part of a light fitting.
Tags: Ceiling, Lining Paper, Wallpaper, Wallpaper Calculator
Posted in Decorating Tips | 3 Comments »
Painting an up and over Steel Canopy garage door
Posted by Adrian
August 17th, 2010

How to paint an up and over Steel Canopy garage door
When over painting an up and over garage door you need to prepare the surface as you would any other surface.
Wash off any dirt and grit, then abrade the surface with sandpaper, I tend to use 80-grit for this. Key the surface all over including the bottom and sides.
Now you can dust off the door and undercoat with the appropriate colour undercoat.
I normally start by painting the two edges, but not the bottom of the door. Be careful when painting the edges of the door not to get any on the frame if the door is a different colour, lift the door up about half way, you can now paint the edges.
Next, if your door has horizontal sections start at the top working down, if the door has vertical sections start from one side working across, if the door has panels do these first and then paint the rest of the door.
When I paint either a door with horizontal or vertical sections I do the same thing, I paint the groove first, then the panel, then paint the next groove and then the panel and so on, then with the last panel I paint the bottom of the door.
When the undercoat is dry do the same procedure as before but with your chosen topcoat.
When you topcoat, work fast, that way the paint flows nicely and you can put a good amount on. As you paint the door lift it up as you go, it’s far easier; you don’t have to bend down and the paint wont run!
Finally, when you’re done lift the door all the way up, this serves two purposes, firstly the paint won’t run and will flow well, and secondly it stops insects, dust and dirt blowing over the wet paint on the door as most of it is in the garage.
Be aware of rain though, if the door is left up and it rains the rain will lay on the door and ruin your paint.
Tags: Garage Door, Paint, Painting, Steel Canopy Garage Door, Up and Over
Posted in Decorating Tips | 3 Comments »