Painting, decorating and home improvement tips blog
How to Install an Outdoor Tap
Posted by Adrian
May 20th, 2019
How to Install an Outdoor Tap
Outside taps are essential if you use a garden hose to water the garden, use a sprinkler, irrigation system or even just a pressure washer to clean the patio or car. If you have not already got one you may be thinking it is going to cost a lot of money to call a plumber in to do it. Well if you are confident enough you can fit an outside tap yourself by using an outside tap kit readily available in hardware stores.
In this post I will describe how to fit an outdoor tap but you can also watch the included video to see how it is done. As with all plumbing jobs, if you are not sure how to do it, call a professional plumber to give advice or do the job for you, you do not want to end up ankle deep in water.
If you buy an outdoor tap kit you will have everything you need to install the tap, including an isolator tap.
Tools required
You will need the following tools:
- An Outdoor Tap Kit
- Masonry Drill Bits (6mm and 16mm)
- Screwdrivers
- Adjustable spanner
- PTFE (thread tape)
- A Sharp Knife
Installing the water supply pipe
To install the water supply you need to connect to an existing copper water pipe. This is done by using a self cutting isolator tap to cut into the copper pipe. You should clean the copper pipe, remove any paint with a scraper or knife in the area you are going to install the isolator tap.
Remove the isolator tap from the clamp and attach the clamp to the copper pipe in the place you wish to have the isolator tap. Ensure the clamp seal washer is correctly in place before tightening the clamp to the copper pipe.
When the clamp is in place take the self cutting isolator tap and place it into the clamp hole making sure the isolator tap is turned off, be careful not to cross thread the tap, screw the isolator tap clockwise until the cutter has cut a hole into the copper pipe.
Once the isolator tap has cut a hole into the copper pipe you need to secure the tap by using the back nut onto the clamp. You can test the isolator tap now by turning it on, catch the water in a bucket, the turn the isolator tap off again.
Once you are happy the isolator tap is fitted OK and working, you can connect the water supply flexible hose to the end of the isolator tap.
You should now drill a 16mm hole through the wall if you are having an external tap, but if you are having the tap in say a garage you do not need to do this stage. If you are drilling a hole, do so now and push the water supply flexible hose through the hole.
You can now move on and fit the outdoor tap.
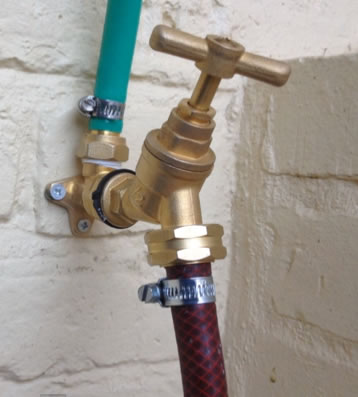
Installing the outdoor / garden tap
Once you have the water supply to the location of your outdoor tap you can then install the tap.
Take the backing plate / wall mounted connector, the water inlet and the tap and wrap some PTFE (thread tape) around the threads to ensure a watertight seal. Wrap the PTFE tape around the thread a few times of both the inlet and the tap. The screw the inlet onto the backing plate / wall mounted connector and use an adjustable spanner to tighten this onto the backing plate.
Now decide where you wish for the tap to be fixed to the wall, mark the holes using the backing plate and drill and rawl plug the holes, then screw the backing plate onto the wall.
You now need to cut the water supply flexible pipe to the correct length, you can cut the pipe with a sharp knife, once you have done this you can push the pipe onto the water inlet on the backing plate, secure the pipe using a hose (jubilee) clip.
Next you can screw the tap into the backing plate / wall mounted connector, tighten the tap into the connector with adjustable spanners.
Now the tap is fitted and you have the water supply connected up you can attach the hose adapter or whatever fitting you have for the tap.
Finally, you can turn on the isolator tap to allow water down the water supply hose and to the outdoor tap, then undo the tap and test the function of the tap.
You have just fitted an outdoor tap.
How to Install an Outdoor Tap video
Watch this video to see step by step stages of how to fit an outdoor / garden tap.
Tags: Exterior Tap, Garden Tap, Garden Tap Kit, Gardening, Irrigation System, Outdoor Tap, Outside, Plumber, Plumbing, Pressure Washer, Sprinkler, Tap
Posted in Home Improvements | 1 Comment »
Lining paper, what is it?
Posted by Adrian
April 30th, 2019
Lining paper, what is it?
Lining paper has been traditionally used to produce a good, sound, smooth surface for wallpapering over, however it is now more popular to hang lining paper and emulsion over it.
Lining paper is used to remove any small imperfections on a wall or ceiling, it is not however a miracle cure, so preparation should always be done before hanging lining paper. It isn’t a substitute for plastering either.
Once all the holes and cracks have been filled, the walls or ceiling should be properly rubbed down and any filler should be sanded smooth and level. One this is done dust down the walls to remove any loose debris. You can seal any filler by either using a ‘size’ such as watered down wallpaper paste, or you can emulsion over the filler to help seal it off.
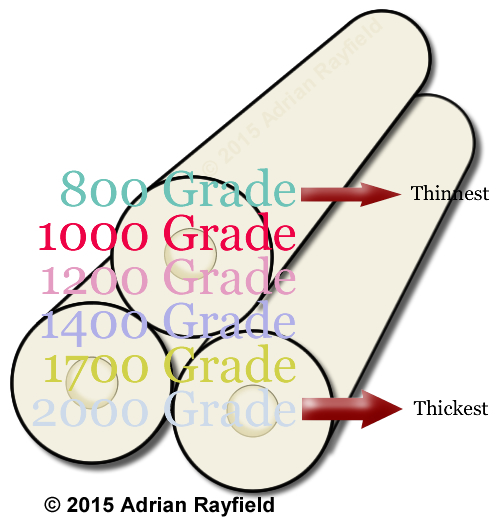
What thickness lining paper
Lining paper comes in different thicknesses, guages or grades, this refers to their weight. they start at 800 guage and go up to 2000 guage, it all depends on how thick you want it to be. Lining paper does offer some insulation qualities but there are also specialist papers for this.
A good mid-range lining paper to go for is 1200 or 1400 gauge, they aren’t too thin and not to thick to be hard to work with.
Can I paint lining paper
As mentioned above, lining paper is meant to produce a smooth background for wallpapering over, but yes you can paint over the lining paper once it is fully dried.
Cross lining, what’s that?
Cross-lining is where the lining paper is hung horizontally rather the vertically like traditional wallpapers, normally if you are going to be emulsioning over the lining paper you could hang it as you would wallpaper, vertically.
Once you have hung the lining paper you need to allow it to fully dry before you emulsion over it, this will take normally between 12 – 24 hours depending on drying conditions.
How to measure for lining paper
Before you buy lining paper or order wallpaper you need to know how much to buy, I have written an article on how to measure a room for wallpaper that explains how you need to do it. I have also written a wallpaper calculator so you can work out how many rolls of wallpaper you need to buy.
Cost of lining paper
With everyone having to tighten their belts these days, cost is a real factor when it comes to decorating, wallpaper can be very expensive if you plan to wallpaper the entire room, a way around this is to only do one wall, or a feature wall as it is known.
If however you wish to change the look of a room every couple of years, or you have pets or children that makes wallpaper not a viable option, lining paper and emulsion maybe the answer.
Once lining paper has been put up it can painted over and over again, saving costs in the long run as all that is required is a fresh new coat of emulsion. Also, if you then decide to wallpaper at a later date, you can do so over the emulsioned lining paper.
Tags: Cross lining, Emulsion, Feature Wall, Lining Paper, Paint, Wallpaper
Posted in Decorating Tips, Home Improvements, Resources | 3 Comments »
Spring clean – Cleaning your garden furniture
Posted by Adrian
April 20th, 2019
Spring clean – Cleaning your garden furniture
After the long cold winter we have just endured the garden looks a little worse for wear, but now we are getting some warmer spring like days it is the perfect time to get out into the garden. Apart from cutting back and pulling out the winter bedding plants and cutting the knee length grass, the garden furniture (unless kept in a shed or garage) will be in need of some tender loving care.
If you have plastic garden furniture you will have less work to do, if you have wooden furniture it does need looking after and the spring is the ideal time to do it, ready for the summer.
Plastic and metal garden furniture
If you have plastic or metal garden furniture all you really need to do is either pressure wash them off and dry them or use a bucket of warm soapy water and a sponge or cloth to wipe them over and remove the ground in winter dirt and grime. Check for condition, and check for rust on metal furniture and treat as required.
Wooden garden furniture
If you have wooden garden furniture you need to spend a little time cleaning and protecting them. A lot of garden furniture is simply oiled with teak oil to protect them from the elements. Some furniture may be painted or stained, but whatever they are protected with, a good clean is needed first.
Ideally a pressure washer is the perfect tool for the job, a quick blast from one of these and you will remove the grime, once you have washed the furniture down, let it dry before doing anything else to it. If you do not have a pressure washer, a bucket of warm soapy water and a nail brush and then a good rinse will do.
Check the condition of the furniture, has any of the seat slats rotted over the winter, if so you will need to replace them. The last thing you want is the mother-in-law to come round for a barbecue and sit on a chair and fall through it!
Once any repairs have been carried out you can get on with protecting the furniture, if you have stained wood give it a light rub down with sandpaper before coating it, if the furniture is painted a colour, with a gloss for example, you should treat this as you were painting any wood on your house. Give it a rub down, an undercoat and then a topcoat.
If you have furniture that is oiled rather than stained or painted, allow to dry after washing and rub it down to remove any ‘furry’ bits. Once it is smooth you can oil it with an oil such as teak oil, use a rag to apply the oil, leave to soak in and then apply another coat. Apply 3-4 coats for good penetration and protection. Allow 24 hours to dry before using the furniture.
Once you have cleaned your garden furniture you’re set for the summer. When it comes to the winter, if you have the space it is always best to put the furniture in a shed or garage but if this is not possible consider covering it up for the winter, it will mean one less job for next spring.

Tags: Garden Furniture, Metal Furniture, Plastic Furniture, Pressure Washer, Teak Oil, Wooden Furniture
Posted in Decorating Tips, Home Improvements | No Comments »