Painting, decorating and home improvement tips blog
DIY jobs – The right tool for the job
Posted by Adrian
November 26th, 2020

DIY jobs – The right tool for the job
When it comes to tackling DIY jobs it is best to be planned and prepared, whether it be a building job, gardening, a simple handyman job, plumbing or woodworking job, it is best to be prepared with the correct tools. By using the wrong tool for the job you run the risk of personal injury, damaging equipment or the job you are working on, and more often than not using the wrong tool makes the job harder to do and makes the job take longer to complete.
The right tools for the job
It maybe an old saying and a bit of a cliche but, by having the right tool for the job, will make the job far easier, safer and produce a far superior job. Rather than struggling without the correct tools and in an unsafe way and finishing up with a botched job that you’ll more than likely end having to redo, or calling in a professional to do the job properly for you.
A clean workspace is a safe workspace
If you have a clean environment to work in, without clutter and dangerous hazards such as extension leads and tools all over the floor, the DIY job will be a far safer place to work and a easier place to work, so you will enjoy doing some DIY rather than hate it and shudder at the thought of any DIY tasks. It doesn’t take long to move stuff out of the way and tidy up.
Be prepared
Take time to think about the job, gather the tools you will need, remove any dangers (this includes small children and pets) from your work area. Think about how you are going to do the job, have you got everything that you require to complete the job, the last thing you want to do is have to rush out and buy something in the middle of the job.
If you are doing a plumbing job don’t forget to turn off any water supply before removing taps or cutting pipes. Make sure electrical supplies are turned off before touching wires or removing socket faceplates.
Gardening
If you decide to do a DIY job in the garden you should still think about the right tool for the job, and of course safety, such as using an extension lead with a RCD plug (residual-current device) so that if you run over it with the mover the power will be cut immediately.
Power tools
Lets face it we all love power tools, right? Well in the wrong hands they can cause serious injury and damage. However, having the correct power tool for the job will again make life easier, quicker and far more enjoyable.
Your stories
If you have any stories you would like to share, please do so in the comment box below. We would love to hear them,
Tags: Decorating, DIY, Gardening, Painting, Plumbing, Power Tool, Woodwork
Posted in Home Improvements | No Comments »
How to bleed a radiator
Posted by Adrian
February 11th, 2020
How to bleed a radiator
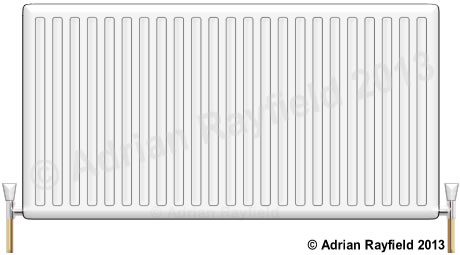
If you have central heating and radiators you will from time to time need to bleed them. This basically means allowing any build up of air out of the system and allow that space to be filled with water.
If you do not bleed the system you will get cold areas within the radiator and the system will not be as efficient and you will not be getting the full heat out of the system.
How can I tell if I need to bleed my radiators
You can tell if you need to bleed your radiators simply by feeling them once they have been on for a while, the radiator will feel cooler at the top than the bottom, mostly the air will be at the top of the radiators, but you may feel cooler spots lower down also. If you find cooler areas more than likely this will be air which doesn’t get as hot as the water so therefore is cooler. If this is what you find, bleed the radiators.
How do I bleed my radiators
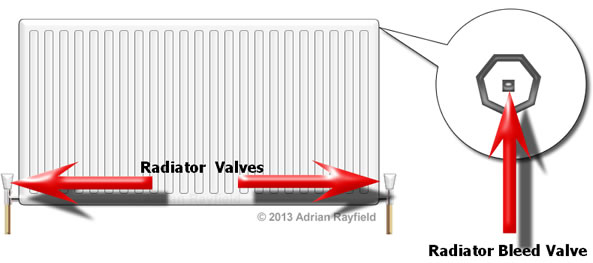
This is a quick and easy job, firstly open up all the radiator valves fully, including thermostatic ones, then run the system for around 10 minutes and then turn the system off. You will then need a radiator bleed valve key and a cloth. If you haven’t got a bleed valve key, they can be bought cheaply at a hardware store.
Go around all radiators and open slightly the bleed valve by turning anti-clockwise, this will be located at the top of each radiator and on one edge. Depending on the age of the radiator you may have a small plastic end over the bleed valve, this will direct the water away from the wall. Make sure this is facing away from the wall if not turn it so that it is, you could aim it into a bucket before opening the bleed valve.
Carefully open the valve slightly with the valve key, air should then come out, keep the valve open until water comes out then shut the valve by turning clockwise. Hold the cloth around the bleed valve as you do this to catch any water.
Once you have done this to all radiators you may have to check the pressure of the boiler by looking at the gauge, if the pressure has dropped you may have to ‘top up’ the pressure. This is normally done by opening a tap on the boiler until the correct pressure is reached. To top up the boiler open the tap on the filling Loop, check the boiler handbook to find out how to do this.
If you find that after you have bled the radiators the radiators nearer the boiler are hotter than those furthest away, this means the radiators aren’t balanced and you may have to turn the valves down on the radiators near the boiler and leave the ones furthest away fully open, this will allow the water to reach the furthest away radiators before cooling down.

Top Tip : If the bottom of the radiators are cold, this could be due to a build up of sludge and rust, this needs solving by draining the system down and flushing it all through. If you are unsure call a plumber / heating engineer.
Tags: Bleed, Boiler, Central Heating, DIY, Handyman, heating, Plumbing, Radiator, Valve
Posted in Home Improvements | No Comments »
How to fix squeaky floorboards
Posted by Adrian
September 23rd, 2019
How to fix squeaky and creaking floorboards
You know how it is, you creep home late at night and head up to bed trying not to wake the family, then squeak the floorboards make a noise like the floor is falling through and wakes the family, not a good scenario but one fairly common I would guess.

If you suffer from squeaky and creaking floorboards it can not only wake the family as I jokingly mentioned above it can just be annoying. Well thankfully it isn’t too much of a problem to fix them for any handyman or DIY enthusiast.
What causes squeaky floorboards
Squeaky floorboards are caused mainly by badly fitting boards. If the boards are taken up to run electrical cables or pipework and are not put back properly, or the boards nailed back using the old nails in the old nail holes which means the nails don’t have a tight fit on the board and allow for them to move and squeak. Sometimes the end of the boards are not sitting on a joist and can move rubbing against the floorboards next to it.
Another reason for squeaky floorboards is simply that the boards have dried out and the nails are no longer holding the board down tight enough or the boards have moved and are rubbing together, whatever the reason you should be able to fix the problem.
How to fix squeaky floorboards
The first thing to do is to remove the floor covering, or part of it if you can’t fully clear the room. Once the floor covering has been removed you need to tread the boards, walk around and identify the squeaks and creaks and mark the boards where the noise is with a pencil. Do this over the entire floor.
Now go back and look at each mark you have made and identify what the problem is, for just boards that are rubbing together, you can either remove a board and plane a little off the edge, or try adding some talcum powder or chalk dust between the two rubbing boards to help movement between the two boards.
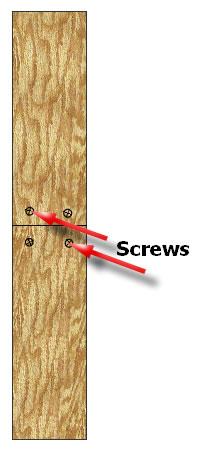
If the boards seem to be moving around the nails at the end of the boards, you need to screw these down. Don’t just put a screw in though as you may go through an electrical cable or a pipe, you may have to lift the board to see what is underneath first. Remove the nails and drill pilot holes next too the old nail holes so not to split the wood and then put a screw in making sure it pulls the board down tight.
If the board is split at the end, you may have to replace that board, or you may be able to lift it and turn it round so the other end is under the skirting board.
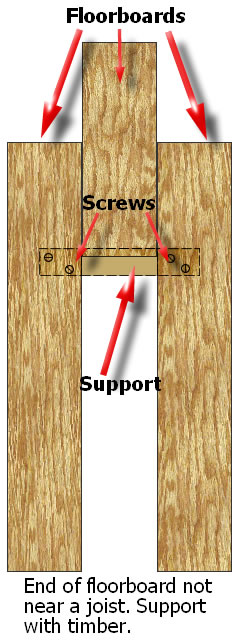
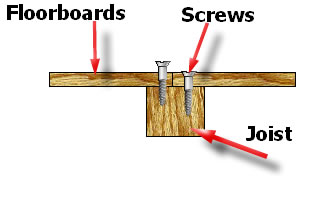
If the end of the board isn’t supported on a joist you will have to lift the board and put in a support. This can be done by lifting the unsupported board and fitting a length of 2×1 (50mm x 25mm) under the boards, ideally fixing it to a joist with screws. If a joist isn’t near, screw through the floorboards under either side of the unsupported one fixing the support to the underside of the boards, then re-fix the previously unsupported board and screw this board into the timber support you have fitted.
Do I need a new floor
Depending on how the floorboards have been lifted and cut will depend on if you need to replace boards or not, as mentioned above you may be able to lift a board and turn it around so the damaged end goes under the skirting, or even under furniture that doesn’t move. On the whole squeaky and creaking floorboards can be rectified.
How to lift floorboards
To lift floorboards you can use a club hammer and a wide bladed chisel such as a cold chisel or by using a crowbar. Prise the board up from one side then the other, be careful not to split the board, once you have the board slightly lifted up lay a piece of timber underneath to hold the end up and continue working along the board and moving the timber support as you go. If the floorboards are tongue and groove, you will need to cut the tongue off first in order not to damage the grove on the board next to it.
Safety First
Always remember to check under the floorboards for pipework and electrical cables before nailing or screwing down the floorboards, this will avoid driving a nail or screw through them. It is always a good idea to mark on the floorboards where the cables and pipes run under the floor, you can do this by using a pencil or better still a permanent marker pen. By marking the floor you will know where the cables and pipes run if you remove the floor covering or wish to run new pipework or cables in the future.
Tags: Cables, Chisel, Club Hammer, Creaking, DIY, Electrical, Floorboards, Flooring, Handyman, Nails, Pipes, Pipework, Plumbing, Squeaking, Woodwork
Posted in Home Improvements | No Comments »