Painting, decorating and home improvement tips blog
Ceiling wallpaper calculator
Posted by Adrian
November 16th, 2009
 After the success of our wallpaper calculator we have now developed a ceiling wallpaper calculator which is now live.
The ceiling wallpaper calculator is very similar to the wallpaper calculator so it is easy and fast to use; we have also included our feet to metre converter for you convenience.
As always, we welcome your comments.
Coming soon………
The Paint calculator
Tags: Calculator, Converter, Measure, Updates, Wallpaper, Wallpaper Calculator
Posted in Decorating Tips, News | No Comments »
New photo lightbox Gallery added
Posted by Adrian
November 2nd, 2009
We have added a new photo gallery, it is a ‘lightbox’ style gallery. This will give us more scope to add many more images over time.
We now also have split the gallery into two sections, an interior and an exterior section, making it easier and more organised.
The new gallery can be found at https://www.propertydecorating.co.uk/gallery.php
Tags: Exterior, Gallery, Interior, Photos, Pictures
Posted in News | No Comments »
How to paint a flush door
Posted by Adrian
November 1st, 2009
Painting a flush door
This tip applies to both interior and exterior flush doors. Flush doors have no panels on them so you may find it easier and quicker to use a gloss roller to paint the door, see the note at the end of this tip.
The first job is to remove the door furniture such as handles, letterbox, knocker etc, now cover the floor. The next job is to remove any loose paint as well as any dirt and grime. Next rub the door down, depending on the surface you are painting over and its condition 80-grit sandpaper will be fine. Rub down, going in the direction of the grain.
Once you have ‘keyed’ the surface with the sand / glass paper dust off the surface. If the door has any bare wood showing you will need to use the appropriate primer. Once the primer is dry you can paint the door with a suitable undercoat, finally the finish coat (woodstain, gloss or satinwood etc) of your choice.
So what order do I paint the flush door?
OK, here is the order to paint your flush door:
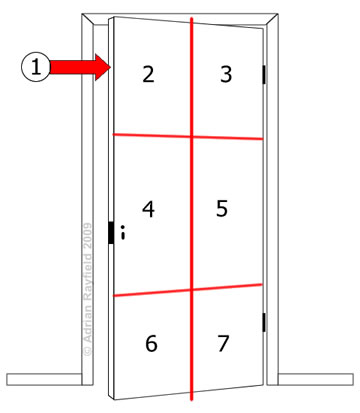
If you imagine the door split up into sections, say 6 sections. (Shown as red line in diagram). You may want to work in smaller sections, so divide the door into 8 sections. You should work quickly and complete the door in one go.
- Paint the door edge, you should always paint the edge you will see if the door is open. Number 1 in diagram. If it is an exterior door you should also paint the top of the door, and the bottom if you can.
- Paint the first two sections. Numbers 2 and 3 in the diagram.
- Paint the next two sections. Numbers 4 and 5 in the diagram. Blend the paint of section 2 and 4 with long brush strokes, do the same for section 3 and 5.
- Finally paint the two remaining sections. Numbers 6 and 7 in diagram. Blend the sections as before.
- If you are using gloss, check to ensure the paint hasn’t run, if there are runs simply brush them out.
- You should now have a newly painted door!
NOTES:
If you are using a gloss roller, work in the same way as above and when the entire door is covered, roll from top to bottom across the door, then do it again but this time without applying any preasure to the roller, this should eliminate any ‘air’ bubbles the roller may have left.
Tags: Door, External Door, Flush door, Gloss roller, Internal Door, Painting
Posted in Decorating Tips | 1 Comment »