Painting, decorating and home improvement tips blog
Painting over varnished wood
Posted by Adrian
March 14th, 2012
Preparing to paint over varnish or old stained wood
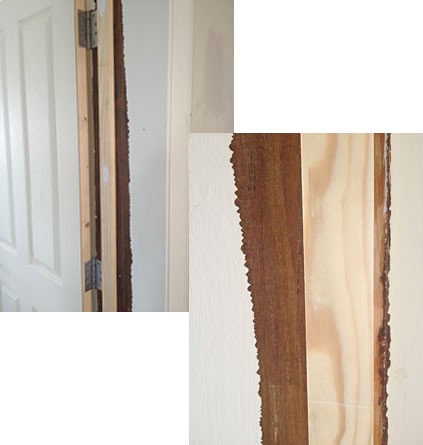
I recently did a job that had new fire doors installed and because of this new door stops also had to be fitted, when the stops were fitted the paint came away with the old door stops. The paint had been applied over stained and varnished wood. You may have this in your home if it’s old enough, does the paint chip easily and reveal dark wood underneath? More than likely you have varnish or stained wood and painted over without the proper preparation. As you can see by the following picture it looked a bit of a mess.
The paint hadn’t adhered to the varnish underneath and simply flacked off, as you can see by the following quick video it wasn’t too much of a job to scrape the paint off due to lack of preparation when the varnish was painted over.
The following image shows the paint removed and prepared ready for the first coat of primer.
Tags: BIN, Door, Paint, Painting, Primer, Satinwood, Varnish, Zinsser
Posted in Decorating Tips, Video | 2 Comments »
Getting a professional finish – a quick guide to gloss work
Posted by Adrian
June 1st, 2011
Getting a professional finish – a quick guide to gloss work
When you are painting gloss paintwork many people find they end up with brush marks in the final dried paintwork. This could be due to a couple of reasons.
I have been asked, how come I don’t get lots of brush marks, runs or dirt in my gloss work.
Preparation, Brushes and Paint
Firstly, your preparation is vital and shouldn’t be overlooked. You may find my post on Decoration and Preparation of interest.
Also you need to use a good quality brush, many cheaper brushes can be too wiry and stiff which can cause brush marks in the wet gloss.
Another thing to consider is to use a good quality gloss paint; many top brands will flow well as you apply the gloss to the woodwork eliminating brush strokes as it dries. Cheaper brands or solid non-drip type gloss can be a bit thick to apply and may not flow that well.
Applying the Gloss Paint
The other thing you need to consider is how you apply the gloss, you need to put enough on but not so much the gloss runs. This comes with experience and knowing the products you are using.
Once you have applied the gloss, use the brush to go over the area you have just painted with long strokes with an unloaded brush, this will help spread the gloss more evenly. Once you have done this, go over the area again with the unloaded brush with even lighter strokes until you are barely toughing the paint.
If you follow these basic steps your gloss work should look more like a professional has done it.
Be aware that if you are painting gloss paint and it is in a damp atmosphere, such as outside, you may get a ‘bloom’ (a dullness) over it by the next day and the sheen will be gone, and you will have to re-paint it. To avoid this, don’t paint gloss in a damp atmosphere of too early or too late in the year when the damp can affect your paint.
Please note: This post refers to oil based gloss paint and not water based gloss paint, although the principles are the same, drying times and how it acts differ.
Tags: brush, Gloss, Oil-based paint, Paint, Paintbrushes, water-based paints
Posted in Decorating Tips | 4 Comments »
Painting an up and over Steel Canopy garage door
Posted by Adrian
August 17th, 2010

How to paint an up and over Steel Canopy garage door
When over painting an up and over garage door you need to prepare the surface as you would any other surface.
Wash off any dirt and grit, then abrade the surface with sandpaper, I tend to use 80-grit for this. Key the surface all over including the bottom and sides.
Now you can dust off the door and undercoat with the appropriate colour undercoat.
I normally start by painting the two edges, but not the bottom of the door. Be careful when painting the edges of the door not to get any on the frame if the door is a different colour, lift the door up about half way, you can now paint the edges.
Next, if your door has horizontal sections start at the top working down, if the door has vertical sections start from one side working across, if the door has panels do these first and then paint the rest of the door.
When I paint either a door with horizontal or vertical sections I do the same thing, I paint the groove first, then the panel, then paint the next groove and then the panel and so on, then with the last panel I paint the bottom of the door.
When the undercoat is dry do the same procedure as before but with your chosen topcoat.
When you topcoat, work fast, that way the paint flows nicely and you can put a good amount on. As you paint the door lift it up as you go, it’s far easier; you don’t have to bend down and the paint wont run!
Finally, when you’re done lift the door all the way up, this serves two purposes, firstly the paint won’t run and will flow well, and secondly it stops insects, dust and dirt blowing over the wet paint on the door as most of it is in the garage.
Be aware of rain though, if the door is left up and it rains the rain will lay on the door and ruin your paint.
Tags: Garage Door, Paint, Painting, Steel Canopy Garage Door, Up and Over
Posted in Decorating Tips | 3 Comments »