Painting, decorating and home improvement tips blog
Painting an up and over Steel Canopy garage door
Posted by Adrian
August 17th, 2010

How to paint an up and over Steel Canopy garage door
When over painting an up and over garage door you need to prepare the surface as you would any other surface.
Wash off any dirt and grit, then abrade the surface with sandpaper, I tend to use 80-grit for this. Key the surface all over including the bottom and sides.
Now you can dust off the door and undercoat with the appropriate colour undercoat.
I normally start by painting the two edges, but not the bottom of the door. Be careful when painting the edges of the door not to get any on the frame if the door is a different colour, lift the door up about half way, you can now paint the edges.
Next, if your door has horizontal sections start at the top working down, if the door has vertical sections start from one side working across, if the door has panels do these first and then paint the rest of the door.
When I paint either a door with horizontal or vertical sections I do the same thing, I paint the groove first, then the panel, then paint the next groove and then the panel and so on, then with the last panel I paint the bottom of the door.
When the undercoat is dry do the same procedure as before but with your chosen topcoat.
When you topcoat, work fast, that way the paint flows nicely and you can put a good amount on. As you paint the door lift it up as you go, it’s far easier; you don’t have to bend down and the paint wont run!
Finally, when you’re done lift the door all the way up, this serves two purposes, firstly the paint won’t run and will flow well, and secondly it stops insects, dust and dirt blowing over the wet paint on the door as most of it is in the garage.
Be aware of rain though, if the door is left up and it rains the rain will lay on the door and ruin your paint.
Tags: Garage Door, Paint, Painting, Steel Canopy Garage Door, Up and Over
Posted in Decorating Tips | 3 Comments »
Lead flashing
Posted by Adrian
July 24th, 2010
Why not to paint lead flashing
I’ve been working on exterior houses over the past few weeks and I thought I would share this tip with you.
Whilst painting the exterior of a house, many jobs include the painting of the lead flashing, because the paint on the lead has started to peel. Many houses have lead flashing either under the windows or maybe along the roof of a conservatory.
One of the reasons why the paint peels off of lead is because the lead oxidises, this means the lead has a chemical reaction with the oxygen in the air, this lifts the paint and leaves a white powder on the surface of the lead. Another reason for paint peeling is the lead expands and contracts with the heat, this can crack the paint allowing moisture or water in and lifting the paint.
If your lead flashing has been painted it can be a long job cleaning it all off which is why most people re-paint the lead.
If you do repaint the lead, remove all the loose flaky paint and any white powder substance, which is the oxidisation. Next use a flexible undercoat and topcoat, such as Dulux Weathershield undercoat and gloss, I have found this lasts OK, although not forever.
What you should do with lead flashing.
If you have new or unpainted lead please don’t start to paint it! The best solution is not to paint it and to use an oil to treat the lead; this will keep it supple and stop it from cracking.
The best oil’s to use are one of the following, Patination Oil, WD40 or 3in1 oil, all are widely available from hardware shops or builders merchants.
Simply take a cloth, tip some oil onto the cloth and then work it into the lead, you will notice the lead becomes darker as the lead absorbs some of the oil. Continue doing this until you’re happy with the result. Your lead will now look good, be able to breath and be supple to stop it from drying out and cracking.
You will need to re-apply the oil when the lead is starting to look a light grey or just a little bit weathered. If you stick with this method your lead will last for years and you don’t have to worry about paint peeling off it ever!
Tags: Dulux, Lead, Lead Flashing, Oil, Paint, Weathershield
Posted in Decorating Tips | 46 Comments »
Feature Walls : How To Wallpaper A Fire Breast Wall
Posted by Adrian
July 3rd, 2010
Feature Walls : How To Wallpaper A Fire Breast Wall
As wallpaper can be expensive it is very popular nowadays to have a feature / accent wall to give interest to a room without breaking the bank!
Fire breast feature wallpapering
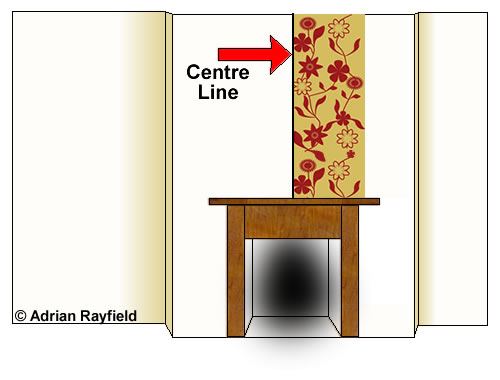
The first thing you need to do once you have decided to wallpaper your fire breast or fire breast wall is to work out how much wallpaper you will require, by measuring the wall and using our wallpaper calculator for this.
Next you need to work out the centre of the breast, do this by measuring across the width and divide it by two. Next mark the centre and draw a straight line from top to bottom. This is your centre line to work from.
Now you need to take the width of the paper and work out where you need to start.
This will be either with the edge of the paper on the centre line or the centre of the sheet across the centre line. The aim of this is to make sure you don’t end up with a sheet finishing on the external corner, or a sheet not leaving enough to go around the corner for the next sheet you butt up to. If the edge of the sheet is to close to an external corner it may not stick very well and be difficult to join your paper, especially if the corner runs out (i.e. the corner is not vertical).
Like all wallpapering jobs, you need to work out where to start before you actually put paper on the walls. Once you have worked out all the measurements and decided where your first sheet needs to go you can start to paper. As always, follow the manufactures guidelines and soaking times.
It is up to you if you wish to just paper the fire breast or continue doing the walls either side of the breast.
Tags: Feature Wall, Fire Breast, Wallpaper, Wallpaper Calculator
Posted in Decorating Tips | 1 Comment »