Painting, decorating and home improvement tips blog
How to Install an Outdoor Tap
Posted by Adrian
May 20th, 2019
How to Install an Outdoor Tap
Outside taps are essential if you use a garden hose to water the garden, use a sprinkler, irrigation system or even just a pressure washer to clean the patio or car. If you have not already got one you may be thinking it is going to cost a lot of money to call a plumber in to do it. Well if you are confident enough you can fit an outside tap yourself by using an outside tap kit readily available in hardware stores.
In this post I will describe how to fit an outdoor tap but you can also watch the included video to see how it is done. As with all plumbing jobs, if you are not sure how to do it, call a professional plumber to give advice or do the job for you, you do not want to end up ankle deep in water.
If you buy an outdoor tap kit you will have everything you need to install the tap, including an isolator tap.
Tools required
You will need the following tools:
- An Outdoor Tap Kit
- Masonry Drill Bits (6mm and 16mm)
- Screwdrivers
- Adjustable spanner
- PTFE (thread tape)
- A Sharp Knife
Installing the water supply pipe
To install the water supply you need to connect to an existing copper water pipe. This is done by using a self cutting isolator tap to cut into the copper pipe. You should clean the copper pipe, remove any paint with a scraper or knife in the area you are going to install the isolator tap.
Remove the isolator tap from the clamp and attach the clamp to the copper pipe in the place you wish to have the isolator tap. Ensure the clamp seal washer is correctly in place before tightening the clamp to the copper pipe.
When the clamp is in place take the self cutting isolator tap and place it into the clamp hole making sure the isolator tap is turned off, be careful not to cross thread the tap, screw the isolator tap clockwise until the cutter has cut a hole into the copper pipe.
Once the isolator tap has cut a hole into the copper pipe you need to secure the tap by using the back nut onto the clamp. You can test the isolator tap now by turning it on, catch the water in a bucket, the turn the isolator tap off again.
Once you are happy the isolator tap is fitted OK and working, you can connect the water supply flexible hose to the end of the isolator tap.
You should now drill a 16mm hole through the wall if you are having an external tap, but if you are having the tap in say a garage you do not need to do this stage. If you are drilling a hole, do so now and push the water supply flexible hose through the hole.
You can now move on and fit the outdoor tap.
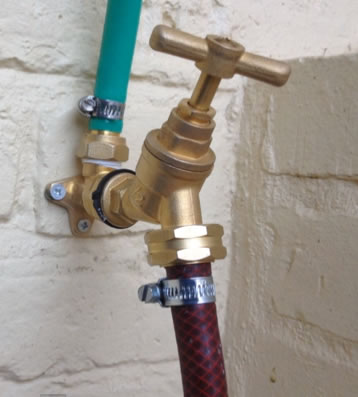
Installing the outdoor / garden tap
Once you have the water supply to the location of your outdoor tap you can then install the tap.
Take the backing plate / wall mounted connector, the water inlet and the tap and wrap some PTFE (thread tape) around the threads to ensure a watertight seal. Wrap the PTFE tape around the thread a few times of both the inlet and the tap. The screw the inlet onto the backing plate / wall mounted connector and use an adjustable spanner to tighten this onto the backing plate.
Now decide where you wish for the tap to be fixed to the wall, mark the holes using the backing plate and drill and rawl plug the holes, then screw the backing plate onto the wall.
You now need to cut the water supply flexible pipe to the correct length, you can cut the pipe with a sharp knife, once you have done this you can push the pipe onto the water inlet on the backing plate, secure the pipe using a hose (jubilee) clip.
Next you can screw the tap into the backing plate / wall mounted connector, tighten the tap into the connector with adjustable spanners.
Now the tap is fitted and you have the water supply connected up you can attach the hose adapter or whatever fitting you have for the tap.
Finally, you can turn on the isolator tap to allow water down the water supply hose and to the outdoor tap, then undo the tap and test the function of the tap.
You have just fitted an outdoor tap.
How to Install an Outdoor Tap video
Watch this video to see step by step stages of how to fit an outdoor / garden tap.
Tags: Exterior Tap, Garden Tap, Garden Tap Kit, Gardening, Irrigation System, Outdoor Tap, Outside, Plumber, Plumbing, Pressure Washer, Sprinkler, Tap
Posted in Home Improvements | 1 Comment »
Putting up fencing
Posted by Adrian
March 24th, 2019
How to erect fencing
If you are planning to put up a new fence or simply replace an existing one, it is a good idea to tell your neighbours your plans and ask them to remove any breakable pots or tie back treasured plants and also ask them for permission to go onto their property if required.
You will also need to check the boundaries of your property and make sure you know which side is your fence and which is that of your neighbours. If you are replacing a fence then follow the old fence line but if you are putting up a new fence make sure you mark the boundary before starting. You may also want to check with the local planning authority you are allowed to erect a new fence and the height you are allowed to go to.
Before you buy
Remember that if you buy a 5 foot high fence, the post needs to be 7 feet tall as 2 feet will go into the ground, if you are going to use a gravel board and a 5 foot fence you will need allow for this also for the length of post.
This blog post deals with erecting a new fence with new panels and concrete posts but the principles are the same for wooden posts or metal spikes.
Tools for putting up a fence
You will need the following tools, it may also help to have a friend help you lift the posts and fence panels.
- A Spade
- Gardening Gloves
- A String line
- Fence panels
- Concrete Posts
- A Spirit Level
- Bags of PostFix (pre-mixed sand gravel and cement)
- A Tape Measure
- A Saw
- Gravel Boards (optional)
Getting Started
The first thing you need to do is mark the boundary, use a string line for this. Once you have your straight line you need to work out where the first post will go, this maybe up against the house. You now have to dig the holes and fix the posts.
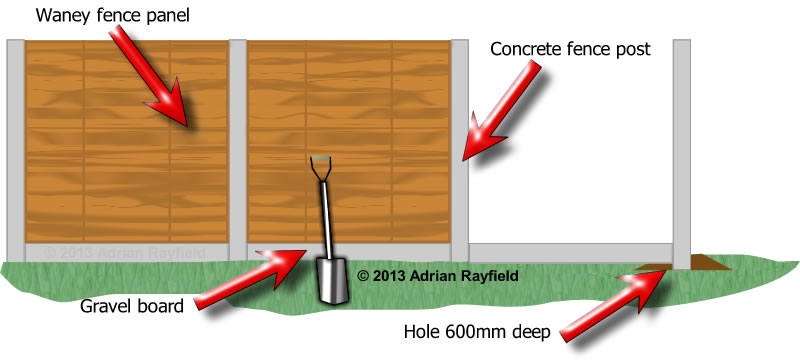
Fixing the fence posts
You will need to dig holes for each post, each post should be 18-24 inches in the ground, and the hole should be around 3 times as wide as the post, as a guide the hole will be about the spades width and the spades blade and a half deep.
Once you have the correct size hole drop the post into the centre of the hole, upright it using the spirit level. At this point you can secure the post by dropping a couple of half bricks or large stones to wedge between the post and outer edge of the hole. If you have a friend helping you you can get them to hold it upright for you. Now tip half of the dry PostFix into the whole, then add water as per instructions on the bag. Keep checking the post is upright, then tip the rest of the PostFix into the whole and add water. Allow the given time to set. Do this with all the posts.
Make sure the gap between each post will allow for a fence panel, you can either stand the panel in it’s place whilst you fix the next post, or if you are using gravel boards, use these as spacers.
Fitting the fence panels
Once all the posts are fixed and the concrete is set, if you haven’t done so already and you are using them, fit your gravel boards. Next lift the fence panels into place by slotting them into the groove on the posts, you may need two people to do this. You may want to wear garden gloves to avoid splinters.
How to cut fence panels
If you need to cut the width off a fence panel because the gap between the posts are smaller than the panel, you will need to cut the panel down to fit. To do this carefully remove the end baton, then measure between the groves in the concrete posts and mark this on the fence, cut the top and bottom baton allowing for the width of the side baton. Then re-fix the side baton and finally cut down the edge of the side baton trimming the unwanted part of the panel. Your panel should now fit snugly between the two posts.
Tags: Concrete fence Post, Fence, Fence Panel, Fence Posts, Gardening, Gravel Boards, PostFix, Spade, Wooden Post
Posted in Home Improvements | No Comments »