Painting, decorating and home improvement tips blog
How to paint a panel door?
Posted by Adrian
May 6th, 2009
This tip applies to both interior and exterior panelled doors, it doesn’t matter how many panels there are, whether it be a 1, 2, 4 or 6 panelled door, the principle is the same.
The first job is to remove the door furniture such as handles, letterbox, knocker etc, now cover the floor. The next job is to remove any loose paint as well as any dirt and grime. Next rub the door down, depending on the surface you are painting over and its condition 80-grit sandpaper will be fine. Rub down, going in the direction of the grain, if you have an internal ‘grain effect’ door be careful not to rub too hard!
Once you have ‘keyed’ the surface with the sand / glass paper dust off the surface. If the door has any bare wood showing you will need to use the appropriate primer. Once the primer is dry you can paint the door with a suitable undercoat, finally the finish coat (gloss or satinwood etc) of your choice.
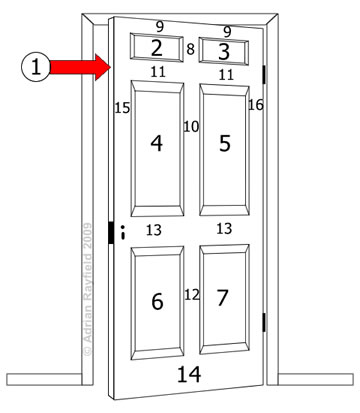
So what order do I paint the panel door?
OK, here is the order to paint your panel door:
- Paint the door edge, you should always paint the edge you will see if the door is open. Number 1 in diagram. If it is an exterior door you should also paint the top of the door, and the bottom if you can.
- Paint the panels. Numbers 2-7 in diagram.
- Paint the top mullion and rail, numbers 8 and 9 in diagram, and work through all mullions and rails finishing with the bottom rail. Number 14 in diagram.
- Finally paint the two stiles. Numbers 15 and 16 in diagram.
- If you are using gloss, check to ensure the paint hasn’t run off the panels, if there are runs simply brush them out with a dry brush.
- You should now have a newly painted door!
NOTES:
Stiles: vertical parts
Mullion: vertical parts between panels
Rails: horizontal parts
Panels: moulded ‘inset’ shaped areas
Tags: Door, External Door, Internal Door, Painting, Panel door, Panelled door
Posted in Decorating Tips | 12 Comments »
Making life easy
Posted by Adrian
March 23rd, 2009
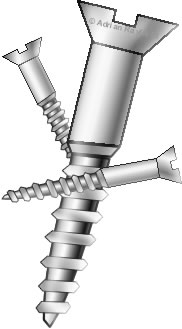
Wood screws – Make life easy
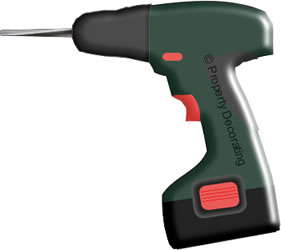
If you have screwed something into wood before you may of noticed two things, firstly it can be tough using a screwdriver rather than a drill, secondly you may split the wood.
There are two very simple tips you can try and they are:
- First drill a ‘pilot hole’, basically drill a smaller hole than you need allowing the screw to go in easier and the wood will not split.
- Before you screw the screw into the wood apply one of the following wd40, soap (liquid or hard), wax or oil to the thread of the screw. By doing this it makes the screw glide into the wood, it also helps the thread from not rusting so quickly on steal screws and has an added benefit that if you want to take the screw out in the future it will be far easier to do so. In fact I have taken doors off that have been hung for the best part of 100 years and the screws come out simply because rubbing wax on the threads used to be an old chippies (carpenter) trick.
Tags: Drill, Drilling, Screw, Wood
Posted in Decorating Tips | No Comments »
Don’t make a mess – How to Catch Dust While Drilling Into a Wall
Posted by Adrian
February 28th, 2009
Don’t make a mess – catch the dust!
How to Catch Dust While Drilling Into a Wall
When you have decorated your room and it’s time to put the room back, put up pictures, curtain rails/poles you don’t want to have brick dust all over your newly decorated room.
To avoid the brick dust or plasterboard dust from falling down the wall whilst drilling here is a great tip!
Continue reading Don’t make a mess – How to Catch Dust While Drilling Into a Wall
Tags: Drill, Drilling, Dust, Rawl plugs
Posted in Decorating Tips | No Comments »