Painting, decorating and home improvement tips blog
How to fit new glass into a window or door frame
Posted by Adrian
November 2nd, 2016
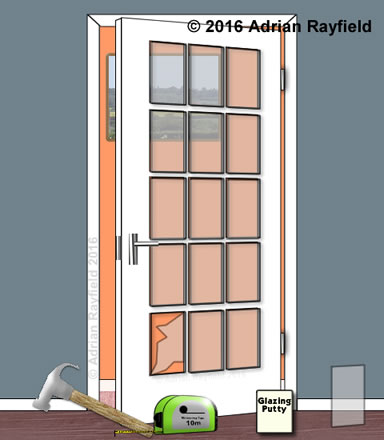
How to fit new glass into a window or door frame
Fitting a new piece of glass into a wooden or metal frame is a job you may need to do from time to time. Before you start running out to the shed a grabbing a hammer and chisel, safety first.
Make sure you wear suitable gloves to protect your hands and safety glasses or goggles for your eyes. You may also want to wear safety boots or at least sturdy shoes or boots and suitable clothing, this is not a flip flop, t-shirt and shorts kinda job!
Once you have to correct safety gear on you are ready to get the tools you require. Firstly determine the tools you need, is the glass held in with beading or putty?
For glass held in with putty you will need:
- A hammer
- A chisel or alternative to remove old putty
- Small tacks to hold new glass in
- Putty
- A tape measure
- A new pane of glass
For glass that is held in with glazing beads you will need:
- A hammer
- A chisel or alternative to remove glazing beads
- Pincers or pliers
- A tape measure
- A new pane of glass
- Putty, silicone, or caulk
It may be easier to remove the door of window and lay flat, but it isn’t always practical.
Removal and fitting of glass in a putted window or door
Firstly you need to remove any loose and large pieces of glass, it is a good idea to apply masking tape to the broken glass (carefully) so that as you remove the glass another piece doesn’t fall out. Once the loose glass is removed you need to remove the old putty from the frame, do this carefully with a hammer and chisel, taking care not to cut into the frame.
Ensure all putty is removed as any hard bits left can cause problems as you put the new glass in, and even crack the new glass. Remove any old tacks that held the glass in also.
Once all the old glass,putty and any tacks are removed, clear up, dispose of the old glass safely and remove dust and debris from the frame. A vacuum maybe useful to pick up any small bits of debris.
Now you can measure up for the new glass, of you haven’t done so already. Measure the width, height and thickness of the old glass, then you can either cut some glass yourself or go to a merchant and get them to cut some glass to size for you. The glass should be slightly smaller than the frame it is going in.
Now you are ready to fit the new glass, it is best to remove all the putty from the tub and put onto a board and knead like it is bread, this will mix in any linseed oil back into the putty and also warm it slightly to make it easier to use.
When this is done you can apply some putty to the frame, do this only on the edge the glass sits in. Then put the new glass in the frame, gently push the glass into the frame and making a seal with the new putty. Put some tacks in to hold the glass in place. clean of excess putty from inside frame.
Now you need to apply putty to the frame and smooth off giving an angled bead all around the glass with mitred corners.
Once you have glazed the frame, leave it alone, allow the putty to dry for a day before touching it at all, and a week or more before applying paint.
Removal and fitting of glass in a beaded window or door
You should remove any large pieces of glass, place masking tape of the glass to help prevent more glass falling out as you remove one piece, once all the broken glass is removed you can start to remove the glazing beads.
Take a hammer and chisel and gentle prize up the bead from the frame. You should be able to pull the nails out with pincers or pliers. Be very careful not to break the beading as it can be re-used. Make a note where each bead came from so that you can replace them into the same place.
Now measure for the glass allowing some movement, so 2-3mm smaller on each side. Either cut the glass to size yourself or get a merchant to do it for you. Now you have the glass the correct size you are ready to fit it.
Ensure the frame is clear from debris, use either a brush to dust or vacuum cleaner. The depending on situation and preference you need to apply putty, silicone (this can not be painted over) or caulk or the frame where the glass touches, then push the glass into position, pushing gently onto the glass to seal it against either the putty, silicone or caulk.
You can now start replacing the glazing beads, it is best to start at the bottom, put the bead into place and push it against the glass, lift the glass slightly off of the bottom of the frame and then put a nail into the bead to hold it tight, don’t hammer it all the way in just in case you need to adjust or remove the bead. Now add the second bead in the same way, and finally the two remaining beads. Once you are happy you can hammer all the nails all the way in and fill the holes ready for painting.
Tags: caulk, Door, Glass, Glass panelled door, Glazing bead, Putty, Silicone, Window
Posted in Decorating Tips | No Comments »
Painting around a window or glazed door
Posted by Adrian
February 7th, 2010
How to paint around a window and get a professional looking job
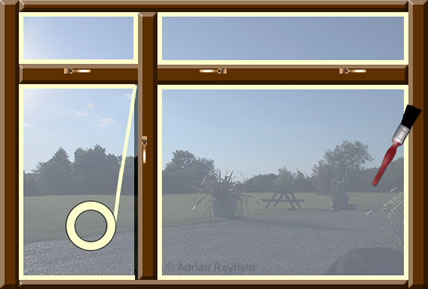
If you are unconfident of cutting in around windows or glazed doors you can use this following tip.
To stop getting paint on windows or glass panelled doors when you paint them you can use masking tape to mask the glass.
Take time and care to only get the tape on the glass.
Place the tape on the glass, you can then run a sharp knife along the frame to ensure the tape is only on the glass, but being careful not to cut into the frame.
Once you have gone around all the window/s you are ready to paint. Paint around the window, glazes door etc as normal.
Leave the paint to fully dry, and then remove the tape carefully. You may need to cut the tape around the window to ensure it doesn’t pull the paint off as you remove the tape, take your time and you will have a newly painted window or glazed door.
The other method is to paint around the window or glazing in your door and paint slightly onto the glass, leave to dry and then clean the paint off the glass with a sharp blade.
Both methods take longer to do than simply cutting in but if you don’t have a steady hand or aren’t confident either method will give you a more professional final job.
Tags: Door, Glass panelled door, Masking Tape, Paint, Painting, Windows
Posted in Decorating Tips | No Comments »
How to paint a glass panelled door
Posted by Adrian
January 11th, 2010
Painting a glass panelled door
This tip applies to both interior and exterior glass panelled doors, it doesn’t matter how many panels there are, whether it be a 2, 4, 8, 12 or even 15 panelled door, the principle is the same.
The first job is to remove the door furniture such as handles, letterbox, knocker etc, now cover the floor with a dustsheet to catch any splashes of paint. The next job is to remove any loose paint as well as any dirt and grime.
Next rub the door down, depending on the surface you are painting over and its condition 80-grit sandpaper will be fine to use. Rub down, going in the direction of the grain, if you have an internal ‘grain effect’ door be careful not to rub too hard and run the grain effect off!
Make sure you rub down all of the edges of the glazing beads, but be careful not to scratch the glass.
Once you have rubbed down ie ‘keyed’ the surface with the sand / glass paper dust off the surface. If the door has any bare wood showing you will need to use the appropriate primer. Once the primer is dry you can paint the door with a suitable undercoat, finally the finish coat (gloss, satinwood or woodstain etc) of your choice.
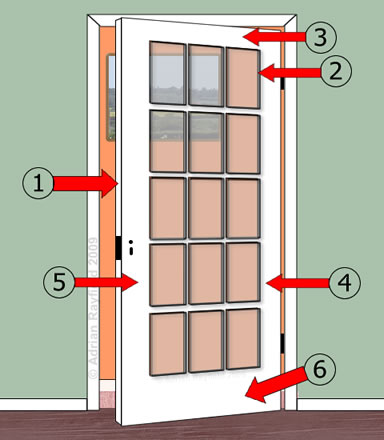
So what order do I paint the panel door?
OK, here is the order to paint your panel door:
- Paint the door edge, you should always paint the edge you will see if the door is open. Number 1 in diagram. If it is an exterior door you should also paint the top of the door, and the bottom if you can.
- Paint all the glazing beads and muntins. Paint each window in turn, try and not get too much paint on the railes or stiles. You can brush the excess paint off with an unloaded brush. Number 2 in diagram.
- Paint the top rail, number 3 in diagram.
- Paint the two side stiles next, numbers 4 and 5 in diagram.
- Finally paint the bottom rail. Number 6 in diagram.
- If you are using gloss, check to ensure the paint hasn’t run off the glazing beads, if there are runs simply brush them out with a dry brush.
- You should now have a newly painted door!
NOTES:
Stiles: vertical parts
Rails: horizontal parts
Glazing beads: holds the glass in door
Muntin: vertical glazing beads
Tags: Door, External Door, Glass panelled door, Internal Door, Painting, Panel door
Posted in Decorating Tips | 9 Comments »