Painting, decorating and home improvement tips blog
How to clean paint brushes
Posted by Adrian
September 2nd, 2015

How to clean paint brushes
Once you have used your paint brush you have three options, option one is to simply throw it away. This is costly and if you have spent out on a good brush it is a serious waste of money! Option two, store the brush in a brush storage container or similar. This is good if you will be using the same brush with the same colour again in the future. Option three, clean your paint brush.
Depending if you are a professional painter and decorator or a DIYer and how much you have spent on your brushes will determine what you will do with your brushes. For professional painters we like to look after our brushes as we tend to buy good quality brushes that aren’t cheap so keeping them for as long as possible requires they are looked after and cleaned out.
Cleaning your brushes
If you are using water based paints then all you need is some water and soap and maybe a brush comb. Once you have finished with it and ready to clean the brush, get as much out of the brush as you can by wiping it on the edge of the paint can. Then run the brush under warm water, have the bristles facing down so the paint runs out of the bristles rather than up them and into the ferrule where it can dry and go hard.
Once the worst is washed out you can use a little soap to help wash any colour out of the bristles. Once you have done this you can use a brush comb to remove any stubborn and dried paint for the bristles, then give it a final rinse and shake out the water.
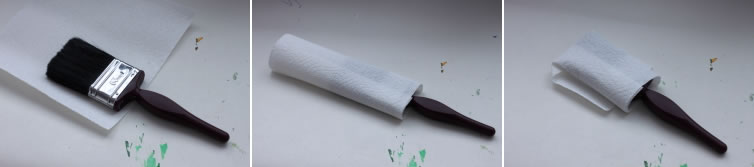
You should now store the brush either in it’s original packaging or wrapped in kitchen towel to help keep all the bristles straight, ready for it’s next use.
If you are using oil based paints, you should start the same way and remove as much paint as possible, then use a brush cleaner or white spirit to wash the brush out in, you may have to use clean brush cleaner to make sure all the paint and colour is removed. You can then treat the brush as you would one you have used in water based paints, so wash in warm soapy water, use a brush comb if required and store in its original packaging or paper towel.
Storing brushes
If you are going to use your brush again in the not too distant future you can buy a brush storage container, there are several on the market. By using these storage containeryou can quickly and easily come back to your brushes, they will still be soft, in the colour you want and ready to go. So they are well worth the investment if you use your brushes a lot or are a painter and decorator.
Tags: brush, Brush Cleaning, Brushes, Decorating, Oil-based paint, Painting, water-based paints
Posted in Decorating Tips | 2 Comments »
Getting a professional finish – a quick guide to gloss work
Posted by Adrian
June 1st, 2011
Getting a professional finish – a quick guide to gloss work
When you are painting gloss paintwork many people find they end up with brush marks in the final dried paintwork. This could be due to a couple of reasons.
I have been asked, how come I don’t get lots of brush marks, runs or dirt in my gloss work.
Preparation, Brushes and Paint
Firstly, your preparation is vital and shouldn’t be overlooked. You may find my post on Decoration and Preparation of interest.
Also you need to use a good quality brush, many cheaper brushes can be too wiry and stiff which can cause brush marks in the wet gloss.
Another thing to consider is to use a good quality gloss paint; many top brands will flow well as you apply the gloss to the woodwork eliminating brush strokes as it dries. Cheaper brands or solid non-drip type gloss can be a bit thick to apply and may not flow that well.
Applying the Gloss Paint
The other thing you need to consider is how you apply the gloss, you need to put enough on but not so much the gloss runs. This comes with experience and knowing the products you are using.
Once you have applied the gloss, use the brush to go over the area you have just painted with long strokes with an unloaded brush, this will help spread the gloss more evenly. Once you have done this, go over the area again with the unloaded brush with even lighter strokes until you are barely toughing the paint.
If you follow these basic steps your gloss work should look more like a professional has done it.
Be aware that if you are painting gloss paint and it is in a damp atmosphere, such as outside, you may get a ‘bloom’ (a dullness) over it by the next day and the sheen will be gone, and you will have to re-paint it. To avoid this, don’t paint gloss in a damp atmosphere of too early or too late in the year when the damp can affect your paint.
Please note: This post refers to oil based gloss paint and not water based gloss paint, although the principles are the same, drying times and how it acts differ.
Tags: brush, Gloss, Oil-based paint, Paint, Paintbrushes, water-based paints
Posted in Decorating Tips | 4 Comments »
How to paint an interior wall
Posted by Adrian
March 8th, 2010

How to paint an interior wall
To start gather all the equipment needed
You will need:
- Dustsheets – To cover floor and furniture
- A brush – 1½ or 2 inch
- A roller cage – for the roller sleeve to go onto
- A roller sleeve – for smooth walls use a fine or medium pile roller, ideally a 9-inch sleeve
- A roller tray – big enough for a 9-inch roller
- A paint kettle – to tip some paint into for cutting in
- Paint – The paint for the walls, normally emulsion (use our paint calculator to determine how much paint you need)
First cover the floor and furniture with dustsheets. Next open your tin of paint and stir well, tip a small amount into the paint kettle, then fill the paint tray.
Now cut in (i.e paint around the edge) using the brush and kettle, cut in around one wall at a time including any sockets or switches.
Once you have cut in, take your roller and get some paint onto it, roll it on the tray to work the paint into the roller sleeve and get it all around the sleeve.
Now take the roller and roll it over the wall, it is best to roll in a ‘W’ motion, this will ensure you don’t end up with lines and also will give a nice even coat across the wall. When you have covered a wall, go lightly over the wall with an unloaded roller to get rid of any ‘orange peel’ effect.
Simply repeat this operation for each wall you need to paint.
Tags: brush, Emulsion, Paint, Paint Calculator, Paint kettle, Roller
Posted in Decorating Tips | 1 Comment »