Painting, decorating and home improvement tips blog
How to Choose a Paint Roller
Posted by Adrian
September 23rd, 2016
How to Choose a Paint Roller
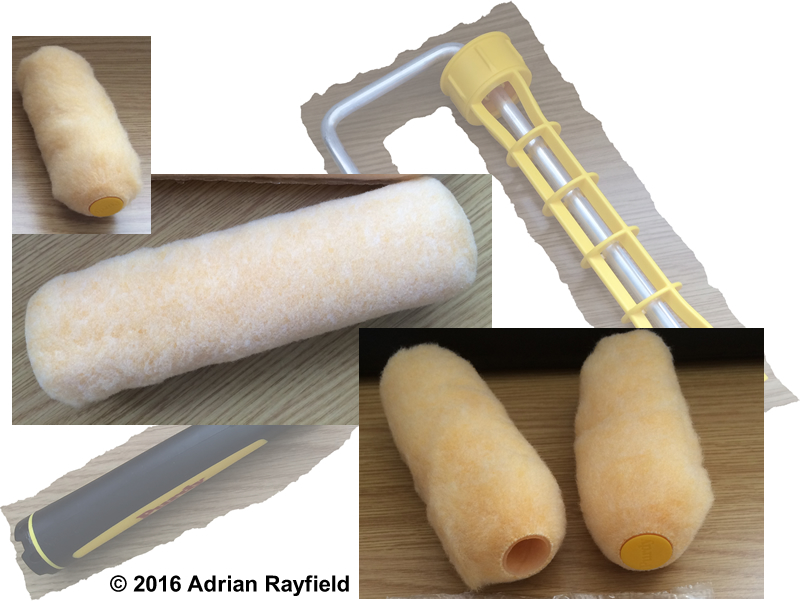
When it comes to painting walls, ceilings or trim you need to consider the type of roller you need to use for the best results for the job you are doing. This not only includes the length of the roller but the nap or pile of the roller, a bigger nap roller will hold more paint, whereas as a smaller nap roller will hold less but will give a smoother finish.
You also have to have the correct roller cage or arm for the roller sleeve. Roller sleeves have a different diameter core, or hole, for where the cage fits into, it may have a 1 ½ inch or a 1 ¾ inch core so make sure you have a matching cage and roller sleeve.
Some rollers, such as a 4 inch mini rollers don’t need a cage, the sleeve has a small diameter core that slides over a arm. This is essentially a length of metal that has a right angled bend on the end to accept a mini roller sleeve. If you get a long arm for a 4 inch microfibre sleeve it is ideal for getting into those hard to reach places such as behind a radiator.
Some manufacturers do however make small rollers that do need a small ¾ frame for there 4 inch rollers.
Choosing the right roller sleeve for the job
Below is a list of roller sleeve pile thickness (nap) for a particular job, there are slight variations between manufacturers so thickness given is only a guide.
- Short pile – ⅜ nap (10mm approx) Ideal for smooth surfaces, newly plastered ceiling and walls, emulsions, eggshell and satin finishes.
- Medium pile – ½ nap (13mm approx) Ideal for semi-rough surfaces such as Artexed ceiling and walls, flat walls and ceilings, emulsions.
- Long pile – ¾ nap (19mm approx) Ideal for semi-rough to rough surfaces, emulsions, masonry paint.
- Extra long pile – 1 ¼ nap (32mm approx) Ideal for rough to very rough surfaces, masonry paints, emulsion.
- Mini microfibre roller – ⅜ nap (10mm approx) Ideal for smooth finishes, emulsion, new plaster.
- Foam roller – High Density Foam Ideal for smooth finishes, trim, gloss, satin and varnishes.
So basically a thin nap is ideal for flat surfaces, trim etc and thick nap is ideal for rough textured surfaces such as heavy artex or masonry. Foam rollers are great for trim, doors etc.
It is worth paying for a decent roller set up if you intend to use it more than once, some cheap DIY store offerings should be avoided as they do not last and the sleeve may molt leaving you with bits of roller sleeve in you paint, or you spending more time picking bits out of the paint rather than painting.
Tags: Ceiling, Eggshell, Emulsion, Foam, Long, Masonry, Medium, Microfibre, mini, Nap, Paint, Pile, Plaster, Roller, Satin, Short, Sleeve, Walls
Posted in Decorating Tips | 1 Comment »
Save money on paint
Posted by Adrian
September 24th, 2013
Save money on paint
In these hard times we have to save money where we can, this tip is simple but so easy to do but you will be amazed at the amount of paint you save! And another benefit to this tip is it also help the environment so your carbon footprint will be reduced too.
When you have finished painting with a roller or brush by scraping out as much paint as possible will save your money as your tin of paint will go that little bit further. Take your roller and with a scraper scrape the paint out of the roller back into the tin or paint tray, you will be amazed how much comes out, especially a thick piled roller sleave. Do this also with your paint brushes. Also, take time in removing as much paint from paint trays when your finished for the day.
Wrap it up
If you are using a roller for a job but don’t finish in a day, don’t wash your brushes or roller out, wrap them up in a bag they will stay usable overnight and you can come back to them and start work straight away and you save time as you didn’t spend ages washing out the brush or roller the night before.
Going green
The added benefit to this tip is to the environment, less paint is washed down the drain, less water is used and the paint lasts longer so you don’t have to use your car to buy more.
Saving money
If you use this tip you will be saving money, which in today’s economic climate we all need to do.
Removing paint video
Here is a quick video of paint being removed from a roller, the thicker the roller pile the more paint you should be able to recover for next time.
If you liked this post, please share it with your friends, family and colleagues via the social media buttons below. You can also subscribe to my Property Decorating YouTube channel.
Tags: Economical, Environment, Money, Paint, Paint Brush, Roller, Saving Money, Scraper, Thick piled roller
Posted in Decorating Tips, Video | 2 Comments »
How to paint a ceiling
Posted by Adrian
April 11th, 2010

How to paint a ceiling
To start gather all the equipment needed
You will need:
- Dustsheets – To cover floor and furniture
- A brush – 1½ or 2 inch
- A roller cage – for the roller sleeve to go onto
- A roller sleeve – for smooth and lightly textured artexed ceilings use a fine or medium pile roller, ideally a 9-inch sleeve, for heavily artexed ceilings a long pile roller sleeve may be required
- A roller tray – big enough for a 9-inch roller
- A paint kettle – to tip some paint into for cutting in
- Paint – The paint for the ceiling, normally emulsion (use our paint calculator to determine how much paint you need)
- A step ladder
First move any furniture out of the room and cover any remaining furniture or alternatively cover the floor and furniture with dustsheets. Make sure you can reach the entire ceiling without over reaching, as this is unsafe. Next open your tin of paint and stir well, tip a small amount into the paint kettle, then fill the paint tray.
Now cut in (i.e. paint around the edge) using the brush and kettle, cut in around the ceiling including any light fittings. If you have coving, paint this with the brush also.
Once you have cut in, take your roller and get some paint onto it, roll it on the tray to work the paint into the roller sleeve and get it all around the sleeve.
Now take the roller and roll it over the ceiling, I find it best to work away from a natural light source such as a window
Work in small area’s in front, behind and either side of you, then top the roller up and move to the next area.
When you second coat the ceiling it maybe an idea to work at adjacent angle to avoid any missed area’s, this will also ensure you don’t end up with lines and also will give a nice even coat across the ceiling.
When you second coat the ceiling, cut in as before but this time don’t brush the coving, use a fairly dry roller to go over the coving, this will give a nicer finish. In my opinion anyway!
Tags: Ceiling, Emulsion, Paint, Paint Calculator, Roller
Posted in Decorating Tips | 2 Comments »