Painting, decorating and home improvement tips blog
How to fit new guttering
Posted by Adrian
August 25th, 2012
How to put up new guttering
With the end of the summer quickly approaching now is a good time to start thinking about jobs that need doing before the winter sets in. One job that may need doing is guttering, you may need to fix a leaking joint or replace a length of damaged downpipe. Whatever the job now is a good time to do it.
Choosing your guttering
If you are having new guttering you need to decide on which type be it round or square and the colour you prefer, black, brown or white. Then measure up allowing for any cutting that maybe required. Make sure you get enough brackets for the gutter and downpipes. It is advised to have a bracket every metre, this will give the gutter enough support when you get heavy snow sitting in it.
Buying the guttering
Once you have decided on your gutter and measured up it is now time to buy the guttering, ensure you get any outlets either running outlet or stopend outlet, stopends, any angled gutter, a shoe/boot for the end of the downpipe, downpipe and clips, and any union brackets.
Fixing the guttering
You may find it easier with two people to do this job, so now the time to call on a mate to help, but it can be done by just one person for those people with no mates!
Decide on where the outlet is going to be, you may not have a choice as the downpipe may go into a drain or you may want it to go into a water butt. The important thing to remember is the outlet has to be the lowest point for the water to run out of it. One additional tool you will need for this job is some string, this could be a chalk line or string you found in your wife’s craft draw! it doesn’t matter as long as it is long enough to span the length of where your fixing the guttering, which may be the entire width of the house, so a good 5 or 6 metres will be needed.
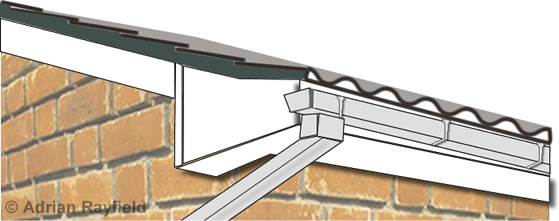
Now you know where the outlet is going, you can start to fix the guttering, take a bracket and place it against the fascia board and close to the roof tiles , mark the holes, drill and screw the first bracket to the fascia. Now go to the other end of the fascia, if the outlet is going to be at one end, come in about a metre from the end of the fascia and fix another bracket about an inch and a half down from the roof tiles. Now take your string and tie it between the two brackets pulling it tight to give it tension, this will give you a nice gentle fall toward the outlet. Now simply take a bracket measure about a metre from the first one, slide the bracket up to the string line, drill and screw, continue doing this until you get all the way along, you may have to decrease the gap to get brackets around a metre apart, don’t increase by much as the weight of the next snow could pull your gutter down.
If you have your outlet in the middle of the fascia, the same principle applies but work from one side then the other toward the middle, or wherever the outlet is.
Once all the brackets are up you can work out where the stopend outlet needs to be fixed, remember this still needs to continue to have a fall on it from the the last bracket you fitted.
Putting it all together
Next you need to measure and cut the gutter to fit between any union brackets or stopends, once all clipped into place you need to fit the downpipe, cut and fit the the downpipe and angles together to get the downpipe to where you want it to go, simply secure the downpipe to the wall with the downpipe brackets. Ideally your rain water would go into a water butt, this can easily be done by using a water butt connector, this allows the water butt to be filled from the downpipe and when it’s full will continue down the downpipe to a drain, so not overflowing.
Tags: Downpipe, Gutter, Guttering, Running Outlet, Stopend, Stopend Outlet, Union Bracket
Posted in Decorating Tips | No Comments »
Weather To Paint or Not!
Posted by Adrian
July 15th, 2012
Weather to Paint or Weather to Not!
That is the question here in the UK this summer.
Here in the UK we are having some very wet weather for the season. At Property Decorating this is normally the time of year for our exterior painting work to get into full swing.
Its Raining Again …….
According to the Met office ……
“Met Office confirms wettest June in over a century” ref : https://www.metoffice.gov.uk/climate/uk/interesting/april-july2012

Apparently the Met Office figures for this June are showing double the average amount of rain fall thus making this year the wettest “June” since their records began in 1910.
Weather to paint
So if you are considering weather or not to paint your exterior there are some things to bare in mind ;
Is it dry enough to paint the surface of your exterior or is it already too wet?
What is the forecast, will you have enough time to get the job done in time? Most paint companies have details of their products drying times so you can at least estimate the time you will need for drying and second coating.
So there are many factors to think about, with Masonry paint for example could simply be washed away with heavy rain leaving you with poor and patchy coverage, likewise Gloss paint can get pitted with heavy rain and not give you the finish you require.
These are just a few points to think about when thinking about ‘weather’ its wise to paint in this unseasonably wet weather.
Umbrella anyone !!!!
Tags: Gloss, Masonry, Paint, rain, weather
Posted in Decorating Tips | 1 Comment »
How to wallpaper around a door
Posted by Adrian
May 7th, 2012
How to wallpaper around a door
Following from my recent post, wallpapering around a window reveal this post continues on from that and will show how to paper around a door.
Where to start wallpapering
Before you start papering you need to work out where the paper comes to at the door architrave, to do this measure your roll of paper, then start at one corner of the wall with the door in it and mark the sheets from the corner to the door, then over the door and to the other corner, does this work out OK? What you are looking for is not to end up with a sheet falling just short of the door architrave and you having to fiddle about putting in a small strip. You may have to start with a half sheet from the corner to avoid this situation or it may just work out OK if your following the pattern around the room.
Once you have worked out the best place to start, use a plumb line or a level to mark a vertical line from the ceiling to the skirting board ensuring you allow a little paper to return around the corner by about 1cm.
Putting up the first sheet of wallpaper
Once you have pasted the first sheet of paper, line it up with your vertical mark on the wall and smooth out the bubbles as you go, trim the top and bottom and wipe any excess paste off the paper, continue doing this until you reach the door frame. One thing I always find easiest is to take the sheet of paper that is going to start to go around the door architrave, hold it up and match any pattern then mark the paper on the inside of the architrave then take the paper to the paste table and cut the bit that would go over the door off, this saves getting paste all over your door and frame and also can make it easier to handle.
Tags: Decorating, Door, Interior Decorating, Wallpaper, Wallpaper Calculator, Wallpapering
Posted in Decorating Tips | 2 Comments »