Painting, decorating and home improvement tips blog
How to paint new plasterwork
Posted by Adrian
April 7th, 2012
Painting new plaster
When you have had either walls or ceilings plastered or skimmed over with plaster you need to know how to paint them correctly to get a long lasting finish.
Firstly ensure they are dry, this will depend on what plastering you have had done. One thing not to do, start painting colour samples on bare plaster, due to the brushes that come with the samples and how thick you apply the sample you will see this on your walls forever unless you rub them down, best to paint on some lining paper or plain white paper, you can then move it around the room and see the colour in different lights. There is a previous post about this Colour samples and testers.
To Paint new plasterwork
Firstly get some sandpaper, not too course, as you don’t want to ruin the new plaster, around 120 grit and lightly rub over the plaster to remove any splashed plaster or drips of dirty water. Then brush the area down to remove any loose dust.
Next, you may well think it’s simply a case of deciding on a colour and painting over the new plaster? STOP!
You should never paint new plaster with a vinyl emulsion as this will sit on top of the plaster leaving a skin or layer that could peel off. You should always paint new plaster with a ‘New Plaster Sealer’ or a non-vinyl emulsion.
I use a non-vinyl emulsion and is my preferred method. I use a matt emulsion, typically white to seal the plasterwork before using a vinyl emulsion colour over the top to complete the job. The ‘New Plaster Sealer’ or a non-vinyl emulsion will soak into the new plasterwork and the finish coats you apply will adhere to this first ‘mist’ coat.
You don’t have to worry about covering the plaster totally, you just need to give it a ‘mist’ coat (as it’s known) to seal the plaster, you’re not looking for complete coverage and opacity.
Once you have mist coated your new plaster you can now apply your choice of finish coat and colour.
Paint Calculator
You may find my paint calculator useful to help work out the quantity of paint you require to mist coat your new plaster and also for your final finish coat. One thing to note, new plaster can be absorbent so slightly more paint maybe required than normal to get a good depth of colour and a good finish.
Tags: Ceiling, Emulsion, Mist Coat, Paint, Paint Calculator, Plaster, Plasterwork, Vinyl, Walls, water-based paints
Posted in Decorating Tips | 20 Comments »
Painting over varnished wood
Posted by Adrian
March 14th, 2012
Preparing to paint over varnish or old stained wood
I recently did a job that had new fire doors installed and because of this new door stops also had to be fitted, when the stops were fitted the paint came away with the old door stops. The paint had been applied over stained and varnished wood. You may have this in your home if it’s old enough, does the paint chip easily and reveal dark wood underneath? More than likely you have varnish or stained wood and painted over without the proper preparation. As you can see by the following picture it looked a bit of a mess.
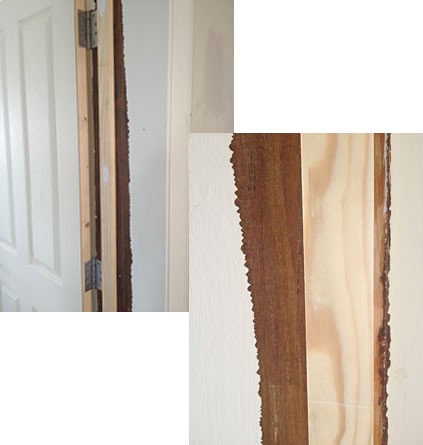
The paint hadn’t adhered to the varnish underneath and simply flacked off, as you can see by the following quick video it wasn’t too much of a job to scrape the paint off due to lack of preparation when the varnish was painted over.
The following image shows the paint removed and prepared ready for the first coat of primer.
Tags: BIN, Door, Paint, Painting, Primer, Satinwood, Varnish, Zinsser
Posted in Decorating Tips, Video | 2 Comments »
How to store your paint brushes
Posted by Adrian
March 3rd, 2012
OK, so you’ve been nagged into doing some DIY at the weekend and have to get out your paint brushes, you head of out to the shed to get them, but when you get there and look at the brushes they look as if they have seen better days. The bristles are all splayed out and it looks like it’s have a ‘bad hair day’!
So how could this been avoided?
Simply put you need to store your brushes, and all equipment for that matter, correctly.
When you have done your decorating and have washed your brushes out you need to store them correctly until the next time your ear is bent to do more decorating 🙂
How to store your paint brushes
Once you have finished painting, remove as much paint as you can from the brush by scraping it on the edge of the tin, if your using water-based paints next wash the remaining paint in clean water. If you are using oil-based paints you will need to wash the brushes out in white spirit, turpentine or a brush cleaner before washing in clean water. Once you have ensured you have all the paint out shake the water remaining water out of the bristles. Now take a piece of dry kitchen towel and lay the brush at one edge, now wrap the kitchen towel tightly around the brushes bristles, finally fold the end of the kitchen towel over at the end.

Now you can store you brush away knowing that when you come back to it, your brush will be in good enough condition to use.
A simple but effective way both DIYers and professionals alike can store brushes. Happy decorating!
Tags: Brushes, Cleaning, Decorating, Oil-based paint, Paint brushes, Solvent Based, water-based paints
Posted in Decorating Tips | No Comments »