Painting, decorating and home improvement tips blog
Feature Walls : How To paint a feature wall
Posted by Adrian
January 14th, 2014
Feature Walls : How To paint a feature wall
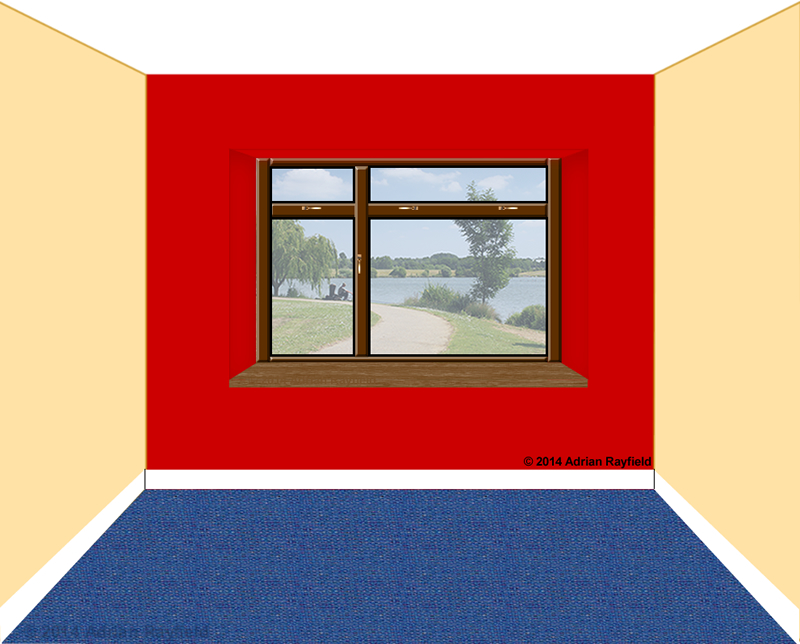
Feature walls have become very popular in recent years, they are a great way of giving a room a new look without the expense of changing everything in a room or completely redecorating. Simply by re-painting the feature wall can transform the look of a room. You can also follow the latest trends simply by re-decorating the feature wall.
Feature walls can be painted or wallpapered, it is personal choice and it will depend on the type of look you are going for.
Sometimes a feature all is called an accent wall, but they are both the same thing.
Deciding on paint for a feature wall
Deciding on what colour paint to buy for a feature wall will be determined by how the remaining walls have been decorated, typically a contrasting colour is used. But if the other walls have been wallpapered you can pick a colour from the paper to use as the feature wall colour.
Once you have decided on the colour for your feature wall you can buy the paint, you can buy ‘Feature Wall’ paint, this is just over a litre in size and should be enough to paint one wall. You don’t have to go this route, you can buy any colour in any sized can of paint. You could even use leftover paint if it suits your needs.
If you are unsure how much paint you will require for your feature wall, give our paint calculator a go, simply fill in the required figures and hit the calculate button and you will be told how many litres you need to by for your given area.
Painting a feature wall
To paint your feature wall, you can either mask the adjoining walls, skirting and ceiling with low tack masking tape, then cut in with a brush around the edge of the feature wall, just overlapping the masking tape but being careful not to paint any other surface. The use a roller to fill in the main wall area. By using masking tape you should achieve a straight line.
If you are confident in cutting in you can cut in without masking up. Cutting in is the term used whereby you use a paintbrush to go up to an adjoining surface, be it a wall, ceiling or skirting boards.
Once you have cut in or painted up to the masking tape and painted the first coat onto your feature wall, allow the paint to fully dry before applying a second coat. When you have painted the second coat you can remove the masking tape, if you used any.
Making a statement
By painting a feature wall you are making a statement, and making this one wall the focal point of a room. You may want to do this to highlight some pictures that are hanging on the wall, you maybe make a fireplace the focus of the room or simply it can give orientation to a room.
Whatever the reason for painting a feature wall, it can quickly and easily transform any room and give a focal point to an area of a room.
Tags: Decorating, Emulsion, Feature, Feature Wall, Paint, Paint Calculator, Painting, Statement, Wall
Posted in Decorating Tips | No Comments »
Feature Walls : How To Wallpaper A Fire Breast Wall
Posted by Adrian
July 3rd, 2010
Feature Walls : How To Wallpaper A Fire Breast Wall
As wallpaper can be expensive it is very popular nowadays to have a feature / accent wall to give interest to a room without breaking the bank!
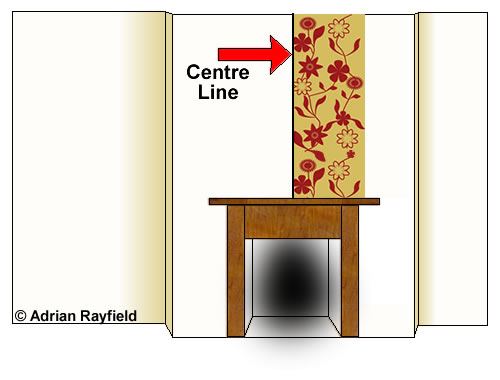
Fire breast feature wallpapering
The first thing you need to do once you have decided to wallpaper your fire breast or fire breast wall is to work out how much wallpaper you will require, by measuring the wall and using our wallpaper calculator for this.
Next you need to work out the centre of the breast, do this by measuring across the width and divide it by two. Next mark the centre and draw a straight line from top to bottom. This is your centre line to work from.
Now you need to take the width of the paper and work out where you need to start.
This will be either with the edge of the paper on the centre line or the centre of the sheet across the centre line. The aim of this is to make sure you don’t end up with a sheet finishing on the external corner, or a sheet not leaving enough to go around the corner for the next sheet you butt up to. If the edge of the sheet is to close to an external corner it may not stick very well and be difficult to join your paper, especially if the corner runs out (i.e. the corner is not vertical).
Like all wallpapering jobs, you need to work out where to start before you actually put paper on the walls. Once you have worked out all the measurements and decided where your first sheet needs to go you can start to paper. As always, follow the manufactures guidelines and soaking times.
It is up to you if you wish to just paper the fire breast or continue doing the walls either side of the breast.
Tags: Feature Wall, Fire Breast, Wallpaper, Wallpaper Calculator
Posted in Decorating Tips | 1 Comment »
Cleaning paint trays and paint kettles
Posted by Adrian
January 15th, 2010
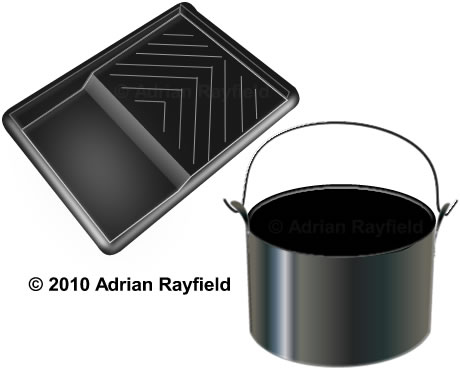
Don’t clean out paint trays or paint kettles
Use tin foil to cover then throw away.
Tired of cleaning out your used paint trays or paint kettles?
Use this useful tip and save yourself hours of cleaning.
Take your paint tray or paint kettle, get some tin/aluminium foil, and tear off a length enough to cover the inside of the paint tray or kettle. You could also use cling-film if you prefer.
Now cover the inside of the tray or kettle with the foil, be careful not to pierce the foil with your finger. You may want to add a second layer.
Now tip the paint into your covered tray or kettle and paint away.
When you are done painting, tip out any remaining paint back into the paint can, then remove the foil and dispose of it.
If you want to paint a feature wall this solution is ideal. It is quick and easy for changing the colour in the paint tray and paint kettle from feature wall colour to main colour without having to wash it out first.
A simple but effective decorating tip!
Tags: Feature Wall, Paint kettle, Paint tray
Posted in Decorating Tips | 1 Comment »