Painting, decorating and home improvement tips blog
How to build a step
Posted by Adrian
June 30th, 2020
How to build a step
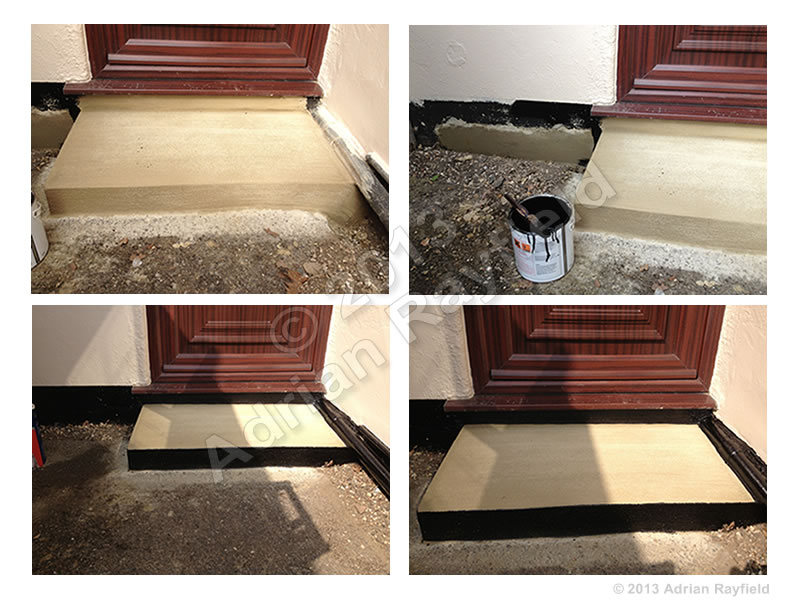
On a recent job I was asked if I could repair a step to a back door, the step was already built out of Celcon blocks and rendered over. The rendering had broken off and become loose over time. I was asked to re-render the step, which I did. I have included some photos of the finished job below.
Building a step
Before you build your outside step you need to work out the height, width and depth of your step, you also need to decide on the materials used to build it, such as concrete, bricks, blocks, block paving blocks, are you going to top it off with slabs?
Once this has all been decided you can start building your step. If you are going to use bricks, lay the edge bricks out to make sure you are happy with the size, you can then fix these down with mortar. Once these are set you can fill in using sand and cement, concrete or hardcore. You can then fix slabs on the top.
If you are going to use concrete only you are going to need to build a form (this is a temporary mold) use timber such as skirting boards to build the shape and size of the step you require, once you have done this you can mix and pour the concrete into the form, tamp it down to ensure all areas are filled and any air bubbles come to the top. You are going to want to have a textured finish the the top of the step to avoid it becoming slippery when wet of with snow and ice on it. The best way to do this is once the concrete is at the top of the form and levelled off, take a piece of wood wider than the step and tamp down across the form, this should leave ridges in the top of the concrete so when it dries you are left with a non-slip surface.
Once the concrete has set you can remove the form leaving you with a concrete step.
With the step I repaired the blocks were already in place, all I had to do was re-render the step, I did this by removing the loose render, cleaning the exposed bricks and sealing with a PVA sealer to aid adhesion. I then mixed up my render and rendered the step, I did this without a form so I could render the top and sides in finish the surface. Once I had got the basic shape, and ensured the top of the step sloped away from the house I left it to dry for a few hours, I then returned to see if it had set enough to ‘work’, which it had, at this point I used a rendering float to rub over the step, this showed up and low spots I needed to fill in. Once this was done I rubbed over with the rendering float to remove the sharp square edges and to leave a non-slip textured step and sides. I then painted the edges of the step to match the plinth, which also had a repair done to it.
To finish off I painted the plinth and the edge of the step in black bitumen paint.
Finished step
Below is the step that I repaired and painted.
Tags: Building a step, Concrete Step, Doorstep, Render, Step, Step Repair
Posted in Home Improvements | No Comments »