Painting, decorating and home improvement tips blog
How to build a step
Posted by Adrian
June 30th, 2020
How to build a step
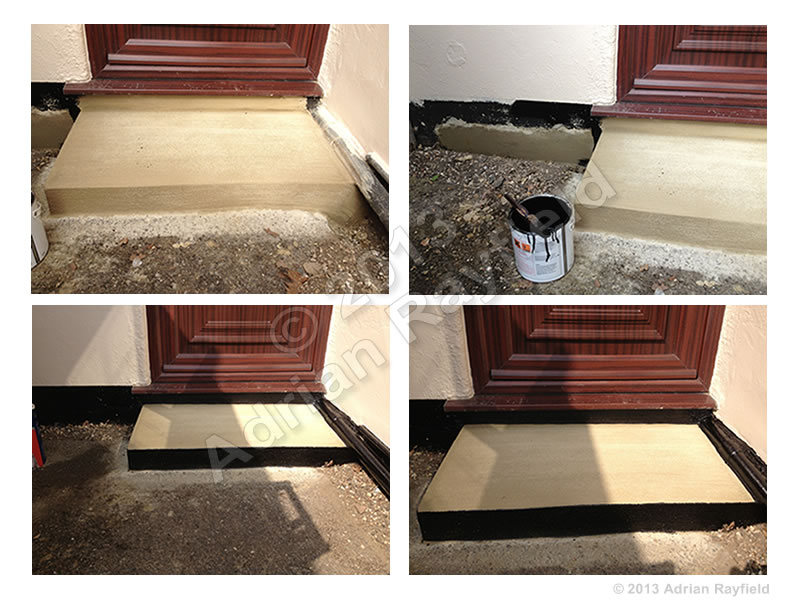
On a recent job I was asked if I could repair a step to a back door, the step was already built out of Celcon blocks and rendered over. The rendering had broken off and become loose over time. I was asked to re-render the step, which I did. I have included some photos of the finished job below.
Building a step
Before you build your outside step you need to work out the height, width and depth of your step, you also need to decide on the materials used to build it, such as concrete, bricks, blocks, block paving blocks, are you going to top it off with slabs?
Once this has all been decided you can start building your step. If you are going to use bricks, lay the edge bricks out to make sure you are happy with the size, you can then fix these down with mortar. Once these are set you can fill in using sand and cement, concrete or hardcore. You can then fix slabs on the top.
If you are going to use concrete only you are going to need to build a form (this is a temporary mold) use timber such as skirting boards to build the shape and size of the step you require, once you have done this you can mix and pour the concrete into the form, tamp it down to ensure all areas are filled and any air bubbles come to the top. You are going to want to have a textured finish the the top of the step to avoid it becoming slippery when wet of with snow and ice on it. The best way to do this is once the concrete is at the top of the form and levelled off, take a piece of wood wider than the step and tamp down across the form, this should leave ridges in the top of the concrete so when it dries you are left with a non-slip surface.
Once the concrete has set you can remove the form leaving you with a concrete step.
With the step I repaired the blocks were already in place, all I had to do was re-render the step, I did this by removing the loose render, cleaning the exposed bricks and sealing with a PVA sealer to aid adhesion. I then mixed up my render and rendered the step, I did this without a form so I could render the top and sides in finish the surface. Once I had got the basic shape, and ensured the top of the step sloped away from the house I left it to dry for a few hours, I then returned to see if it had set enough to ‘work’, which it had, at this point I used a rendering float to rub over the step, this showed up and low spots I needed to fill in. Once this was done I rubbed over with the rendering float to remove the sharp square edges and to leave a non-slip textured step and sides. I then painted the edges of the step to match the plinth, which also had a repair done to it.
To finish off I painted the plinth and the edge of the step in black bitumen paint.
Finished step
Below is the step that I repaired and painted.
Tags: Building a step, Concrete Step, Doorstep, Render, Step, Step Repair
Posted in Home Improvements | No Comments »
Parts of a staircase
Posted by Adrian
September 1st, 2014
Parts of a staircase
Continuing on from my other “parts of a..” posts such as parts of a door frame and parts of a window, this time we are looking at parts of a staircase. Most of you probably use one staircase or more in a typical day but have you ever wondered what the individual parts are called, well this blog post will hopefully explain them for you.
Staircases can be made from all sorts of materials, most commonly is wood, and depending on how elaborate you want the stairs can be made from expensive hardwoods and be either varnished of waxed to show the beauty of the wood off.
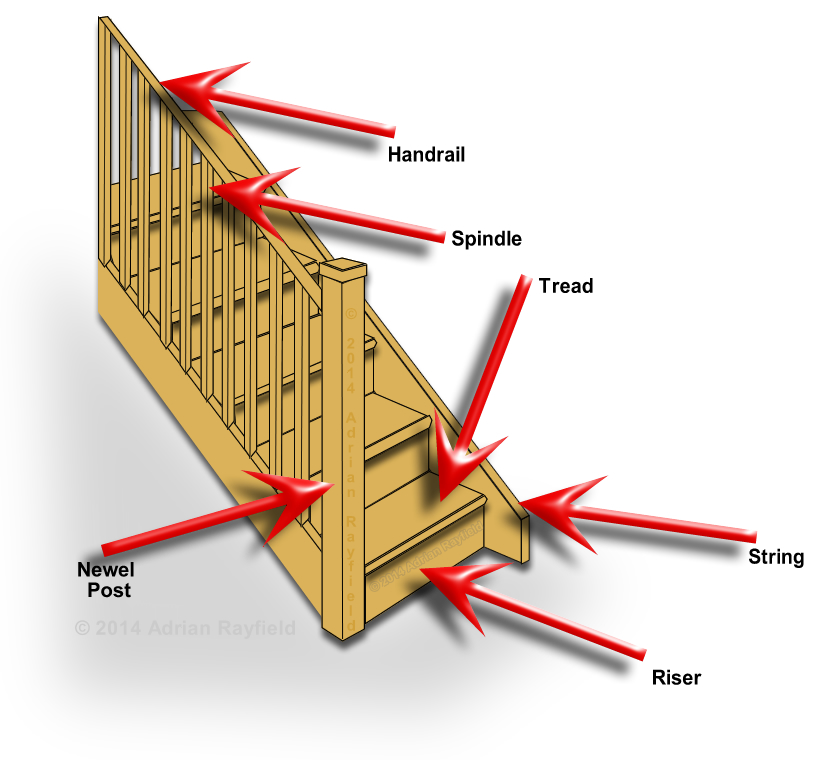
The main parts of a staircase are as follows:
Handrail
The handrail is the part of the staircase that you hold onto as you go up and down the stairs. The handrail is to give stability and support as you use the stairs. The handrail can go upto the newel post or sit on top if the newel post to form a continuous handrail, this may have a scrolling handrail at the end, know as a Monkey tail.
Spindle
Spindles can either be plain or decorative, they infill between the baserail and the handrail, they have to be a set distance apart and no more than 99mm to avoid a childs head passing through between spindles. This gap is in line with UK building regulations. Spindles are also known as Baluster and are part of the balustrade which consists of handrail, baserail, spindles and newel posts.
Baserail
The baserail is a rail allowing the spindles to be fixed into with spacers fitting into the rail to space to spindles correctly. The baserail sits on top of the stringer.
Toprail
The top rail is the same as a baserail but sits under the handrail.
Tread
The stair tread, is as the name suggests the part you tread on as you ascend and descend the staircase. 220mm is the minimum tread depth for UK domestic staircases.
Riser
The riser is the vertical section that makes up the front of the step, the minimum depth for the UK domestic staircase is 220mm. You can have open risers, this is where you have a small or no riser and gives and open and airy feel. The maximum gap allowed for this gap is 100mm.
Step
The step is the tread and riser together making the ‘step’.
String
The string are a structural part of the staircase that hold the tread and the riser (step). Typically there is a string on either side of the staircase, but not in every case. Strings or stringers can be ‘closed’ or ‘cut’.
Closed stringers are the cheapest option and plainest in there look, the stringers encloses the tread and riser.
Cut stringers are cut to follow the line of the tread and riser, allowing the tread and riser to be seen.
The wall string is the string that sits flush against a wall.
Slope, pitch, rake
The slope, pitch or rake is the angle of the stairs, 42° is the UK rake angle.
Landing
Landings are the area at the top of bottom of the stairs, although you can get half and quarter landings that allow the staircase to change direction and take up less space than a traditional straight staircase.
Newel
The newel is the large posts at the top and bottom of the stairs. The newel posts has the string and the handrail jointed into it. The newel can be plain or decorative, to match the spindles for example.
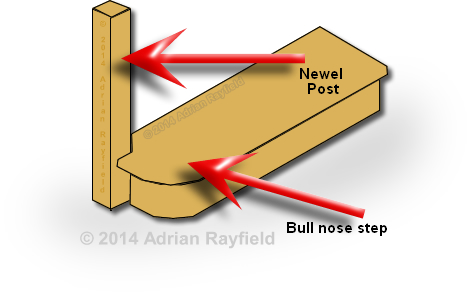
Bullnose step
This is typically the bottom step that has a rounded off end, a bullnose. The bullnose step start beyond the bottom newel post and wraps around the newel. Sometimes if the handrail sits on top of the newel and has a monkey tail on the end, the spindles sit on the step. You can also get a shaped step known as a curtail step.
Nosing
The nosig is the rounded front edge of the tread that protrudes beyond the face of the riser.
Tags: Bullnose, Handrail, Landing, Newel, Newel Post, Pitch, Rake, Riser, Slope, Spindle, staircase, Stairway, Stairwell, Step, String, Stringers, Tread
Posted in Decorating Tips | 1 Comment »