Painting, decorating and home improvement tips blog
How to remove artex
Posted by Adrian
June 4th, 2013

How to remove artex
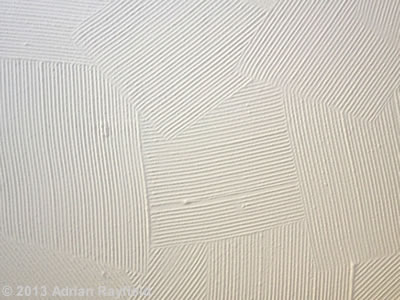
Artex is a decorative finish, you may have it on your ceilings and maybe your walls. There are several popular finishes such as swirl, stipple, broken leather, scroll, circle and bark for the walls. Artex was very popular until the 1990’s were it became less popular in favour of smooth plastered ceilings and walls.
Before the mid-1980’s Artex contained white asbestos to strengthen it. Depending on when your house was build or when Artex was applied in your house will depend if it contains asbestos.
Artex and health issues
If you are unsure if your Artex contains white asbestos or not it is best to get a local firm to test it first, for advice, contact the Environment Agency or your local environmental health department or look at www.asbestoswatchdog.co.uk.
If the Artex is untouched and has been sealed with paint, or the Artex was produced after the mid-1980’s then there shouldn’t be any health risks, but if unsure always get it checked first.
For more information of Artex you can read more about Artex on Wikipeadia.
How to remove Artex from ceiling and walls
First be sure that your Artex doesn’t contain harmful white asbestos, if you are unsure get it checked before doing any removal or disturbing the Artex, or call a local firm to remove it for you.

Once you are sure the Artex doesn’t contain white asbestos you have a couple of options to get rid of it.
You can skim over it with plaster, making it smooth and ready to paint or wallpaper once dry. This option is a quicker and far less messy option, although it may require some scrapping to remove high spots before plastering.
The other option is to completely remove it, this can be done with a scrapper. Make sure you wear protective clothing, goggles and a mask and cover the floor with dust sheets. Use a scrapper to scrape the Artex off, this could take some time, once the worst is off you could use a wallpaper steamer to remove the rest. This will obviously make a fair bit of mess, especially if your removing Artex of the ceiling.
Once you have removed all the Artex you can then plaster or if the ceiling or walls are is in good enough condition paper over them, you may have to fill holes, joins and scrapper marks before this is possible.
If you found this or any other post on the Property Decorating blog, please feel free to leave a comment, share on Facebook, Twitter and Google+. You can also follow us and Like us to find out when we have a new decorating tip go live.
Tags: Artex, Broken Leather, Ceiling, Emulsion, Plaster, Stipple, Swirl, Wallpaper, Walls, White Asbestos
Posted in Decorating Tips | No Comments »
How to paint new plasterwork
Posted by Adrian
April 7th, 2012
Painting new plaster
When you have had either walls or ceilings plastered or skimmed over with plaster you need to know how to paint them correctly to get a long lasting finish.
Firstly ensure they are dry, this will depend on what plastering you have had done. One thing not to do, start painting colour samples on bare plaster, due to the brushes that come with the samples and how thick you apply the sample you will see this on your walls forever unless you rub them down, best to paint on some lining paper or plain white paper, you can then move it around the room and see the colour in different lights. There is a previous post about this Colour samples and testers.
To Paint new plasterwork
Firstly get some sandpaper, not too course, as you don’t want to ruin the new plaster, around 120 grit and lightly rub over the plaster to remove any splashed plaster or drips of dirty water. Then brush the area down to remove any loose dust.
Next, you may well think it’s simply a case of deciding on a colour and painting over the new plaster? STOP!
You should never paint new plaster with a vinyl emulsion as this will sit on top of the plaster leaving a skin or layer that could peel off. You should always paint new plaster with a ‘New Plaster Sealer’ or a non-vinyl emulsion.
I use a non-vinyl emulsion and is my preferred method. I use a matt emulsion, typically white to seal the plasterwork before using a vinyl emulsion colour over the top to complete the job. The ‘New Plaster Sealer’ or a non-vinyl emulsion will soak into the new plasterwork and the finish coats you apply will adhere to this first ‘mist’ coat.
You don’t have to worry about covering the plaster totally, you just need to give it a ‘mist’ coat (as it’s known) to seal the plaster, you’re not looking for complete coverage and opacity.
Once you have mist coated your new plaster you can now apply your choice of finish coat and colour.
Paint Calculator
You may find my paint calculator useful to help work out the quantity of paint you require to mist coat your new plaster and also for your final finish coat. One thing to note, new plaster can be absorbent so slightly more paint maybe required than normal to get a good depth of colour and a good finish.
Tags: Ceiling, Emulsion, Mist Coat, Paint, Paint Calculator, Plaster, Plasterwork, Vinyl, Walls, water-based paints
Posted in Decorating Tips | 20 Comments »
How to paper a ceiling
Posted by Adrian
September 16th, 2010

How to paper a ceiling
Papering a ceiling can be a daunting thought for many people. I recently had to paper a ceiling with lining paper. The client required the existing paper to be removed, which was an Anaglypta.
After removing the paper, filling the cracks and giving the entire ceiling a good rub down I then re-papered it with 1400 gauge lining paper leaving a smooth flat surface in preparation for painting.
So how do you paper a ceiling?
If you have someone to help you it is an easier job but you can do it yourself.
Firstly you need to work out how many rolls of paper you need, to do this use our ceiling wallpaper calculator.
Next ensure the ceiling is prepared properly, do this by filling any cracks and holes, rubbing the ceiling down and ensuring any stains are blocked out first.
Next, measure the length of the room, for example the ceiling I did was just under 3.7 metres. I then cut the paper allowing enough for trimming at both ends, so in my case I cut the paper at 3.7 metres.
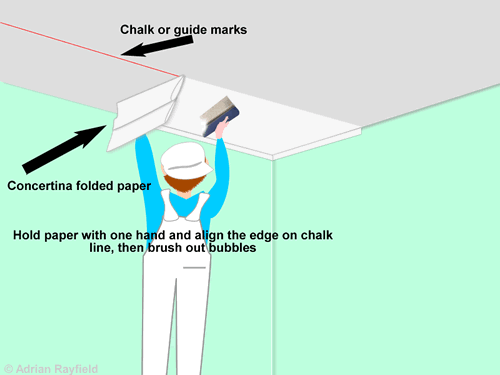
When you have cut the paper you need to mark a straight line or guide marks on the ceiling to follow to get the paper on straight. Measure the width of the paper, lining paper is 56cm wide. Allow for trimming and mark the ceiling from the wall with a pencil, I marked at 54cm allowing 2cm for trimming the edge.
If you have someone who can help you the best way is to mark the ceiling at each end and then use a chalk line to mark the ceiling.
Once you have done your guide marks on the ceiling you need to prepare the ladders or scaffolding etc that you will be using. Now you can paste the paper, make sure it is well pasted and you cover all the edges; fold the paper in a concertina style, allow the paper to soak until supple, for lining paper I allow 10 minutes.
When the paper is ready take the first concertina and put the edge against your guide marks or chalk line allow for trimming and the end also, hold the rest of the paper in one hand and brush out any bubbles. Then unfold the next concertina and smooth out, do this until you get to the end, you can then check the paper is on your marks, if not you should be able to slide the paper a bit until it is.
Next trim both of the ends and the edge.
If you have someone to help you get them to hold the concertinaed paper whilst you smooth out the bubbles and align the edge.
Once the first sheet is in place you can paste the next sheet and put this up, do this by again allowing enough for trimming and the end, butt the edge of the paper with the previous sheet and continue to the end. Carry on doing this until you have finished your ceiling, you then need to allow 24 hours for the paste to dry before painting.
You will no doubt have some sort of light fitting on your ceiling, when you get to this you will need to cut around it. Cut around in small sections removing the paper as you go. Ensure the electric supply is turned off before removing any part of a light fitting.
Tags: Ceiling, Lining Paper, Wallpaper, Wallpaper Calculator
Posted in Decorating Tips | 3 Comments »
