Painting, decorating and home improvement tips blog
How to mix wallpaper paste
Posted by Adrian
November 14th, 2012
How to mix wallpaper paste
How many times have you mixed up wallpaper paste to put up that new wallpaper you just bought and end up mixing something that resembles lumpy porridge, jelly or water. The reason for this is you must have mixed it wrong.
So how do you mix wallpaper paste? Firstly you will need to gather the tools you require. You will need :
- A clean bucket
- Something to stir the paste such as a stick
- A sachet of wallpaper paste
Mixing the wallpaper paste
Take your clean bucket and fill it with water, the amount of water will depend on the type of wallpaper you are going to be hanging and how many rolls you are going to hang. It’s always easier to mix an entire sachet rather than trying to mix half as it’s not easy to get the ratio right, unless like me, you have mixed up gallons of the stuff!
Here is a guide to how much water to use and how many rolls you can expect to do with one standard sachet of paste.
| Paper Type | Cold water in Pints | Cold water in litres (approx) | Number of rolls |
|---|---|---|---|
| Normal paper including woodchip | 14 | 8 | 10-12 |
| Washable and vinyl | 12 | 7 | 7-9 |
| Textured and blown vinyl | 10 | 5.5 | 4-6 |
| Embossed papers (Anaglypta® Original) | 10 | 5.5 | 3-5 |
| Embossed papers (Anaglypta® SupaDurable) |
9 | 5 | 1.5-3.5 |
Take the bucket of water and give it a good stir (not with the wife’s wooded spoon from the kitchen), next cut the top off the sachet of paste an tip it all in, now stir again one way then the other, do a figure of eight, do this for around 20-30 seconds.
Once the paste chips are all dissolved leave to stand for a further 90 seconds then give it a final stir before using.
Once mixed, paste will last for a few days in the bucket so you can come back to it cover it to stop anything dropping into it and come back to finish the job another day.
If you need to know how many rolls of wallpaper to buy, why not use our wallpaper calculator.
Tags: Anaglypta, Decorating, Wallpaper, Wallpaper Calculator, Wallpaper Paste, Wallpapering
Posted in Decorating Tips, Video | 19 Comments »
How to wallpaper around a door
Posted by Adrian
May 7th, 2012
How to wallpaper around a door
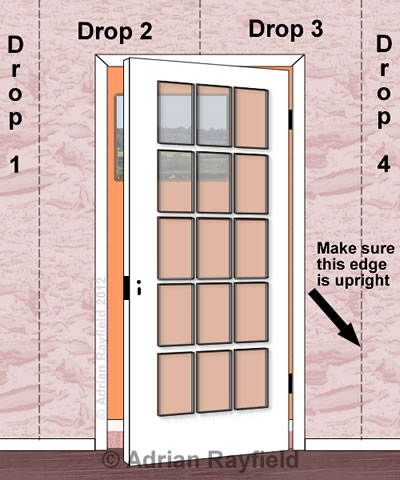
Following from my recent post, wallpapering around a window reveal this post continues on from that and will show how to paper around a door.
Where to start wallpapering
Before you start papering you need to work out where the paper comes to at the door architrave, to do this measure your roll of paper, then start at one corner of the wall with the door in it and mark the sheets from the corner to the door, then over the door and to the other corner, does this work out OK? What you are looking for is not to end up with a sheet falling just short of the door architrave and you having to fiddle about putting in a small strip. You may have to start with a half sheet from the corner to avoid this situation or it may just work out OK if your following the pattern around the room.
Once you have worked out the best place to start, use a plumb line or a level to mark a vertical line from the ceiling to the skirting board ensuring you allow a little paper to return around the corner by about 1cm.
Putting up the first sheet of wallpaper
Once you have pasted the first sheet of paper, line it up with your vertical mark on the wall and smooth out the bubbles as you go, trim the top and bottom and wipe any excess paste off the paper, continue doing this until you reach the door frame. One thing I always find easiest is to take the sheet of paper that is going to start to go around the door architrave, hold it up and match any pattern then mark the paper on the inside of the architrave then take the paper to the paste table and cut the bit that would go over the door off, this saves getting paste all over your door and frame and also can make it easier to handle.
Tags: Decorating, Door, Interior Decorating, Wallpaper, Wallpaper Calculator, Wallpapering
Posted in Decorating Tips | 2 Comments »
How to paper a ceiling
Posted by Adrian
September 16th, 2010

How to paper a ceiling
Papering a ceiling can be a daunting thought for many people. I recently had to paper a ceiling with lining paper. The client required the existing paper to be removed, which was an Anaglypta.
After removing the paper, filling the cracks and giving the entire ceiling a good rub down I then re-papered it with 1400 gauge lining paper leaving a smooth flat surface in preparation for painting.
So how do you paper a ceiling?
If you have someone to help you it is an easier job but you can do it yourself.
Firstly you need to work out how many rolls of paper you need, to do this use our ceiling wallpaper calculator.
Next ensure the ceiling is prepared properly, do this by filling any cracks and holes, rubbing the ceiling down and ensuring any stains are blocked out first.
Next, measure the length of the room, for example the ceiling I did was just under 3.7 metres. I then cut the paper allowing enough for trimming at both ends, so in my case I cut the paper at 3.7 metres.
When you have cut the paper you need to mark a straight line or guide marks on the ceiling to follow to get the paper on straight. Measure the width of the paper, lining paper is 56cm wide. Allow for trimming and mark the ceiling from the wall with a pencil, I marked at 54cm allowing 2cm for trimming the edge.
If you have someone who can help you the best way is to mark the ceiling at each end and then use a chalk line to mark the ceiling.
Once you have done your guide marks on the ceiling you need to prepare the ladders or scaffolding etc that you will be using. Now you can paste the paper, make sure it is well pasted and you cover all the edges; fold the paper in a concertina style, allow the paper to soak until supple, for lining paper I allow 10 minutes.
When the paper is ready take the first concertina and put the edge against your guide marks or chalk line allow for trimming and the end also, hold the rest of the paper in one hand and brush out any bubbles. Then unfold the next concertina and smooth out, do this until you get to the end, you can then check the paper is on your marks, if not you should be able to slide the paper a bit until it is.
Next trim both of the ends and the edge.
If you have someone to help you get them to hold the concertinaed paper whilst you smooth out the bubbles and align the edge.
Once the first sheet is in place you can paste the next sheet and put this up, do this by again allowing enough for trimming and the end, butt the edge of the paper with the previous sheet and continue to the end. Carry on doing this until you have finished your ceiling, you then need to allow 24 hours for the paste to dry before painting.
You will no doubt have some sort of light fitting on your ceiling, when you get to this you will need to cut around it. Cut around in small sections removing the paper as you go. Ensure the electric supply is turned off before removing any part of a light fitting.
Tags: Ceiling, Lining Paper, Wallpaper, Wallpaper Calculator
Posted in Decorating Tips | 3 Comments »