Painting, decorating and home improvement tips blog
Colour Trends For 2017
Posted by Adrian
December 1st, 2016
Colour Trends For 2017
Dulux Colour Futures™ from AkzoNobel have again come up with what they think the upcoming trends for colour for 2017 will be, through their international research they have selected a range of colours they think will be in trend throughout 2017, this year it consists of a interesting contrast between bolder, more striking colours and a selection of muted, lighter shades.

What Is To Colour For 2017
The colour of the year 2017 is…… 87BG 27/077 (also known as Denim Drift).
“Our review of international architecture, fashion and design trends revealed that blue is the colour of the moment. To make it relevant for your home, the team chose a blue that works as well in a kitchen as it does in a bedroom. Denim Drift, is the must-have colour for 2017. It will look great on your wall!”
Quote from Heleen van Gent Creative Director Dulux’s Global Aesthetics Center.
You can see more of this years colour schemes here:
Dulux Trade website or here:
https://www.dulux.co.uk/en/articles/colour-futures-2017.
Paint Calculator
If you would like to use the colour of the year (87BG 27/077) or any other colour you need to buy and need to work out how much you need to buy, use our FREE Paint Calculator.
Tags: 2016, 2017, 87BG 27/077, AkzoNobel, Colour, Colour of the year, Colour Trends, colour trends 2016, Denim Drift, Dulux, Dulux Colour Futures, Dulux Trade, Emulsion, ICI Paints, Paint, Paint Calculator, Painting, trend, trends for 2017
Posted in Decorating Tips, News, Resources | No Comments »
How to fit new glass into a window or door frame
Posted by Adrian
November 2nd, 2016
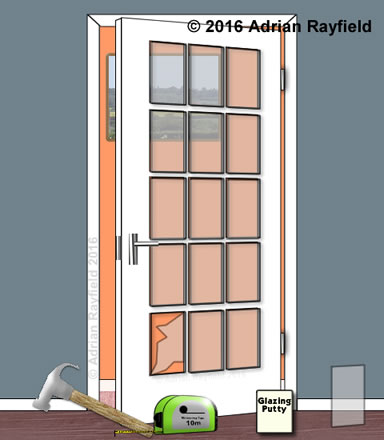
How to fit new glass into a window or door frame
Fitting a new piece of glass into a wooden or metal frame is a job you may need to do from time to time. Before you start running out to the shed a grabbing a hammer and chisel, safety first.
Make sure you wear suitable gloves to protect your hands and safety glasses or goggles for your eyes. You may also want to wear safety boots or at least sturdy shoes or boots and suitable clothing, this is not a flip flop, t-shirt and shorts kinda job!
Once you have to correct safety gear on you are ready to get the tools you require. Firstly determine the tools you need, is the glass held in with beading or putty?
For glass held in with putty you will need:
- A hammer
- A chisel or alternative to remove old putty
- Small tacks to hold new glass in
- Putty
- A tape measure
- A new pane of glass
For glass that is held in with glazing beads you will need:
- A hammer
- A chisel or alternative to remove glazing beads
- Pincers or pliers
- A tape measure
- A new pane of glass
- Putty, silicone, or caulk
It may be easier to remove the door of window and lay flat, but it isn’t always practical.
Removal and fitting of glass in a putted window or door
Firstly you need to remove any loose and large pieces of glass, it is a good idea to apply masking tape to the broken glass (carefully) so that as you remove the glass another piece doesn’t fall out. Once the loose glass is removed you need to remove the old putty from the frame, do this carefully with a hammer and chisel, taking care not to cut into the frame.
Ensure all putty is removed as any hard bits left can cause problems as you put the new glass in, and even crack the new glass. Remove any old tacks that held the glass in also.
Once all the old glass,putty and any tacks are removed, clear up, dispose of the old glass safely and remove dust and debris from the frame. A vacuum maybe useful to pick up any small bits of debris.
Now you can measure up for the new glass, of you haven’t done so already. Measure the width, height and thickness of the old glass, then you can either cut some glass yourself or go to a merchant and get them to cut some glass to size for you. The glass should be slightly smaller than the frame it is going in.
Now you are ready to fit the new glass, it is best to remove all the putty from the tub and put onto a board and knead like it is bread, this will mix in any linseed oil back into the putty and also warm it slightly to make it easier to use.
When this is done you can apply some putty to the frame, do this only on the edge the glass sits in. Then put the new glass in the frame, gently push the glass into the frame and making a seal with the new putty. Put some tacks in to hold the glass in place. clean of excess putty from inside frame.
Now you need to apply putty to the frame and smooth off giving an angled bead all around the glass with mitred corners.
Once you have glazed the frame, leave it alone, allow the putty to dry for a day before touching it at all, and a week or more before applying paint.
Removal and fitting of glass in a beaded window or door
You should remove any large pieces of glass, place masking tape of the glass to help prevent more glass falling out as you remove one piece, once all the broken glass is removed you can start to remove the glazing beads.
Take a hammer and chisel and gentle prize up the bead from the frame. You should be able to pull the nails out with pincers or pliers. Be very careful not to break the beading as it can be re-used. Make a note where each bead came from so that you can replace them into the same place.
Now measure for the glass allowing some movement, so 2-3mm smaller on each side. Either cut the glass to size yourself or get a merchant to do it for you. Now you have the glass the correct size you are ready to fit it.
Ensure the frame is clear from debris, use either a brush to dust or vacuum cleaner. The depending on situation and preference you need to apply putty, silicone (this can not be painted over) or caulk or the frame where the glass touches, then push the glass into position, pushing gently onto the glass to seal it against either the putty, silicone or caulk.
You can now start replacing the glazing beads, it is best to start at the bottom, put the bead into place and push it against the glass, lift the glass slightly off of the bottom of the frame and then put a nail into the bead to hold it tight, don’t hammer it all the way in just in case you need to adjust or remove the bead. Now add the second bead in the same way, and finally the two remaining beads. Once you are happy you can hammer all the nails all the way in and fill the holes ready for painting.
Tags: caulk, Door, Glass, Glass panelled door, Glazing bead, Putty, Silicone, Window
Posted in Decorating Tips | No Comments »
How to Choose a Paint Roller
Posted by Adrian
September 23rd, 2016
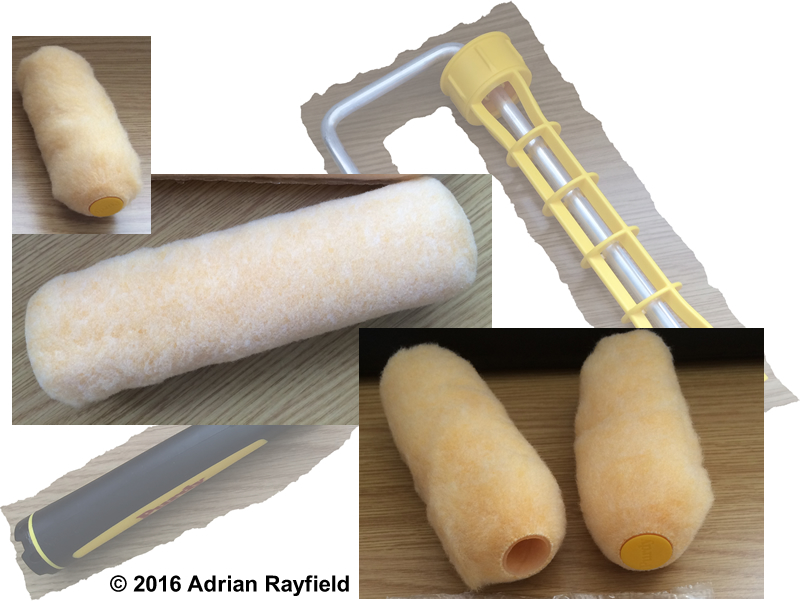
How to Choose a Paint Roller
When it comes to painting walls, ceilings or trim you need to consider the type of roller you need to use for the best results for the job you are doing. This not only includes the length of the roller but the nap or pile of the roller, a bigger nap roller will hold more paint, whereas as a smaller nap roller will hold less but will give a smoother finish.
You also have to have the correct roller cage or arm for the roller sleeve. Roller sleeves have a different diameter core, or hole, for where the cage fits into, it may have a 1 ½ inch or a 1 ¾ inch core so make sure you have a matching cage and roller sleeve.
Some rollers, such as a 4 inch mini rollers don’t need a cage, the sleeve has a small diameter core that slides over a arm. This is essentially a length of metal that has a right angled bend on the end to accept a mini roller sleeve. If you get a long arm for a 4 inch microfibre sleeve it is ideal for getting into those hard to reach places such as behind a radiator.
Some manufacturers do however make small rollers that do need a small ¾ frame for there 4 inch rollers.
Choosing the right roller sleeve for the job
Below is a list of roller sleeve pile thickness (nap) for a particular job, there are slight variations between manufacturers so thickness given is only a guide.
- Short pile – ⅜ nap (10mm approx) Ideal for smooth surfaces, newly plastered ceiling and walls, emulsions, eggshell and satin finishes.
- Medium pile – ½ nap (13mm approx) Ideal for semi-rough surfaces such as Artexed ceiling and walls, flat walls and ceilings, emulsions.
- Long pile – ¾ nap (19mm approx) Ideal for semi-rough to rough surfaces, emulsions, masonry paint.
- Extra long pile – 1 ¼ nap (32mm approx) Ideal for rough to very rough surfaces, masonry paints, emulsion.
- Mini microfibre roller – ⅜ nap (10mm approx) Ideal for smooth finishes, emulsion, new plaster.
- Foam roller – High Density Foam Ideal for smooth finishes, trim, gloss, satin and varnishes.
So basically a thin nap is ideal for flat surfaces, trim etc and thick nap is ideal for rough textured surfaces such as heavy artex or masonry. Foam rollers are great for trim, doors etc.
It is worth paying for a decent roller set up if you intend to use it more than once, some cheap DIY store offerings should be avoided as they do not last and the sleeve may molt leaving you with bits of roller sleeve in you paint, or you spending more time picking bits out of the paint rather than painting.
Tags: Ceiling, Eggshell, Emulsion, Foam, Long, Masonry, Medium, Microfibre, mini, Nap, Paint, Pile, Plaster, Roller, Satin, Short, Sleeve, Walls
Posted in Decorating Tips | 1 Comment »