Painting, decorating and home improvement tips blog
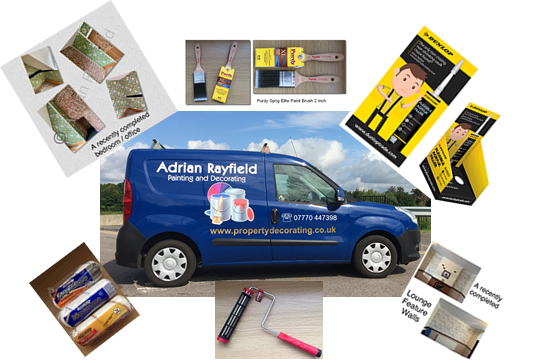
Painting And Decorating in Southend For 30 Years
Posted by Adrian
March 26th, 2023
Painting And Decorating in and around Southend For 30 Years
March 2023 sees the 30th year of my decorating career. It was thirty years ago this month that I first picked up my paint brushes and rollers and started painting and decorating. I have worked in a few places around the UK during this time, but I prefer to stay close to home, here in Southend on Sea and the surrounding areas.
Over the past 30 years of painting and decorating I have seen a lot of changes, not only in the painting industry but the economy also, as we all worry about the current living costs here in the UK, and further afield the war in Ukraine. And of course how the pandemic, Covid-19, changed many things for us, including work practises and day to day living. We have all had uncertain and hard times, but I’m still here and ready to decorate your property. So if you would like some work done, contact me for an estimate.

I have undertaken commercial work as well as residential work in my career and painted properties from warehouses to high street shops, to mansion houses, but most commonly I decorate residential properties, just like yours.
Styles and fashions continually change, and over the past 30 years there has been styles come and go, and come around again. Colours change as fashion does, and if you want to know the colours for 2023 have a look at my colour trends for 2023 post .
Painting And Decorating Website And Blog
Over the past eighteen years or so my website has had many designs, and my blog has grown and grown with many posts explaining how to decorate, how things are done and product reviews, with now in excess of 120 posts.
I also created and written the code for four materials calculators, a wallpaper calculator, a ceiling paper calculator, a tile calculator and a paint calculator, these have proved to be very popular with lots of hits per day with people working out their materials. These are used not only by DIYer’s but tradesmen also.
I enjoy writing blog post’s, although I don’t blog as much as I did for several reasons, but I like helping people who want to do painting and decorating or DIY jobs around the house but are not sure how to go about it. I find this very rewarding.
New Media
I continue to use social media, you can find me on Facebook, I also have a LinkedIn page, also a YouTube channel.
I can’t believe it has been 30 years, I would like to thank my past, present and future clients for their custom and continued support.
Tags: 2023, 30 years, 30years, colour of the year 2023, commercial, contact me, covid 19, Decorating, DIY, Emulsion, Estimate, Facebook, high street, Paint Brush, Paint Calculator, Painting, painting and decorating southend, pandemic, propertires, propertry, property decorating, Residential, rollers, Southend, Southend on Sea, ukraine, Wallpaper, Wallpaper Calculator, Wallpapering, youtube
Posted in Decorating Tips, Home Improvements, News, Resources, Reviews, Video | No Comments »
Making and using a water level
Posted by Adrian
March 31st, 2021
Making and using a water level
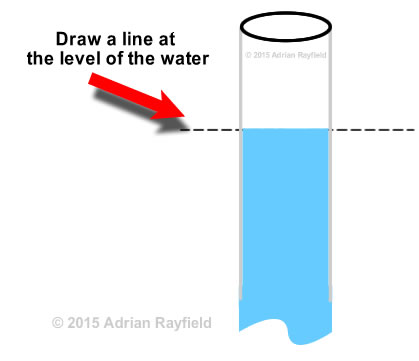
Water levels can come in very useful when you need to make a level line across a big expanse, such as in a room and a level simply won’t do. You can buy laser levels but they can be expensive and you may only require it once, this post describes how to make a cheap water level.
Water levels can be used for things such as dado and picture rails, wallpaper borders etc.
Making a water level
To make a water level is fairly straightforward, you will need the following items.
- A long length of clear tubing
- Water
- Something to bung ends of tube (optional)
- Funnel (optional)
You will need a length of clear tubing, long enough to reach around your work area, such as a room. The tube needs to be clear so you can see the water, so a garden hose wouldn’t be any good as it isn’t transparent.
Once you have your length of tubing you need to fill it with water. This can be done by using a funnel in one end of the tube and running water into it to fill the tube. You can also try the syphon method, but whatever you find works best for you. Make sure that there are no air bubbles in the length of tube, if there are work them out to an open end.
Don’t fill the tube fully as you will need to allow the water to move without it coming out all over the place and for it to settle to get the level.
Once the tube is filled enough you will need to stop the water coming out again, this can be done simply by placing your thumb over the end or a bung of some kind if you have one.
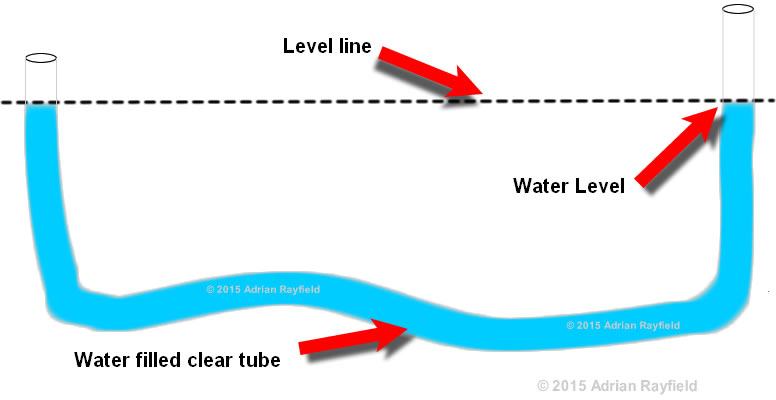
Using a water level
Now that you have made your water level you are ready to use it. You will need a starting point, this can be achieved by measuring and making a pencil mark, or maybe using an existing level, such as a dado rail, it could even be something in another room if the tube is long enough. For example if you want to make sure the dado rail is the same in two rooms. This will be your starting point.
You will need a second person to help you with using the level. One stays at the original level point whilst the other uses the level and marks the wall at the level.
The person holding the ‘fixed’ end, that is the original level mark stays holding the tube at this point, whilst the second person moves to a new point and holds the tube against the wall. The first person instructs the second person to move up or down until the water is level with the original mark, the second person can then mark the wall level with the water in the tube, thus giving a level line.
Continue doing this in several places as required. Remember not to lift tube too high without having end blocked as it will flow out. You can then if required draw a line and join up the marks.
Tags: Dado rail, Decoratomg, DIY, Handyman, Level, Painting, Wallpaper Border, Water, Water Level, Woodwork
Posted in Home Improvements | No Comments »
DIY jobs – The right tool for the job
Posted by Adrian
November 26th, 2020

DIY jobs – The right tool for the job
When it comes to tackling DIY jobs it is best to be planned and prepared, whether it be a building job, gardening, a simple handyman job, plumbing or woodworking job, it is best to be prepared with the correct tools. By using the wrong tool for the job you run the risk of personal injury, damaging equipment or the job you are working on, and more often than not using the wrong tool makes the job harder to do and makes the job take longer to complete.
The right tools for the job
It maybe an old saying and a bit of a cliche but, by having the right tool for the job, will make the job far easier, safer and produce a far superior job. Rather than struggling without the correct tools and in an unsafe way and finishing up with a botched job that you’ll more than likely end having to redo, or calling in a professional to do the job properly for you.
A clean workspace is a safe workspace
If you have a clean environment to work in, without clutter and dangerous hazards such as extension leads and tools all over the floor, the DIY job will be a far safer place to work and a easier place to work, so you will enjoy doing some DIY rather than hate it and shudder at the thought of any DIY tasks. It doesn’t take long to move stuff out of the way and tidy up.
Be prepared
Take time to think about the job, gather the tools you will need, remove any dangers (this includes small children and pets) from your work area. Think about how you are going to do the job, have you got everything that you require to complete the job, the last thing you want to do is have to rush out and buy something in the middle of the job.
If you are doing a plumbing job don’t forget to turn off any water supply before removing taps or cutting pipes. Make sure electrical supplies are turned off before touching wires or removing socket faceplates.
Gardening
If you decide to do a DIY job in the garden you should still think about the right tool for the job, and of course safety, such as using an extension lead with a RCD plug (residual-current device) so that if you run over it with the mover the power will be cut immediately.
Power tools
Lets face it we all love power tools, right? Well in the wrong hands they can cause serious injury and damage. However, having the correct power tool for the job will again make life easier, quicker and far more enjoyable.
Your stories
If you have any stories you would like to share, please do so in the comment box below. We would love to hear them,
Tags: Decorating, DIY, Gardening, Painting, Plumbing, Power Tool, Woodwork
Posted in Home Improvements | No Comments »