Painting, decorating and home improvement tips blog
Painting and Decorating : 20 years
Posted by Adrian
March 31st, 2013

Painting and Decorating for 20 years
2013 sees the 20th year of my decorating career. It was twenty long years ago that I first picked up my paint brushes and rollers and started painting and decorating. I have worked in a few places in the UK during this time but now prefer to stay close to home, here in Southend on Sea.
Over the past 20 years of painting and decorating I have seen a few changes, not only in the painting industry but the economy also, we all have to adapt and a few years ago I also started including DIY and Handyman jobs in the list of services I provide. I feel this offers a complete service to my customers, this came about as my customers often would ask me if I could assemble a flat packed wardrobe for a newly decorated bedroom or hang the odd picture or two, as I know how to do these types of jobs I agreed and now offer this as a service.
I have undertaken commercial work as well as residential work in my career and painted things from warehouses to high street shops to mansion houses.
Styles and fashions have changed over the past 20 years from everything being emulsioned to feature walls, either in emulsion or wallpaper. And who can forget the phase of terracotta!!

Painting and Decorating Website and Blog
Way back when I started there wasn’t the Internet but have had www.propertydecorating.co.uk since 2007 which now includes a painting and decorating tips blog, that has over 60 decorating tips and has proved to be very popular.
I also have two other sites, www.rayfields.co.uk and www.improvingyourproperty.co.uk, both have blogs also covering DIY and Handyman topics as well as painting and decorating.
I have also created and written the code for four materials calculators, a wallpaper calculator, a ceiling paper calculator, a tile calculator and a paint calculator, these have proved to be very popular with lots of hits per day with people working out their materials. These are used not only by DIYer’s but tradesmen also.
I enjoy writing for all the blog’s and helping people out who want to do painting and decorating or DIY jobs around the house but are not sure how to go about it. I find this very rewarding.
New Media
Over more recent years I have started tweeting on Twitter, all the sites have a Facebook pages, I have a Google+ account as well as LinkedIn and a YouTube channel.
YouTube
Most recently I have started to put so video’s up on my YouTube channel, I plan to do lots more of video’s when time allows. But feel free to subscribe to my channel and comment on my videos.

Here’s to another 20 years!!!
Tags: Decorating, Decorator, Facebook, Google+, Painter, Painting, Twitter, Video, YouTube Video
Posted in News | 2 Comments »
How to fit coving and why use it
Posted by Adrian
March 24th, 2013
How to fit coving and why use it
Coving or cornice is very popular, it comes in a wide range of styles, sizes and made from a variety of materials such as plaster or polystyrene. A lot of you may have coving in your house, it helps break up the hard edge between the wall and ceiling and gives a nice aesthetic decorative look. You may have a plain concave coving or something more fancy such as egg and dart or Swag and Bow.
How to fit coving
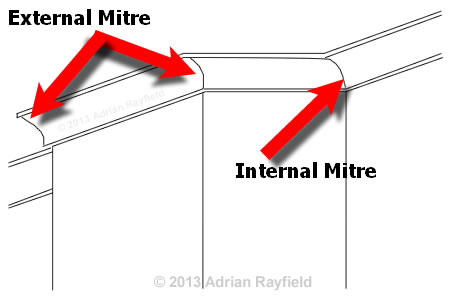
To fit your chosen coving you will need the appropriate cove adhesive, this maybe a lightweight coving adhesive or a powder ‘mix your own’ adhesive for heavier paper faced plaster coving or just plaster coving. You will also need to cut mitres in each or the internal and external corners, it is easier if you use a mitre block or mitre tool that the coving manufacturer make.
Mark the ceiling and wall as described in the instructions as your guide lines, where the lines go will depend on the size of coving. You will need to measure the length of the wall and cut the coving and mitres accordingly, do this around the room until you have all the lengths cut, now mix enough adhesive up (if you need too) to fix a couple of lengths of coving as the adhesive will harden fairly quickly and be unworkable.

Apply adhesive to both edges of the back of the coving noting which is the wall and ceiling edge, this will be printed on the back of the coving. Once the adhesive is applied, push the length into place. Push the coving fairly hard to squeeze out the adhesive so it has a good bond to wall and ceiling. Use a scraper to remove the excess adhesive and a paint brush or sponge to wipe down the face of the coving.
Use adhesive to fill in joints and mitres, continue with the coving in this way until you are done. Leave the coving to dry overnight and then lightly rub down the joints and mitres, then apply 3-4 coats of emulsion to get a good coverage.
Why fit coving
Coving is primarily used in modern homes as a decorative item but it does cover up the nasty looking crack you often get between the ceiling and wall line, this crack is caused my movement in the house, nothing to worry about it is perfectly natural. The house expands and contracts as it gets hot and cold, the crack is caused by the movement of the two.
Coving can also add a nice soft edge rather than a hard edge and make a room look softer and more welcoming. If you are thinking of decorating a room, why not consider adding some coving.
Rooms with low ceilings suit smaller coving such as a 90mm but high ceiling rooms can go for 127mm or larger.
For a list of types of profiles and a little more information about coving, take a look at Wikipedia.
For more in-depth instructions on fitting coving, take a look at the article I wrote on our DIY By Design blog about how to fit coving.
Tags: Concave, Cornice, Cove Adhesive, Coving, Egg and Dart, External, Internal, Plaster, Swag and Bow
Posted in Decorating Tips | No Comments »
Parts of a door frame
Posted by Adrian
February 12th, 2013
Parts of a door frame
If you have ever been around a builder or in a timber yard or a DIY store you may of heard some terms that you are unsure of there meaning or what they are. You may think a door frame is just that, simply called a door frame. Well, you’ll be wrong, there are many parts that make up a door frame and I will explain them below.
A door frame is typically made out of wood for internal door frames, both hard and soft woods are used, hard wood such as oak is more expensive than the cheapest option of pine. External door frames can be made out of wood, metal or plastic, this will depend on the type of door you have. In this post I am talking about an internal soft wood door frame.

Door frame
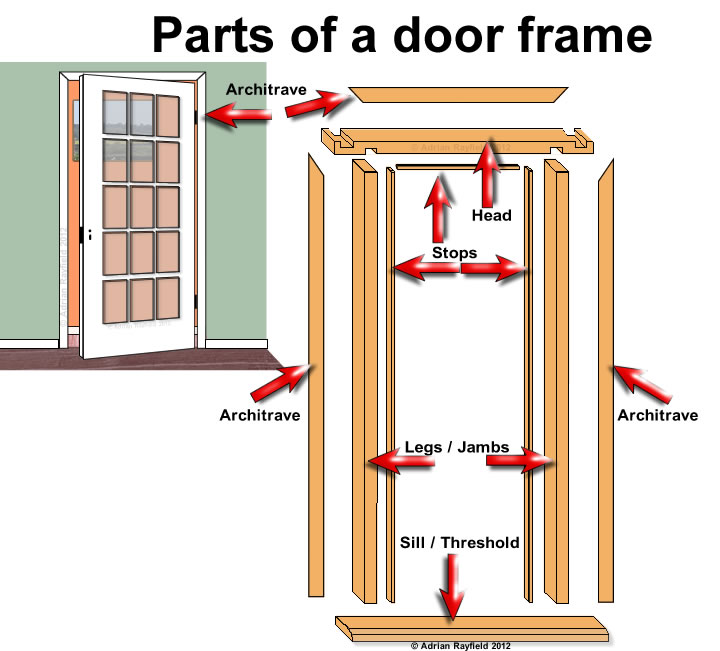
An internal door frame is commonly made out of softwood such as pine, it is smooth planed timber and is known as a door frame, a door casing or door lining. It doesn’t matter what you call it, they are all the same thing. The frame comes in different depths to suit different wall thickness. The door frame is made up from several parts, a head, legs or Jamb, a sill or threshold and door stops. The frame is then finished off with a moulding called an architrave.
The door frame set
If you bought a new door frame you would buy a door frame “set” which includes all the parts to build the door frame, the set will have a head, two legs or jambs and door stops, you do not get any architrave in the set and will have to be bought separately. I will explain each part of the set below.
Door frame – head
The head is the top of the door frame, it allows to two side members of the frame, the legs/jamb to fit into a grove. The door frame head has grooves cut into it at two widths allowing you to choose the width of opening, if the inner groves are used the wood sticking out beyond the frame, known as horns, can be sawn off.
Door frame – legs / jambs
The door frame upright parts are called legs or jambs, in a finished frame one side has the hinges screwed into it and the other side has the door lock keep fitted to it. Some frame legs are rebated so a door stop isn’t required as the rebate makes the stop.
Door frame – door stop
The door stop is a thin piece of wood that is fixed to the inside of the leg / jamb, it’s job as the name suggests is to stop the door. With out a door stop the door can’t be halted and would rip of it’s higes. If the leg / jamb has a rebate a door stop isn’t required.
Door frame – sill / threshold
The door frame sill or threshold is the horizontal part at the bottom of the legs / jambs, this isn’t normally found in interior frames but can be seen on external door frames. It’s purpose is to give the frame rigidity and to help channel the water away as it runs off the door. It’s also the part you carry the bride over once you are married.
Architrave trim
Architraves are decorative mouldings. Not bought in a door frame set, these are bought separately as they come in different sizes and styles and can match your moulding on the skirting boards.
Tags: Architrave, Door, Door Frame, Door Frame Set, Frame, Head, Jamb, Legs, Stop
Posted in Decorating Tips | 6 Comments »
