Painting, decorating and home improvement tips blog
How do you paint a hall stairs and landing?
Posted by Adrian
January 13th, 2013
How do you paint a hall stairs and landing?
Painting a hall, stairs and landing for a lot of people is a daunting task and too much for them to tackle themselves, so they call a professional decorator like myself to do it for them. A lot of people will not have the ladder to aid them to reach the tallest part, or the stairs are an awkward shape.
Having the right tools makes it safe and easier to do, safety should always be in your mind when painting and decorating but especially if you are painting and decorating your hall, landing and stairs. Falling off a ladder whilst working on a stairway can be very painful.
Painting a hall, stairs and landing
Painting a hall, landing and stairs is just like painting any other interior room, you start at the top and work down.
So, start with preparing the walls, filling and holes and cracks, then paint the ceiling and coving, if you have any. Paint the picture rail next, if you have one, then emulsion the walls, if you have a dado emulsion down to that, then paint the dado before painting the remaining walls below the dado rail. This will save the newly painted wood work getting splashed with emulsion.
Finally, paint the stair stringers (the bit that goes up each side), the spindles and handrail and skirting boards.
And don’t forget the loft hatch if it’s in the hallway.
Wallpapering a hall, stairs and landing
If you are going to wallpaper your hallway, landing and stairs it is similar to wallpapering and interior room, you do all the preparation first, then you paint the ceiling and coving, then paint any woodwork such as picture rail, dado rail and the the stair stringers, spindles and handrail and also the skirting boards.
Once all the paint is dry, the final job is to wallpaper your hall, landing and stairs.
Useful links
Below is a list of useful links you may find help you when either painting or wallpapering your hallway, stairs and landing.
- Wallpaper calculator
- Paint calculator
- Ceiling wallpaper calculator
- How to wallpaper
- How to wallpaper around a door
- How to wallpaper around a window or door reveal
Please feel free to comment below, share this and other posts and follow us on our social media channels.
Tags: Ceiling Wallpaper Calculator, Decorating, Door, Hall stairs landing, Interior Decorating, Paint Calculator, Painting, Reveal, Skirting Boards, Wallpaper, Wallpaper Calculator, Wallpapering, Window
Posted in Decorating Tips | 6 Comments »
Painting over varnished wood
Posted by Adrian
March 14th, 2012
Preparing to paint over varnish or old stained wood
I recently did a job that had new fire doors installed and because of this new door stops also had to be fitted, when the stops were fitted the paint came away with the old door stops. The paint had been applied over stained and varnished wood. You may have this in your home if it’s old enough, does the paint chip easily and reveal dark wood underneath? More than likely you have varnish or stained wood and painted over without the proper preparation. As you can see by the following picture it looked a bit of a mess.
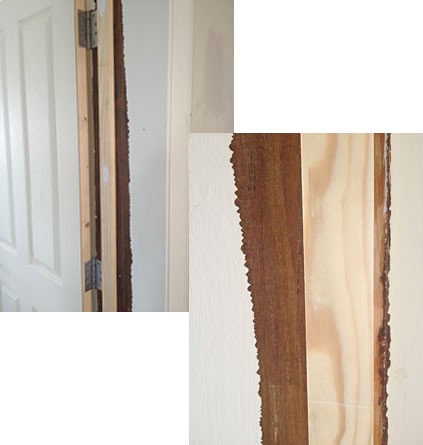
The paint hadn’t adhered to the varnish underneath and simply flacked off, as you can see by the following quick video it wasn’t too much of a job to scrape the paint off due to lack of preparation when the varnish was painted over.
The following image shows the paint removed and prepared ready for the first coat of primer.
Tags: BIN, Door, Paint, Painting, Primer, Satinwood, Varnish, Zinsser
Posted in Decorating Tips, Video | 2 Comments »
Painting an up and over Steel Canopy garage door
Posted by Adrian
August 17th, 2010

How to paint an up and over Steel Canopy garage door
When over painting an up and over garage door you need to prepare the surface as you would any other surface.
Wash off any dirt and grit, then abrade the surface with sandpaper, I tend to use 80-grit for this. Key the surface all over including the bottom and sides.
Now you can dust off the door and undercoat with the appropriate colour undercoat.
I normally start by painting the two edges, but not the bottom of the door. Be careful when painting the edges of the door not to get any on the frame if the door is a different colour, lift the door up about half way, you can now paint the edges.
Next, if your door has horizontal sections start at the top working down, if the door has vertical sections start from one side working across, if the door has panels do these first and then paint the rest of the door.
When I paint either a door with horizontal or vertical sections I do the same thing, I paint the groove first, then the panel, then paint the next groove and then the panel and so on, then with the last panel I paint the bottom of the door.
When the undercoat is dry do the same procedure as before but with your chosen topcoat.
When you topcoat, work fast, that way the paint flows nicely and you can put a good amount on. As you paint the door lift it up as you go, it’s far easier; you don’t have to bend down and the paint wont run!
Finally, when you’re done lift the door all the way up, this serves two purposes, firstly the paint won’t run and will flow well, and secondly it stops insects, dust and dirt blowing over the wet paint on the door as most of it is in the garage.
Be aware of rain though, if the door is left up and it rains the rain will lay on the door and ruin your paint.
Tags: Garage Door, Paint, Painting, Steel Canopy Garage Door, Up and Over
Posted in Decorating Tips | 3 Comments »