Painting, decorating and home improvement tips blog
Weather To Paint or Not!
Posted by Adrian
July 15th, 2012
Weather to Paint or Weather to Not!
That is the question here in the UK this summer.
Here in the UK we are having some very wet weather for the season. At Property Decorating this is normally the time of year for our exterior painting work to get into full swing.
Its Raining Again …….
According to the Met office ……
“Met Office confirms wettest June in over a century” ref : https://www.metoffice.gov.uk/climate/uk/interesting/april-july2012

Apparently the Met Office figures for this June are showing double the average amount of rain fall thus making this year the wettest “June” since their records began in 1910.
Weather to paint
So if you are considering weather or not to paint your exterior there are some things to bare in mind ;
Is it dry enough to paint the surface of your exterior or is it already too wet?
What is the forecast, will you have enough time to get the job done in time? Most paint companies have details of their products drying times so you can at least estimate the time you will need for drying and second coating.
So there are many factors to think about, with Masonry paint for example could simply be washed away with heavy rain leaving you with poor and patchy coverage, likewise Gloss paint can get pitted with heavy rain and not give you the finish you require.
These are just a few points to think about when thinking about ‘weather’ its wise to paint in this unseasonably wet weather.
Umbrella anyone !!!!
Tags: Gloss, Masonry, Paint, rain, weather
Posted in Decorating Tips | 1 Comment »
How to wallpaper around a door
Posted by Adrian
May 7th, 2012
How to wallpaper around a door
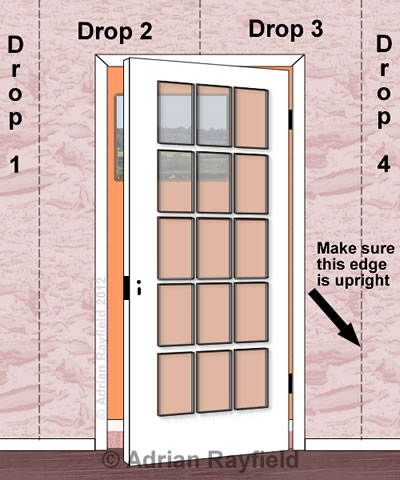
Following from my recent post, wallpapering around a window reveal this post continues on from that and will show how to paper around a door.
Where to start wallpapering
Before you start papering you need to work out where the paper comes to at the door architrave, to do this measure your roll of paper, then start at one corner of the wall with the door in it and mark the sheets from the corner to the door, then over the door and to the other corner, does this work out OK? What you are looking for is not to end up with a sheet falling just short of the door architrave and you having to fiddle about putting in a small strip. You may have to start with a half sheet from the corner to avoid this situation or it may just work out OK if your following the pattern around the room.
Once you have worked out the best place to start, use a plumb line or a level to mark a vertical line from the ceiling to the skirting board ensuring you allow a little paper to return around the corner by about 1cm.
Putting up the first sheet of wallpaper
Once you have pasted the first sheet of paper, line it up with your vertical mark on the wall and smooth out the bubbles as you go, trim the top and bottom and wipe any excess paste off the paper, continue doing this until you reach the door frame. One thing I always find easiest is to take the sheet of paper that is going to start to go around the door architrave, hold it up and match any pattern then mark the paper on the inside of the architrave then take the paper to the paste table and cut the bit that would go over the door off, this saves getting paste all over your door and frame and also can make it easier to handle.
Tags: Decorating, Door, Interior Decorating, Wallpaper, Wallpaper Calculator, Wallpapering
Posted in Decorating Tips | 2 Comments »
How to paint new plasterwork
Posted by Adrian
April 7th, 2012
Painting new plaster
When you have had either walls or ceilings plastered or skimmed over with plaster you need to know how to paint them correctly to get a long lasting finish.
Firstly ensure they are dry, this will depend on what plastering you have had done. One thing not to do, start painting colour samples on bare plaster, due to the brushes that come with the samples and how thick you apply the sample you will see this on your walls forever unless you rub them down, best to paint on some lining paper or plain white paper, you can then move it around the room and see the colour in different lights. There is a previous post about this Colour samples and testers.
To Paint new plasterwork
Firstly get some sandpaper, not too course, as you don’t want to ruin the new plaster, around 120 grit and lightly rub over the plaster to remove any splashed plaster or drips of dirty water. Then brush the area down to remove any loose dust.
Next, you may well think it’s simply a case of deciding on a colour and painting over the new plaster? STOP!
You should never paint new plaster with a vinyl emulsion as this will sit on top of the plaster leaving a skin or layer that could peel off. You should always paint new plaster with a ‘New Plaster Sealer’ or a non-vinyl emulsion.
I use a non-vinyl emulsion and is my preferred method. I use a matt emulsion, typically white to seal the plasterwork before using a vinyl emulsion colour over the top to complete the job. The ‘New Plaster Sealer’ or a non-vinyl emulsion will soak into the new plasterwork and the finish coats you apply will adhere to this first ‘mist’ coat.
You don’t have to worry about covering the plaster totally, you just need to give it a ‘mist’ coat (as it’s known) to seal the plaster, you’re not looking for complete coverage and opacity.
Once you have mist coated your new plaster you can now apply your choice of finish coat and colour.
Paint Calculator
You may find my paint calculator useful to help work out the quantity of paint you require to mist coat your new plaster and also for your final finish coat. One thing to note, new plaster can be absorbent so slightly more paint maybe required than normal to get a good depth of colour and a good finish.
Tags: Ceiling, Emulsion, Mist Coat, Paint, Paint Calculator, Plaster, Plasterwork, Vinyl, Walls, water-based paints
Posted in Decorating Tips | 20 Comments »