Painting, decorating and home improvement tips blog
Putting up fencing
Posted by Adrian
March 24th, 2019
How to erect fencing
If you are planning to put up a new fence or simply replace an existing one, it is a good idea to tell your neighbours your plans and ask them to remove any breakable pots or tie back treasured plants and also ask them for permission to go onto their property if required.
You will also need to check the boundaries of your property and make sure you know which side is your fence and which is that of your neighbours. If you are replacing a fence then follow the old fence line but if you are putting up a new fence make sure you mark the boundary before starting. You may also want to check with the local planning authority you are allowed to erect a new fence and the height you are allowed to go to.
Before you buy
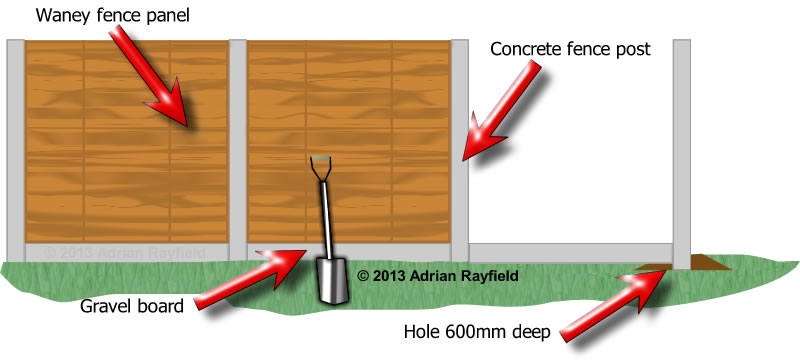
Remember that if you buy a 5 foot high fence, the post needs to be 7 feet tall as 2 feet will go into the ground, if you are going to use a gravel board and a 5 foot fence you will need allow for this also for the length of post.
This blog post deals with erecting a new fence with new panels and concrete posts but the principles are the same for wooden posts or metal spikes.
Tools for putting up a fence
You will need the following tools, it may also help to have a friend help you lift the posts and fence panels.
- A Spade
- Gardening Gloves
- A String line
- Fence panels
- Concrete Posts
- A Spirit Level
- Bags of PostFix (pre-mixed sand gravel and cement)
- A Tape Measure
- A Saw
- Gravel Boards (optional)
Getting Started
The first thing you need to do is mark the boundary, use a string line for this. Once you have your straight line you need to work out where the first post will go, this maybe up against the house. You now have to dig the holes and fix the posts.
Fixing the fence posts
You will need to dig holes for each post, each post should be 18-24 inches in the ground, and the hole should be around 3 times as wide as the post, as a guide the hole will be about the spades width and the spades blade and a half deep.
Once you have the correct size hole drop the post into the centre of the hole, upright it using the spirit level. At this point you can secure the post by dropping a couple of half bricks or large stones to wedge between the post and outer edge of the hole. If you have a friend helping you you can get them to hold it upright for you. Now tip half of the dry PostFix into the whole, then add water as per instructions on the bag. Keep checking the post is upright, then tip the rest of the PostFix into the whole and add water. Allow the given time to set. Do this with all the posts.
Make sure the gap between each post will allow for a fence panel, you can either stand the panel in it’s place whilst you fix the next post, or if you are using gravel boards, use these as spacers.
Fitting the fence panels
Once all the posts are fixed and the concrete is set, if you haven’t done so already and you are using them, fit your gravel boards. Next lift the fence panels into place by slotting them into the groove on the posts, you may need two people to do this. You may want to wear garden gloves to avoid splinters.
How to cut fence panels
If you need to cut the width off a fence panel because the gap between the posts are smaller than the panel, you will need to cut the panel down to fit. To do this carefully remove the end baton, then measure between the groves in the concrete posts and mark this on the fence, cut the top and bottom baton allowing for the width of the side baton. Then re-fix the side baton and finally cut down the edge of the side baton trimming the unwanted part of the panel. Your panel should now fit snugly between the two posts.
Tags: Concrete fence Post, Fence, Fence Panel, Fence Posts, Gardening, Gravel Boards, PostFix, Spade, Wooden Post
Posted in Home Improvements | No Comments »
What is decorators caulk
Posted by Adrian
February 22nd, 2019
What is decorators caulk / filler
Decorators caulk is a decorating gap filler, is made of an acrylic and is flexible once dried. It is ideal for areas that have movement but cannot be used like a powder filler and cannot be rubbed down, it can be painted over. It is the best kept decorators secret ever, my wife had never heard about “flexi-filler” as she calls it until I met her.
Notice the spelling also, it is decorators caulk, not cork.
What is decorators caulk used for
Decorators caulk, or decorators filler as it’s sometimes called is used for filling gaps around door and window frames, along the top of skirting boards, gaps around the ceiling and coving line and is ideal for using if there is movement due to it’s flexible properties.
Use decorators caulk for:
- Around Door frames
- Around Window frames (Wood or UPVC)
- Skirting boards
- Ceiling and wall line
- Around coving
- Staircases
- Interior wall corners
How long does decorators caulk take to dry
This is dependent on many factors such as room temperature and humidity, size of gap filled and porousness of where it has been applied. The drying time can be anything from 20 minutes to 2 or more hours. If unsure it is best to leave for a few hours before over painting it.
How to use decorators caulk
Decorators caulk is easy to use, we have written a post detailing how to use decorators caulk on our other blog DIY By Design so there isn’t any need to cover it in depth here.
Why does decorators caulk crack
Decorators caulk may crack if the gap you filled is too large, it may also sink or shrink slightly. If this is the case apply a second layer of caulk over the top of the first one.
If the caulk has cracked or crazed when you have painted it, this could be you didn’t leave it long enough for it to dry.
It isn’t uncommon for paint to crack or craze on top of the filler, this is mostly a problem for emulsions, a simple solution is to paint over the caulk with a non-vinyl paint, such as an acrylic primer.
Update
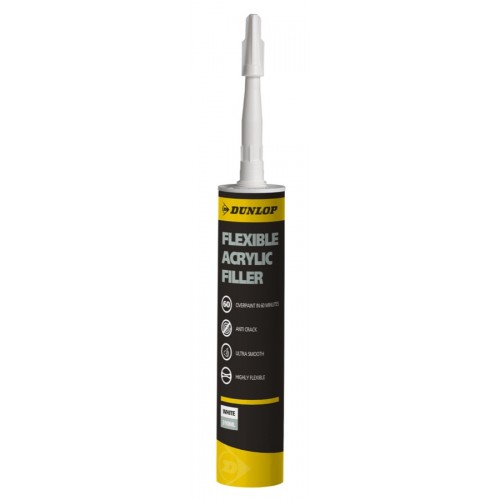
I have done a review on a caulk that doesn’t crack or craze, I have been using it for a while and the results are good.
Read my Review Of Dunlop Pro Decor Flexible Acrylic Filler Caulk here. And if you would like to buy some for yourself you can buy Dunlop Pro Decor Flexible Filler caulk from here.
Tags: Acrylic, caulk, Caulking, Ceiling, Coving, Decorators Caulk, DIY, Door, Filler, Frame, Handyman, Skirting Boards, Window
Posted in Decorating Tips, Home Improvements | 1 Comment »
Types of wallpaper paste
Posted by Adrian
January 23rd, 2019
Types of wallpaper paste
There are many types of wallpaper paste and choosing the correct one can be confusing. Hopefully this post will help you decide the appropriate paste for the paper you are hanging.
The first place to look is on the hanging instructions themselves, this may come as a leaflet that came with the paper of a leaflet in the roll itself. If you are at all unsure ask your supplier or the wallpaper manufacturer directly.
Cold water paste
This is the type of paste that you mix yourself, you mix it with cold water. The amount of water depends on the type of paper being hung, you can find out how many litres of water to use on the paste sachet or box it comes in.
Getting it mixed correctly is the important part so it is strong enough to hold the paper. It is the easiest paste to remove as it is water soluble. This type of paste is starch based.
Here is a short video of how to mix the perfect wallpaper paste up:
All purpose
This paste is made for the majority of wallpapers from lining papers, to embossed and vinyl papers, but you should always check before using paste, especially on specialised papers.
Heavy duty
As the name suggests, this paste is for heavy duty or heavy weight papers, giving stronger adhesion than standard adhesives. It is however harder to remove when redecorating and if you get paste on the front of the paper, so care should be taken not to mark or damage the front of the paper and remove any excess paste as soon as possible.
Extra strong
This type of paste can be in the form of a powder paste or ready mixed, it is ideal for medium weight papers such as lining paper, embossed and anaglypta papers.
Paste the wall
As the name suggest, paste the wall adhesives mean you apply the paste direct to wall and not the back of the paper. This paste is only used for paste the wall papers as the paper has been designed that way and pasting the paper isn’t required.
Ready mixed
Ready mixed pastes come in tubs and are formulated and are vinyl based and do not dry out until they are exposed to air, such as when applied hung wallpaper. Some wallpapers recommend using a ready mixed paste whereas some wallpaper manufacturers may recommend their own ready mixed paste to ensure good adhesion to the surface the paper is being applied to.
The ready mixed pastes do tend to be more expensive than say cold water mixed pastes.
Wallpaper Calculator
Apart from your paste, you will need how many rolls of wallpaper, or ceiling paper to buy. We have a handy calculator for you do work out how many rolls you need to buy. Simply go to our Wallpaper calculator or Ceiling paper calculator, enter the measurements and hit the submit button, the amount of rolls you require will then be returned.
Tags: All purpose, Calculator, Ceiling, Cold Water Paste, Heavy duty, How to mix wallpaper paste, Paste, Paste the wall, Video, Wallpaper, Wallpapering
Posted in Decorating Tips, Home Improvements | No Comments »