Painting, decorating and home improvement tips blog
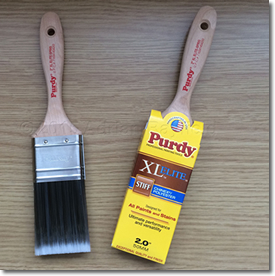
Cleaning a paint brush
Posted by Adrian
October 17th, 2019
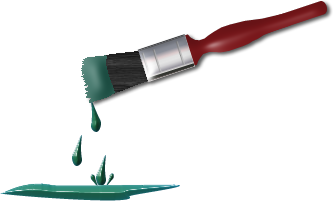
Cleaning a paint brush
Whether you are a professional painter and decorator, a hobbyist or DIYer you will need to clean paint brushes at some point. Brushes range hugely in prices depending on size and quality from just a few pence to several pounds. You may prefer to simply throw them out when you are done, but is that really cost effective? If you spend the best part of £20 on a brush do you really want to throw it away after just one use?
You could store them in a storage product, but this is OK if you intend to use the brush again in the short term and in the same colour. If you are not going to use a brush say within 3-6 months and use a different colour your best bet is to clean out the brush and store it correctly, this way your brush will last for far longer and be in tip top condition giving a good finish every time you use it.
Cleaning and storing your paint brush
Before you clean or store your paint brushes you need to be aware of the type of paint you have been using, either water or oil based, as this will determine how you clean or store your brushes.
Whichever type of paint you have used, remove as much paint from your brush as possible.
Cleaning brushes – water based paints
Run the brush under a running tap, have the bristles facing downwards to prevent washing paint further in the brush where it could dry and go hard. Wash it out until the water runs clear, you can use some mild soap to help remove colour from the bristles and a brush comb to remove any stubborn paint.
Once all the paint has been removed, store in the original package or sleeve or wrapped in kitchen towel or paper to prevent the bristles from splaying out.
Cleaning brushes – Oil based paints
Oil based paint requires a slightly different approach to cleaning than water based paints. Oil based paints need a solvent to break down to oils in the paint allowing it to come out of the brush, unlike water based paints that can simply be removed with water.
To clean oil based paints from brushes, remove as much paint from the brush as possible by wiping it on the edge of the paint can. Then you will need to use white spirit or a brush cleaner to wash the brush in, this will dissolve the paint within the brush. You may have to do this a couple of times with clean white spirit or brush cleaner to get the paint out. Once the paint is removed you can use a brush comb to remove any hardened paint from the bristles, then wash in warm soapy water and once all the white spirit or brush cleaner has been washed out you should store the brush in its original packaging or paper towel to keep the bristles straight and in good condition, ready for it’s next use.
Tags: brush, Brushes, Cleaning, Emulsion, Oil based, Paint, Paints, Storing, Water based
Posted in Decorating Tips, Home Improvements | No Comments »
How to fix squeaky floorboards
Posted by Adrian
September 23rd, 2019
How to fix squeaky and creaking floorboards
You know how it is, you creep home late at night and head up to bed trying not to wake the family, then squeak the floorboards make a noise like the floor is falling through and wakes the family, not a good scenario but one fairly common I would guess.

If you suffer from squeaky and creaking floorboards it can not only wake the family as I jokingly mentioned above it can just be annoying. Well thankfully it isn’t too much of a problem to fix them for any handyman or DIY enthusiast.
What causes squeaky floorboards
Squeaky floorboards are caused mainly by badly fitting boards. If the boards are taken up to run electrical cables or pipework and are not put back properly, or the boards nailed back using the old nails in the old nail holes which means the nails don’t have a tight fit on the board and allow for them to move and squeak. Sometimes the end of the boards are not sitting on a joist and can move rubbing against the floorboards next to it.
Another reason for squeaky floorboards is simply that the boards have dried out and the nails are no longer holding the board down tight enough or the boards have moved and are rubbing together, whatever the reason you should be able to fix the problem.
How to fix squeaky floorboards
The first thing to do is to remove the floor covering, or part of it if you can’t fully clear the room. Once the floor covering has been removed you need to tread the boards, walk around and identify the squeaks and creaks and mark the boards where the noise is with a pencil. Do this over the entire floor.
Now go back and look at each mark you have made and identify what the problem is, for just boards that are rubbing together, you can either remove a board and plane a little off the edge, or try adding some talcum powder or chalk dust between the two rubbing boards to help movement between the two boards.
If the boards seem to be moving around the nails at the end of the boards, you need to screw these down. Don’t just put a screw in though as you may go through an electrical cable or a pipe, you may have to lift the board to see what is underneath first. Remove the nails and drill pilot holes next too the old nail holes so not to split the wood and then put a screw in making sure it pulls the board down tight.
If the board is split at the end, you may have to replace that board, or you may be able to lift it and turn it round so the other end is under the skirting board.
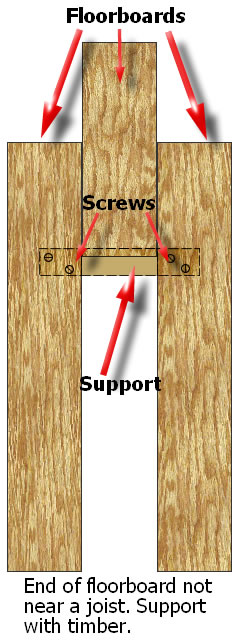
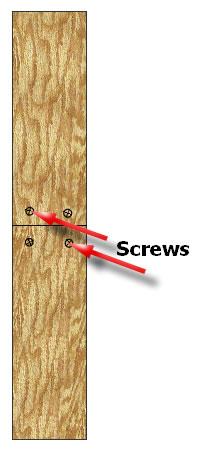
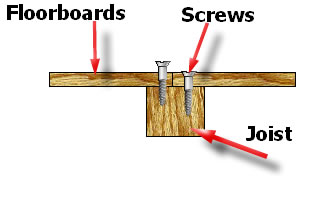
If the end of the board isn’t supported on a joist you will have to lift the board and put in a support. This can be done by lifting the unsupported board and fitting a length of 2×1 (50mm x 25mm) under the boards, ideally fixing it to a joist with screws. If a joist isn’t near, screw through the floorboards under either side of the unsupported one fixing the support to the underside of the boards, then re-fix the previously unsupported board and screw this board into the timber support you have fitted.
Do I need a new floor
Depending on how the floorboards have been lifted and cut will depend on if you need to replace boards or not, as mentioned above you may be able to lift a board and turn it around so the damaged end goes under the skirting, or even under furniture that doesn’t move. On the whole squeaky and creaking floorboards can be rectified.
How to lift floorboards
To lift floorboards you can use a club hammer and a wide bladed chisel such as a cold chisel or by using a crowbar. Prise the board up from one side then the other, be careful not to split the board, once you have the board slightly lifted up lay a piece of timber underneath to hold the end up and continue working along the board and moving the timber support as you go. If the floorboards are tongue and groove, you will need to cut the tongue off first in order not to damage the grove on the board next to it.
Safety First
Always remember to check under the floorboards for pipework and electrical cables before nailing or screwing down the floorboards, this will avoid driving a nail or screw through them. It is always a good idea to mark on the floorboards where the cables and pipes run under the floor, you can do this by using a pencil or better still a permanent marker pen. By marking the floor you will know where the cables and pipes run if you remove the floor covering or wish to run new pipework or cables in the future.
Tags: Cables, Chisel, Club Hammer, Creaking, DIY, Electrical, Floorboards, Flooring, Handyman, Nails, Pipes, Pipework, Plumbing, Squeaking, Woodwork
Posted in Home Improvements | No Comments »
In an emergency – Knowing your utilities
Posted by Adrian
August 19th, 2019
In an emergency – Knowing your utilities
In an emergency it’s important to know where to find your utilities such as gas, electric and water and know how to turn them off if you need to. It is always good to be prepared and have a plan of action, just in case. Knowing where your utilities are could reduce any further problems or damage to your property.
Water
You should know how to turn off your water supply, to do this you need to know where to find your main stop cock. This may be in the house, your garden, front path or driveway. You may also need a ‘key’ to turn it off as some stop cocks are under a cover, out of your reach, so if you need one of these make sure you know where it is.
Depending on the problem you may be able to isolate the problem locally by turning off an isolator valve, thus leaving the water on to the rest of the house. Isolator valves typically have a slotted screw on them, turn this with a screwdriver a quarter turn, handy to know where you can lay your hands on a screwdriver too. Some valves have a lever, simply turn a quarter of a turn in the direction indicated. Other valves you may have are gate valves, these have a tap looking head on them, turn clockwise to turn of the water.
Labelling which pipe is which and having isolator valves fitted is the best option, turning them off every few months will help keep them in working order and prevent limescale build up that can clog up the valve and make it hard or impossible to shut off.
Electricity
If you have an electrical problem and you need to turn off the power, do you know how to turn yours off? If you need to turn the mains power off you need to do so at the fuse box, or consumer unit as it is called. You should see some fuses and a main switch, turn the main switch off. Most commonly your fuse box will be in a downstairs cupboard or under the stairs. It’s always a good idea to keep a torch handy so you can see what you are doing and if your turning the power off at night you need to see where you are going safely.
If you know what the problem is or you just want to turn part of the power off, say the downstairs sockets because you need to work on them, you can turn that fuse off, or for older fuse boxes remove the fuse.
If you have an older style fuse box, keep some fuse wire beside the fuse box in case one blows, you should never replace fuse wire until the problem that caused it is fixed and never use a higher rated fuse wire than is intended.
Gas
At the first sign of a gas leak you should turn off the mains gas supply to the house. This maybe under the stairs, in the garage or outside in locked utility box. You should never turn on any electrical appliance or switch as a spark could cause an explosion, do not smoke or light a match or use any naked flame, such as a candle. Open windows and doors to ventilate the house then call your emergency number of the gas supplier or the National Gas Emergency service on 0800 111 999.
You should stay out of your property until the gas has disbursed, if the leak is bad enough inform you neighbours and advise them they may need to leave their property to be safe. If you have inhaled a lot of gas you may feel ill, you should seek medical advice straight away.
It is a good idea to have a list of emergency numbers so you know where they are in case of an emergency. Maybe have them on a notice or pin board or on your fridge or freezer.Knowing your utilities and how to turn them of in an emergency
Tags: Consumer Unit, Electricity, Emergency, Fuse, Fuse Box, Gas, Isolator Valve, Meter, Stop Cock, Utilities, Valve, Water
Posted in Home Improvements | No Comments »