Painting, decorating and home improvement tips blog
How to fix squeaky floorboards
Posted by Adrian
September 23rd, 2019
How to fix squeaky and creaking floorboards
You know how it is, you creep home late at night and head up to bed trying not to wake the family, then squeak the floorboards make a noise like the floor is falling through and wakes the family, not a good scenario but one fairly common I would guess.

If you suffer from squeaky and creaking floorboards it can not only wake the family as I jokingly mentioned above it can just be annoying. Well thankfully it isn’t too much of a problem to fix them for any handyman or DIY enthusiast.
What causes squeaky floorboards
Squeaky floorboards are caused mainly by badly fitting boards. If the boards are taken up to run electrical cables or pipework and are not put back properly, or the boards nailed back using the old nails in the old nail holes which means the nails don’t have a tight fit on the board and allow for them to move and squeak. Sometimes the end of the boards are not sitting on a joist and can move rubbing against the floorboards next to it.
Another reason for squeaky floorboards is simply that the boards have dried out and the nails are no longer holding the board down tight enough or the boards have moved and are rubbing together, whatever the reason you should be able to fix the problem.
How to fix squeaky floorboards
The first thing to do is to remove the floor covering, or part of it if you can’t fully clear the room. Once the floor covering has been removed you need to tread the boards, walk around and identify the squeaks and creaks and mark the boards where the noise is with a pencil. Do this over the entire floor.
Now go back and look at each mark you have made and identify what the problem is, for just boards that are rubbing together, you can either remove a board and plane a little off the edge, or try adding some talcum powder or chalk dust between the two rubbing boards to help movement between the two boards.
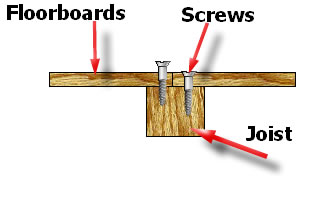
If the boards seem to be moving around the nails at the end of the boards, you need to screw these down. Don’t just put a screw in though as you may go through an electrical cable or a pipe, you may have to lift the board to see what is underneath first. Remove the nails and drill pilot holes next too the old nail holes so not to split the wood and then put a screw in making sure it pulls the board down tight.
If the board is split at the end, you may have to replace that board, or you may be able to lift it and turn it round so the other end is under the skirting board.
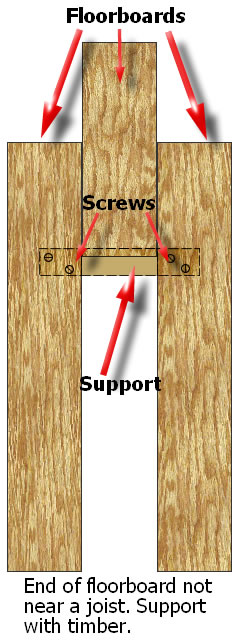
If the end of the board isn’t supported on a joist you will have to lift the board and put in a support. This can be done by lifting the unsupported board and fitting a length of 2×1 (50mm x 25mm) under the boards, ideally fixing it to a joist with screws. If a joist isn’t near, screw through the floorboards under either side of the unsupported one fixing the support to the underside of the boards, then re-fix the previously unsupported board and screw this board into the timber support you have fitted.
Do I need a new floor
Depending on how the floorboards have been lifted and cut will depend on if you need to replace boards or not, as mentioned above you may be able to lift a board and turn it around so the damaged end goes under the skirting, or even under furniture that doesn’t move. On the whole squeaky and creaking floorboards can be rectified.
How to lift floorboards
To lift floorboards you can use a club hammer and a wide bladed chisel such as a cold chisel or by using a crowbar. Prise the board up from one side then the other, be careful not to split the board, once you have the board slightly lifted up lay a piece of timber underneath to hold the end up and continue working along the board and moving the timber support as you go. If the floorboards are tongue and groove, you will need to cut the tongue off first in order not to damage the grove on the board next to it.
Safety First
Always remember to check under the floorboards for pipework and electrical cables before nailing or screwing down the floorboards, this will avoid driving a nail or screw through them. It is always a good idea to mark on the floorboards where the cables and pipes run under the floor, you can do this by using a pencil or better still a permanent marker pen. By marking the floor you will know where the cables and pipes run if you remove the floor covering or wish to run new pipework or cables in the future.
Tags: Cables, Chisel, Club Hammer, Creaking, DIY, Electrical, Floorboards, Flooring, Handyman, Nails, Pipes, Pipework, Plumbing, Squeaking, Woodwork
Posted in Home Improvements | No Comments »
10 ways to improve your property
Posted by Adrian
June 19th, 2019

10 ways to improve your property
If you are thinking of selling your property or simply want to give it an update but wish to add value to your property also, the following 10 ways to improve your property is a good start. They are in no particular order of importance, cost or value adding potential.
As with all improvements you need to decide the reason behind them, if it is to add value to your house you should always research the local area to find out if doing a job will actually add value. If you just want to update your house for you then it is less of a consideration but be careful not to do things to devalue your property.
Garden – Do you have kerb appeal
Is your garden in need of some work, is the grass up to your knees or does it resemble a jungle? The first thing people see as they come to your property is your garden. Simply by keeping it neat and tidy will increase the kerb appeal. Simple things such as weeding the borders, cutting the grass and having well planned all year round plants is maybe all you need to do. If you wish to go a stage further you could use weed control membrane and coloured slate, some coloured pots and maybe even block pave the driveway, this is obviously more expensive but will improve the look and initial appearance of your home.
Environmentally friendly house
Is your property Environmentally friendly? Many people are looking to buy houses that are Environmentally friendly nowadays, for example short flush toilets, double glazed windows, water collection devices such water butts to recycle rain water or condensing boiler. All these things could not only benefit you, the home owner, but also the environment and are all good selling points.
New kitchen?
The kitchen for most homes is the hub of the house, it is where you make meals, maybe eat, and often meet other family members from the household passing through, it can be the organisational hub also with notes stuck on the fridge. A kitchen is also a great selling point of a property, does your kitchen look old and tired, is it 20 years old? There is nothing wrong with an old kitchen, they will often last for years it’s just the fashion and trends that change but the carcass or the kitchen maybe nearly as good as new.
Instead of ripping the entire kitchen out why not consider either having it painted or just replace the doors and worktops to give your kitchen a modern look and feel. There are lots of companies offering replacement doors and worktops online. And you can save yourself a small fortune at the same time.
Bathroom
Everyone likes a nice bathroom, a nice suite and well heated. So if your bathroom isn’t that welcoming you may consider doing it up, especially before selling. You don’t, unless you want to, need to install an entire new suite, replacing taps and getting rid of that old wooden toilet seat and replace it with a new one or a plastic one could be an idea.
Adding a few tiles could brighten up a bathroom and make it easy for mopping up splashes, especially around the bath or basin. Re-grouting your existing tiles could make the bathroom look cleaner and more appealing to potential buyers.
Another consideration is flooring, carpet may seem a good idea and feel nice on your feet in the morning but if your selling your house people may prefer a tiled floor or a vinyl flooring as it is more hygienic and easier to keep clean.
Flooring – carpets or hardwood flooring
Flooring is a large expense so you have to make to right decision, do you go for carpet or a laminate or hardwood floor? If you have cats or dogs a laminate or hardwood floor maybe a better choice than carpet. A dark carpet rather than a light coloured one would be best in a high traffic area, such as by a front or rear door. Hardwood and laminate floors are quick and easy to keep clean, simply brush them over with a broom.
The expense has to be a consideration also, especially if you are thinking of moving. Saving that worn out carpet will not help sell a house whereby a nice hardwood floor may do.
Storage
Storage is always a problem in most households, there is never enough space to keep everything we have nowadays. If you can build storage space it will certainly improve your properties look as all the clutter can be put away. For example, can you make a window seat with storage under the seat? Maybe you can build cupboards under the stairs, or build a toy box for the end of the kids bed.
Any space that can be utilised for storage will make your home run better and could add value to it also, as people always look for storage spaces when viewing a property.
Build
If you have the money you could always build, either an extension or convert the loft maybe, but you don’t have to go for a full on build, simply re-thinking a house and altering it may make the house work better and add value, for example adding an en-suit. A garden room or conservatory is another way of extending and would make a great play room for the kids, or a nice quiet place to relax in an evening.
You could also consider a garage conversion if you don’t use your garage for a car, but consider this carefully as it could affect the selling price later on.
Redecorate -Interior
It may seem obvious but redecorating is a relatively cheap way of improving your property, all houses need to be decorated from time to time as the décor gets tired and may suffer from the knocks and scratches of everyday life. Buying a tin of paint and painting a room can transfer how it looks, bringing it up to date by using a fashionable colour perhaps.
Adding wallpaper, even a feature wall can make a room more sophisticated and doesn’t have to cost the earth.
Redecorate – Exterior
The exterior of your house is just as important if not more so to maintain. Keeping the exterior paintwork such as fascia’s and soffits, doors and windows painted will keep the weather out and reduce the risk of them rotting.
Masonry also needs to be kept in good condition to stop damp from getting in.
Having a well maintained house gives a property great kerb appeal and could help sell a house.
Insulation
Sounds boring doesn’t it? But a well insulated house will have smaller energy bills than those houses with minimal or no insulation. Cavity walls and loft insulation can be done at any time and you may even be able to get a grant to help with the costs. If you haven’t got cavity walls you could line the walls with a thermal liner to reduce heat loss.
Upvc windows and doors with special coated glass will keep the cold out, look for the highest rated glass when you have them fitted. Also adding Upvc windows and doors is nowadays a great selling point as not only does it reduce the energy bills but also noise and or course there is no maintenance except cleaning them.
Tags: Bathroom, Building, Carpets, Exterior Decorating, Flooring, Gardening, Interior Decorating, Kitchen, Property, Storage, Wooden Flooring
Posted in Decorating Tips, Home Improvements | No Comments »
How to paint a bathroom
Posted by Adrian
February 12th, 2014
How to paint a bathroom
Bathrooms can be a retreat, a place where you can have a long bath a relax from the day to day stresses, so a beautiful tranquil bathroom is what you need with relaxing colours, candles, soft fluffy towels, but if however you do not spend too much time in the bathroom, you just have a quick shower and use the loo then a more practical ‘clinical’ type bathroom may suit your needs.
Bathroom paints
When you paint a bathroom there are a few things to consider, such as the type of paint to buy. Do you go for a special bathroom paint that inhibits mould growth and is moisture resistant, or do you save yourself a few pound and go for standard emulsions?
Well, the choice is yours really, circumstance will dictate a little as which one to choose. If you suffer from mould and dampness, such as you have teenages that spend half an hour in the shower or leave the bath running hot water until it’s nearly overflowing, then you may consider the bathroom paint. Ideally having an extractor fan fitted will also reduce condensation.
If you have a good extractor fan, or open the window to let the steam out so you don’t have a bathroom that looks like a fog from yesteryear you could simply go for a standard emulsion.
Preparing for painting
Before you jump straight in with the paint there are a few things you should do first, such as remove anything on the walls, such as toilet roll holder, towel rail, medicine cabinet, mirror etc, unless you want to either mask them up or paint around them. If you wish to remove them they are simple enough to do. Most toilet roll holders and towel rails have a small grub screw holding them on, these are typically an allen key or small screw, loosen these off to remove the item. You can then remove the fixing, or cut in around it.
If you are removing heavier items such as a mirror or medicine cabinet it is always a good idea to have an extra person give you a hand, you don’t want to be dropping a mirror on the floor!
You can then cover up with dust sheets, cover the toilet including the cistern, the bath or shower cubicle and the hand basin and anything else that isn’t removable, and don’t forget the floor.
Once everything has been removed and covered it is time to prepare the ceiling and walls, fill any holes and cracks with filler, sand level and smooth when dry. You should also wash down any splashes from walls and ceiling and make sure that any mould is washed down and removed, for this you can use a mould and mildew remover, or a little bleach. You should always follow the safety advice on these products to avoid accidents.
Painting the bathroom
Start off with the ceiling and coving, if you have any. Give this at least two coats allowing each coat to dry fully between each coat, once the ceiling is done you can paint the walls, cut into the ceiling and around the fixtures and fittings such as toilet, basin etc and fill in with a roller, you can use a small four inch roller to get into those hard to reach places, such as behind the toilet. Give the walls a minimum of two coats to get a good coverage.
Once the walls are done you can paint any woodwork, such as doors, doorframes, windows, skirting boards, and the floor if it is painted or varnished. Rub them down and if you are painting them give them an undercoat before a topcoat. If you are varnishing, rub down and give two coats, if the floor is varnished it may be advisable to give three or more coats to help protect the wood against the water.
A recent completed bathroom
Below is a picture of a recent completed bathroom I painted, I painted this bathroom in 1999 after it had a complete overhaul and modernisation. I recently painted it using Dulux Soft Sheen Violet White on the walls, Vinyl matt brilliant white on the ceiling down to the picture rail and White satinwood on the woodwork and finished off by re-varnishing the floor with six coats of Ronseal Diamond Hard clear satin floor varnish.

Tags: Bath, Bathroom, Ceiling, Extractor Fan, Floor, Flooring, Mould, Paint, Painting, Toilet, Varnish
Posted in Decorating Tips | No Comments »