Painting, decorating and home improvement tips blog
How do you paint a hall stairs and landing?
Posted by Adrian
January 13th, 2013
How do you paint a hall stairs and landing?
Painting a hall, stairs and landing for a lot of people is a daunting task and too much for them to tackle themselves, so they call a professional decorator like myself to do it for them. A lot of people will not have the ladder to aid them to reach the tallest part, or the stairs are an awkward shape.
Having the right tools makes it safe and easier to do, safety should always be in your mind when painting and decorating but especially if you are painting and decorating your hall, landing and stairs. Falling off a ladder whilst working on a stairway can be very painful.
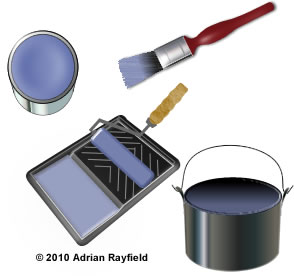
Painting a hall, stairs and landing
Painting a hall, landing and stairs is just like painting any other interior room, you start at the top and work down.
So, start with preparing the walls, filling and holes and cracks, then paint the ceiling and coving, if you have any. Paint the picture rail next, if you have one, then emulsion the walls, if you have a dado emulsion down to that, then paint the dado before painting the remaining walls below the dado rail. This will save the newly painted wood work getting splashed with emulsion.
Finally, paint the stair stringers (the bit that goes up each side), the spindles and handrail and skirting boards.
And don’t forget the loft hatch if it’s in the hallway.
Wallpapering a hall, stairs and landing
If you are going to wallpaper your hallway, landing and stairs it is similar to wallpapering and interior room, you do all the preparation first, then you paint the ceiling and coving, then paint any woodwork such as picture rail, dado rail and the the stair stringers, spindles and handrail and also the skirting boards.
Once all the paint is dry, the final job is to wallpaper your hall, landing and stairs.
Useful links
Below is a list of useful links you may find help you when either painting or wallpapering your hallway, stairs and landing.
- Wallpaper calculator
- Paint calculator
- Ceiling wallpaper calculator
- How to wallpaper
- How to wallpaper around a door
- How to wallpaper around a window or door reveal
Please feel free to comment below, share this and other posts and follow us on our social media channels.
Tags: Ceiling Wallpaper Calculator, Decorating, Door, Hall stairs landing, Interior Decorating, Paint Calculator, Painting, Reveal, Skirting Boards, Wallpaper, Wallpaper Calculator, Wallpapering, Window
Posted in Decorating Tips | 6 Comments »
Colour trends for 2013
Posted by Adrian
December 18th, 2012
Colour trends for 2013
Dulux Colour Futures™ from AkzoNobel have gathered trends from all sorts of industries such as design, interiors, and fashion as well as social trends, economic trends and have come up with the upcoming trends for the coming year, through their international research they have selected a range of colours they think will be in trend throughout 2013.
Colour palettes and colour moods for 2013
The colour theme is being called ‘Connections’ as this is the
“one dominant influence or idea which inspired us to create the five colour trends”
Quote from ColourFutures™
The theme consists of the following five colour palettes and colour moods:
- Collective Passion
- Switching Off
- The Art Of Understanding
- Home Factory
- Visual Solace

What is to colour for 2013
The colour of the year 2013 is……. 90BB 09/186 (also known as Indigo Blue).
“Like the dreamy ocean landscapes hidden from everyone but deep sea divers, this colour gives us a sense of tranquillity and stability which is very restful. It’s a big and benevolent colour which combines the trustworthy nature and evocative elegance of robust blue.”
Quote from ColourFutures™
You can see more of this years colour schemes here:
Dulux Trade website or here:
http://www.colourfutures.com and download the Colour Futures book(PDF).
Paint Calculator
If you would like to use the colour of the year (90BB 09/186) or any other colour you need to buy and need to work out how much you need to buy, use our FREE Paint Calculator.
Tags: 2013, 90BB 09/186, AkzoNobel, Colour of the year, Dulux, Dulux Colour Futures, ICI, ICI Paints, Indigo Blue, Paint Calculator, Trends
Posted in Decorating Tips, News | No Comments »
How to wallpaper
Posted by Adrian
November 30th, 2012
How to wallpaper
When it comes to wallpapering you must prepare the walls properly first otherwise the paper will not adhere well to the wall, cracks, missing plaster, rawl plugs and filler will show through. Getting the preparation right is very important and around 90% of the job. Once you have removed any old paper, filled and sanded down the walls and sealed any new plasterwork, you are ready to begin.
Choosing your wallpaper
Before you buy your wallpaper you will need to measure the walls of the room, or just one wall if you are just doing a feature wall. We have a wallpaper calculator that is quick and easy to use to work out how many rolls of wallpaper you need.
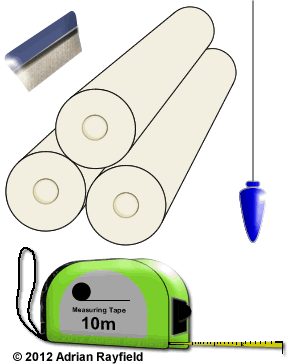
Tools for wallpapering
You will need some tools to wallpaper well and to make you life easier, the following tools are what you will need.
- A paste table
- A clean bucket
- Wallpaper paste
- Rolls of wallpaper
- Paste brush or a roller
- Rolls of wallpaper
- Wallpapering brush
- Pasting brush or a roller and tray for paste
- Clean water
- Sponge or clean cloth
- Tape measure
- Pencil
- Step ladder
- A knife or sharp scissors
- A plumb line
Getting ready to hang the first sheet
Once you have gathered everything together and prepared the walls for wallpapering check your rolls of wallpaper, make sure none are damaged, check to make sure the batch numbers are the same and the shade is the same on all rolls. If they are not the same you can either change them for the same batch or shade codes or work out how many you have of each batch and use these on the same wall, you can get away with different batch numbers or shades codes by using them on an area that doesn’t show or just on a different wall as the light falls differently around the room. Ideally all number should match.
Next mix your paste to the manufactures recommendations, unless your using ready mixed paste of course. Set up your pasting table and take the first roll of wallpaper, unwrap the roll and unroll a length onto the table, familiarise yourself with the pattern and look for the repeat if there is one.
Now take the plumb like, measure out from a corner 2cm less than the width of the sheet of paper, mark the wall then using the plumb line mark a vertical line down the wall.
Hanging the first sheet of wallpaper
Measure from the ceiling to the top of the skirting boards, cut a length of paper off the roll allowing about 5cm at each end to trim the top and bottom of the sheet. Lay the sheet of paper of paper face down on the clean paste table, apply your mixed wallpaper paste onto the back of the sheet from the centre to the edges, make sure the edges are well covered. Concertina fold the sheet and then allow to soak in accordance with the manufactures instructions. Once the paper has soaked for long enough take the top of the sheet and align it with the plumb line you made earlier. Take your wallpapering brush and smooth out the paper and pushing out any air bubbles, start from the centre and work out to the edges.

Once the sheet is smoothed out you will need to trim the top and bottom of the paper with either a sharp knife of a pair of scissors. Now wipe down the paper ensuring you remove all paste from the face of the paper. Wipe down the paste table surface and dry, now paste your next sheet of paper.
Now cut and paste the second sheet of paper and butt the edge up to the first sheet, work the edge down, smooth out as before and wipe the surface, continue doing this until you get to a corner.
Wallpapering around an internal corner
When you come toward a corner, measure from the edge of the last sheet hung to the corner, do this in several places. Take the widest measurement and add 2cm to it then cut a sheet of paper that width. Paste the sheet, once soaked hang as described before but this time wrap around the extra paper around the corner.
Now you can take the other half of the sheet you just cut, or a new sheet (depending on pattern) and measure it’s width. Mark with a plumb line that width from the corner a vertical line. Paste this sheet and then align it with the plumb line and work into the corner allowing it to overlap the paper you have turned the corner with, use a border or vinyl to vinyl adhesive to stick down the edge in the corner.
Wallpapering around a door or window
I recently wrote a post about wallpapering around a door so won’t go to it in detail here, but what I will say is always make sure that you have a straight plumb line as you come out of papering around the door or window as if it isn’t straight you will have problems with the next run of paper!
Papering around switches or sockets

The easiest way is to take switches and sockets off, but DO NOT DO THIS unless you know what you are doing, you should never mess around with electricity! So to leave them on and paper around them, switch off the power, paper over the switch or socket, you an see where the edges of the face plate are, from the centre cut to the corners of the face plate. Now carefully trim the flaps you’ve just made but leaving enough to tuck behind the face plate. Now unscrew the face plate just enough to get the paper behind, carefully ease the plate through the hole in the paper, you will find the plate moves a little so it’s easy to tuck the paper behind, just be careful not to tear the paper.
Screw the face plate back on, wipe the paste of the switch with a damp not wet cloth or sponge, then dry. Now turn the power back on.
You should now have beautiful wallpapered room.
If you found this post of use, please share it via the buttons below, also feel free to comment on this or any other post.
Tags: Cracks, Filler, Paste, Rawl plugs, Tools, Wallpaper, Wallpaper stripping, Wallpapering
Posted in Decorating Tips | 2 Comments »